編輯:關於Android編程
在Android程序開發過程中,明確哪些圖像格式類(ImageFormat、PixelFormat及BitmapConfig等)及圖像(JPG、PNG及BMP等)的轉換方式非常重要,在以後的程序開發過程中會起到非常重要的作用。在一個項目開發過程中一款軟件的開發和圖像處理有著密切的關系,特別是在移動應用程序,在視覺效果等方面起到至關重要的作用,因為這關系到用戶體驗度。下面通過代碼實例給大家分享下:
關於圖像格式類,介紹以下三個:ImageFormat、PixelFormat及BitmapConfig。
1、ImageFormat(android.graphics.ImageFormat),格式參數有以下幾種:
int JPEG ,Encoded formats,常量值: 256 (0x00000100)
int NV16,YCbCr format, used for video,16 (0x00000010)
int NV21,YCrCb format used for images, which uses the NV21 encoding format,常量值: 17 (0x00000011)
int RGB_565,RGB format used for pictures encoded as RGB_565,常量值: 4 (0x00000004)
int UNKNOWN, 常量值:0 (0x00000000)
int YUY2,YCbCr format used for images,which uses YUYV (YUY2) encoding format,20 (0x00000014)
int YV12,Android YUV format,This format is exposed to software decoders and applications
YV12 is a 4:2:0 YCrCb planar format comprised of a WxH Y plane followed by (W/2) x (H/2) Cr and Cb planes
解釋總是英文的最通俗易懂,這裡就不獻丑翻譯了。用法舉例,在構建ImageReader類的對象時,會用到ImageFormat類的圖像格式對象。如
復制代碼 代碼如下:
ImageReader imageReader = ImageReader.newInstance(width, height, ImageFormat.RGB_565, 2);
imageReader對象表示其緩存中最多存在寬高分別為width和height、RGB_565格式的圖像流兩幀。
在需求中用哪一種圖像格式,要視實際情況而定,後面的類似。
2、PixelFormat(android.graphics.PixelFormat),格式參數有以下幾種:
int A_8,常量值:8 (0x00000008)
int JPEG,常量值:256 (0x00000100),constant,已聲明不贊成使用,use ImageFormat.JPEG instead.
int LA_88,常量值:10 (0x0000000a)
int L_8, 常量值:9 (0x00000009)
int OPAQUE,常量值: -1 (0xffffffff),System chooses an opaque format (no alpha bits required)
int RGBA_4444,常量值:7 (0x00000007)
int RGBA_5551,常量值:6 (0x00000006)
int RGBA_8888,常量值:1 (0x00000001)
int RGBX_8888,常量值:2 (0x00000002)
int RGB_332,常量值:11 (0x0000000b)
int RGB_565,常量值:4 (0x00000004)
int RGB_888,常量值:3 (0x00000003)
int TRANSLUCENT,常量值: -3 (0xfffffffd),System chooses a format that supports translucency (many alpha bits)
int TRANSPARENT,常量值:-2 (0xfffffffe),System chooses a format that supports transparency (at least 1 alpha bit)
int UNKNOWN,常量值: 0 (0x00000000)
int YCbCr_420_SP,常量值:17 (0x00000011),constant 已聲明不贊成使用 use ImageFormat.NV21 instead
int YCbCr_422_I,常量值: 20 (0x00000014),constant 已聲明不贊成使用 use ImageFormat.YUY2 instead
int YCbCr_422_SP,常量值:16 (0x00000010),constant 已聲明不贊成使用 use ImageFormat.NV16 instead
注意,有四種圖像格式已被聲明不贊成使用,可以用ImaggFormat相對應的格式進行代替。由此可知,兩種圖像格式之間存在相通之處。用法舉例,讓窗口實現漸變的效果,如
復制代碼 代碼如下:
getWindow().setFormat(PixelFormat.RGBA_8888);
補充說明:RGBA_8888為android的一種32位顏色格式,R、G、B、A分別用八位表示,Android默認的圖像格式是PixelFormat.OPAQUE,其是不帶Alpha值的。
3、Bitmap.Config(Android.graphics.Bitmap內部類)
復制代碼 代碼如下:
Possible bitmap configurations。A bitmap configuration describes how pixels are stored。This affects the quality (color depth) as well as the ability to display transparent/translucent colors。(
官網介紹,大致意思是說:影響一個圖片色彩色度顯示質量主要看位圖配置,顯示圖片時透明還是半透明)。
ALPHA_8:Each pixel is stored as a single translucency (alpha) channel。(原圖的每一個像素以半透明顯示)
ARGB_4444:This field was deprecated in API level 13。Because of the poor quality of this configuration, it is advised to use ARGB_8888 instead。(在API13以後就被棄用了,建議使用8888)。
ARGB_8888 :Each pixel is stored on 4 bytes。 Each channel (RGB and alpha for translucency) is stored with 8 bits of precision (256 possible values) 。This configuration is very flexible and offers the best quality。 It should be used whenever possible。(每個像素占4個字節,每個顏色8位元,反正很清晰,看著很舒服)。
RGB_565:Each pixel is stored on 2 bytes and only the RGB channels are encoded:red is stored with 5 bits of precision (32 possible values),green is stored with 6 bits of precision (64 possible values) and blue is stored with 5 bits of precision。(這個應該很容易理解了)。
用法舉例,構建Bitmap對象時,會用到BitmapConfig類圖像格式對象,如:
復制代碼 代碼如下:
Bitmap bitmap = Bitmap.createBitmap(width, height,Bitmap.Config.RGB_565)
下面來看各種類型圖像之間的轉換都有哪些方法、差異及共同點。
1、YUV轉JPG
查閱到的資料大部分是把Yuv圖像數據通過數學運算得到每個像素點的RGB編碼,存入Bitmap對象,再調用Bitmap類自帶的壓縮方法生成JPG圖片。這種方法效率極低,一張480x320分辨率的圖片有20萬個字節,因此運算需要經過20萬次循環。其實android.graphics包下面有一個YuvImage類,可以將數據直接導入:
YuvImage image = new YuvImage(data, ImageFormat.NV21, IMG_WIDTH, IMG_HEIGHT, null);
前面兩個參數決定了數據源與圖像格式,後面單個參數就不解釋了。
而YuvImage類正好有一個compressToJPEG(Rect rect, int i, OutputStream)方法,可以直接將數據保存在JPG文件的輸出流中。
2、PNG轉Bitmap
byte[] data = null;
 File pngImage = null;
 BufferedOutputStream stream = null;
 try {
   pngImage = new File(outputFile); //outputFile為png圖像名稱
   FileOutputStream fstream = new FileOutputStream(pngImage);
   stream = new BufferedOutputStream(fstream);
   stream.write(data);
 } catch (Exception e) {
   e.printStackTrace();
 } finally {
   if (stream != null) {
     try {
     stream.close();
     } catch (IOException e) {
       e.printStackTrace();
     }
   }
 }
 Bitmap bitmap=BitmapFactory.decodeByteArray(data, 0, data.length);
如果通過資源(drawable)的形式,那就方便地多,只需要一句話。
復制代碼 代碼如下:
Bitmap bmp = BitmapFactory.decodeResource(getResources(), R.drawable.icon);
雖然沒有華麗的算法,但效果不錯哦,就是想改變圖像屬性時得另外實現。
3、ARGB轉Bitmap
 Bitmap bitmapOrg = BitmapFactory.decodeByteArray(rawData, 0, rawData.length);
 Bitmap bitmapNew = bitmapOrg.copy(Config.ARGB_8888, true);
 if(bitmapNew == null)
   return;
 for(int i = 0;i<bitmapNew.getWidth();i++)
 {
   for(int j =0;j<bitmapNew.getHeight();j++)
   {
     int col = bitmapNew.getPixel(i, j);
     int alpha = col&0xFF000000;
     int red = (col&0x00FF0000)>>16;
     int green = (col&0x0000FF00)>>8;
     int blue = (col&0x000000FF);
     int gray = (int)((float)red*0.3+(float)green*0.59+(float)blue*0.11);
     int newColor = alpha|(gray<<16)|(gray<<8)|gray;
   }
 }
 sendMsg(bitmapNew);
 File file = new File(Environment.getExternalStorageDirectory()+File.separator+"gray"+number+".jpg");
 OutputStream out;
 try {
   out = new FileOutputStream(file);
   if(bitmapNew.compress(Bitmap.CompressFormat.JPEG, 100, out))
   out.close();
 } catch (FileNotFoundException e) {
   e.printStackTrace();
 } catch (IOException e) {
   e.printStackTrace();
 }
以上全部內容就是在Android程序開發過程中處理圖像格式類及圖像轉換的方法,需要注意的是,在代碼中做了灰度處理,若想得到彩色圖,分別對Bitmap圖像R、G、B三通道賦值。希望大家能夠喜歡。
 Android動畫之雷達掃描效果
我們首先看一下效果圖,有個整體的印象好了,為了便於理解,這裡就按照動畫所見內容依次展開來說准備這裡決定采用canvas(畫布)和paint(畫筆)實現了這個簡單動畫控件。
 的Android進階之旅------)android:drawableLeft的用法
有時候想在EditText左邊放一個圖片,如圖所示:就可以在xml布局文件中的EditText定義代碼中,添加入下面的代碼,即可實現: android:draw
 Android端實現單點登錄的方法詳解
前言單點登錄SSO(Single Sign On)說得簡單點就是在一個多系統共存的環境下,用戶在一處登錄後,就不用在其他系統中登錄,也就是用戶的一次登錄能得到其他所有系統
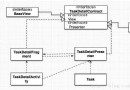
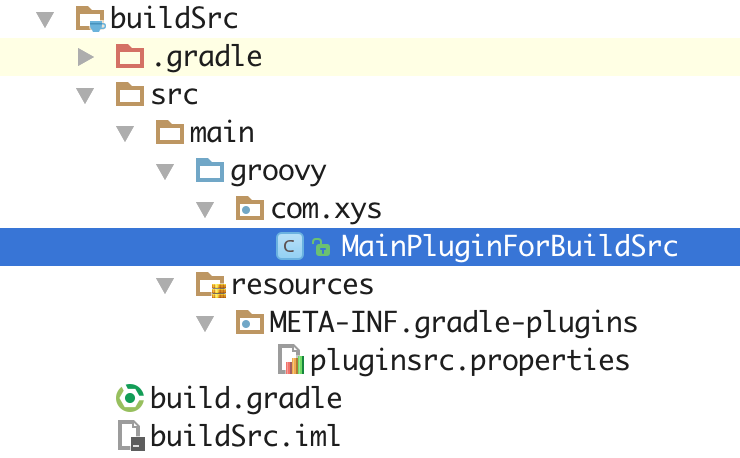 Gradle自定義插件
Gradle自定義插件在Gradle中創建自定義插件,Gradle提供了三種方式:在build.gradle腳本中直接使用 在buildSrc中使用 在獨立Module中