編輯:關於Android編程
本文實例講述了Android實現手機壁紙改變的方法。分享給大家供大家參考。具體如下:
main.xml布局文件:
<?xml version="1.0" encoding="utf-8"?>
<LinearLayout xmlns:android="http://schemas.android.com/apk/res/android"
  android:orientation="vertical" android:layout_width="fill_parent"
  android:layout_height="fill_parent">
  <Button android:id="@+id/clearWall"
    android:layout_width="fill_parent"
    android:layout_height="wrap_content"
    android:text="恢復默認牆紙" />
  <ImageView android:id="@+id/currWall"
    android:layout_width="100px"
    android:layout_height="150px"
    android:layout_gravity="center_horizontal" />
  <Button android:id="@+id/getWall"
    android:layout_width="fill_parent"
    android:layout_height="wrap_content"
    android:text="獲取當前牆紙" />
  <Gallery android:id="@+id/gallery"
    android:layout_width="fill_parent"
    android:layout_height="wrap_content" />
  <Button android:id="@+id/setWall"
    android:layout_width="fill_parent"
    android:layout_height="wrap_content"
    android:text="設置為當前牆紙" />
</LinearLayout>
清單文件:
<?xml version="1.0" encoding="utf-8"?>
<manifest xmlns:android="http://schemas.android.com/apk/res/android"
   package="com.ljq.activity"
   android:versionCode="1"
   android:versionName="1.0">
  <application android:icon="@drawable/icon" android:label="@string/app_name">
    <activity android:name=".WallActivity"
         android:label="@string/app_name">
      <intent-filter>
        <action android:name="android.intent.action.MAIN" />
        <category android:name="android.intent.category.LAUNCHER" />
      </intent-filter>
    </activity>
  </application>
  <uses-sdk android:minSdkVersion="7" />
  <!-- 設置手機牆紙權限 -->
  <uses-permission android:name="android.permission.SET_WALLPAPER" />
</manifest>
WallAdapter自定義適配器:
package com.ljq.activity;
import android.content.Context;
import android.view.View;
import android.view.ViewGroup;
import android.widget.BaseAdapter;
import android.widget.Gallery;
import android.widget.ImageView;
public class WallAdapter extends BaseAdapter {
  private int[] imgIds = null;
  private Context context = null;
  public WallAdapter(int[] imgIds, Context context) {
    super();
    this.imgIds = imgIds;
    this.context = context;
  }
  public int getCount() {
    return imgIds.length;
  }
  public Object getItem(int position) {
    //return imgIds[position];
    return imgIds[position%imgIds.length];//可循環
  }
  public long getItemId(int position) {
    return position;
  }
  public View getView(int position, View convertView, ViewGroup parent) {
    ImageView imageView = new ImageView(context);
    imageView.setBackgroundResource(imgIds[position]);// 設置ImageView的背景圖片
    imageView.setScaleType(ImageView.ScaleType.CENTER_CROP);
    imageView.setLayoutParams(new Gallery.LayoutParams(120, 120));
    return imageView;
  }
}
WallActivity類:
package com.ljq.activity;
import java.io.IOException;
import java.io.InputStream;
import android.app.Activity;
import android.os.Bundle;
import android.view.View;
import android.widget.AdapterView;
import android.widget.Button;
import android.widget.Gallery;
import android.widget.ImageView;
import android.widget.AdapterView.OnItemSelectedListener;
public class WallActivity extends Activity {
  private int[] imgIds={R.drawable.w1, R.drawable.w2, R.drawable.w3, R.drawable.w4};
  private int selectIndex=-1;//被選中的圖片在id數組中的索引
  private ImageView currWall=null;
  private Gallery gallery=null;
  private Button clearWall=null;
  private Button getWall=null;
  private Button setWall=null;
  @Override
  public void onCreate(Bundle savedInstanceState) {
    super.onCreate(savedInstanceState);
    setContentView(R.layout.main);
    gallery=(Gallery)findViewById(R.id.gallery);
    gallery.setAdapter(new WallAdapter(imgIds, WallActivity.this));
    gallery.setSpacing(5);
    gallery.setOnItemSelectedListener(new OnItemSelectedListener(){
      public void onItemSelected(AdapterView<?> parent, View view,
          int position, long id) {
        selectIndex = position;//記錄被選中的圖片索引
      }
      public void onNothingSelected(AdapterView<?> parent) {
      }
    });
    currWall=(ImageView)findViewById(R.id.currWall);
    clearWall=(Button)findViewById(R.id.clearWall);
    getWall=(Button)findViewById(R.id.getWall);
    setWall=(Button)findViewById(R.id.setWall);
    clearWall.setOnClickListener(listener);
    getWall.setOnClickListener(listener);
    setWall.setOnClickListener(listener);
  }
  View.OnClickListener listener=new View.OnClickListener(){
    public void onClick(View v) {
      Button btn=(Button)v;
      switch (btn.getId()) {
      case R.id.clearWall://還原手機壁紙
        try {
          WallActivity.this.clearWallpaper();
        } catch (IOException e) {
          e.printStackTrace();
        }
        break;
      case R.id.getWall://設置ImageView顯示的內容為當前牆紙
        currWall.setBackgroundDrawable(getWallpaper());
        break;
      case R.id.setWall://設置牆紙
        InputStream in=WallActivity.this.getResources().openRawResource(imgIds[selectIndex]);
        try {
          setWallpaper(in);
        } catch (IOException e) {
          e.printStackTrace();
        }
        break;
      }
    }
  };
}
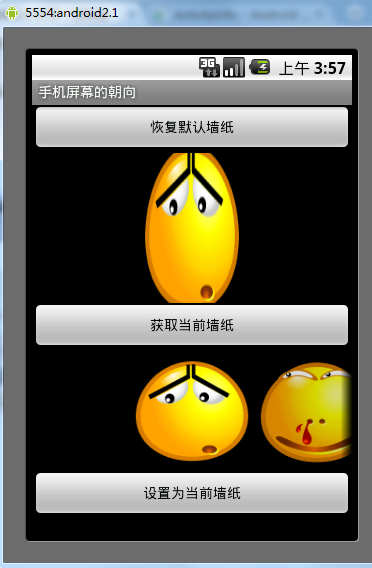
運行結果:
希望本文所述對大家的Android程序設計有所幫助。
 我的Android進階之旅------)Java文件大小轉換工具類 (B,KB,MB,GB,TB,PB之間的大小轉換)
Java文件大小轉換工具類 (B,KB,MB,GB,TB,PB之間的大小轉換) 有時候要做出如下所示的展示文件大小的效果時候,需要對文件大小進行轉換,然後再進行相關的代碼
 android中Context的應用總結
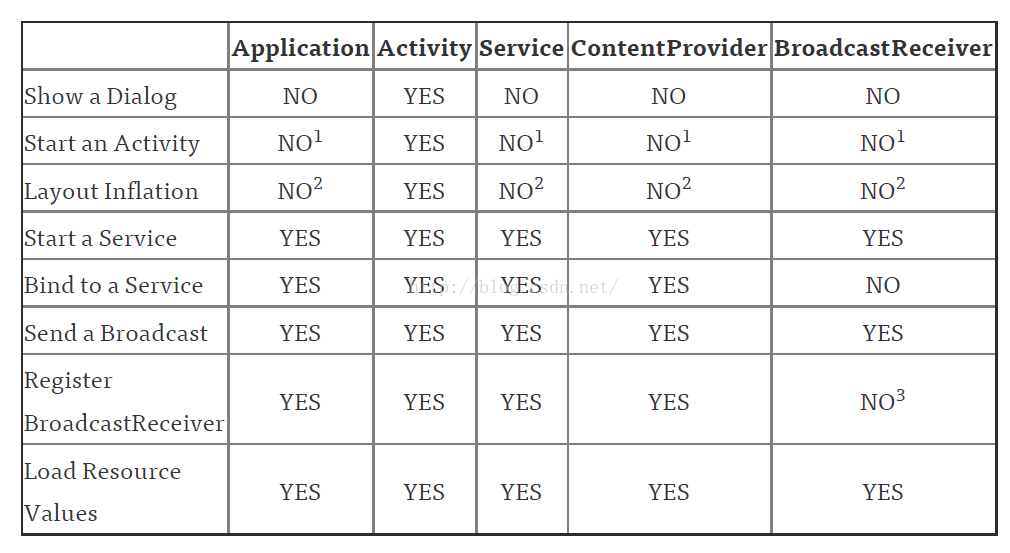
概述作為一名Android開發人員,每天使用最多的類中,恐怕Context可以排的上一號了。因為Context對象在我們的項目中實在是太常見了,我們在加載資源,啟動Act
 Android中文API-Include標簽
雖然,Android提供了多種多樣的可重用輕量級的交互元素(如:TextView 等控件),但是你可能也想重用一些相對較大的特殊布局xml。為了有效的重用布局文件,你可以
 Android應用ViewDragHelper詳解及部分源碼淺析
1 背景 很久沒有更新博客了,忙裡偷閒產出一篇。寫這片文章主要是去年項目中的一個需求,當時三下五除二的將其實現了,但是源碼的閱讀卻一直扔在那遲遲沒有時間理會,
 Android Bound Service(一) ----- Extending Binder Service(進程內綁定Service的簡單例子)
前言 重新學習這一項技術,主要的原因,是因為以前沒有好好的