編輯:關於Android編程
本文實例分析了Android編程之絕對布局AbsoluteLayout和相對布局RelativeLayout。分享給大家供大家參考,具體如下:
一、絕對布局AbsoluteLayout
絕對定位AbsoluteLayout,又可以叫做坐標布局,可以直接指定子元素的絕對位置,這種布局簡單直接,直觀性強,但是由於手機屏幕尺寸差別比較大,使用絕對定位的適應性會比較差。
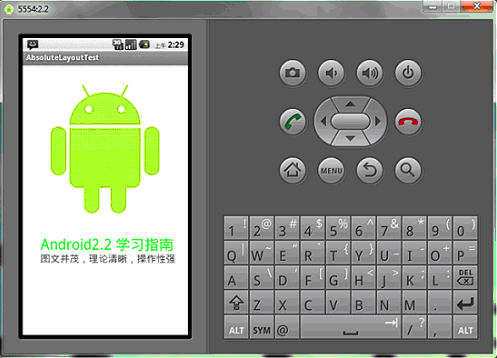
下面我們舉一個例子看看:例子裡的機器人圖片大小是250X250,可以看到我們使用android:layout_x和android:layout_y來指定子元素的縱橫坐標。
XML/HTML代碼:
<?xml version="1.0" encoding="utf-8"?>
<AbsoluteLayout android:id="@+id/AbsoluteLayout01"
android:layout_width="fill_parent"
android:layout_height="fill_parent"
xmlns:android="http://schemas.android.com/apk/res/android"
android:background="#fff"><ImageView
android:src="@drawable/android"
android:layout_y="40dip"
android:layout_width="wrap_content"
android:layout_x="35dip"
android:id="@+id/ImageView01"
android:layout_height="wrap_content">
</ImageView>
<TextView
android:layout_height="wrap_content"
android:layout_width="fill_parent"
android:id="@+id/TextView01"
android:text="Android2.2 學習指南"
android:textColor="#0f0"
android:textSize="28dip"
android:layout_y="330dip"
android:layout_x="35dip“>
</TextView>
<TextView
android:layout_height="wrap_content"
android:layout_width="fill_parent"
android:id="@+id/TextView02"
android:text="圖文並茂,理論清晰,操作性強"
android:textColor="#333"
android:textSize="18dip"
android:layout_y="365dip"
android:layout_x="35dip“>
</TextView>
</AbsoluteLayout>
讓我們看一下在WQVGA的模擬器下的顯示效果:
再在WVGA800的模擬器下看看顯示效果:
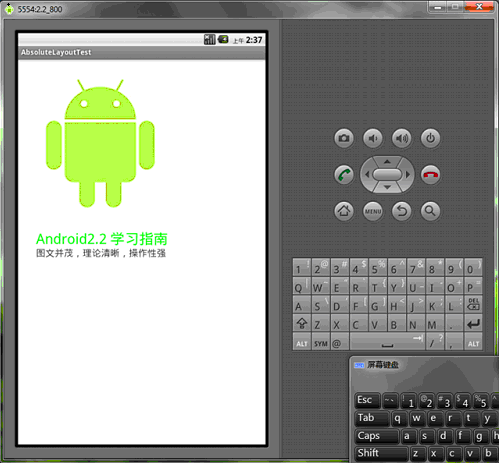
Tip: 在絕對定位中,如果子元素不設置layout_x和layout_y,那麼它們的默認值是0,也就是說它會像在FrameLayout一樣這個元素會出現在左上角。
二、相對布局RelativeLayout
相對布局 RelativeLayout 允許子元素指定它們相對於其父元素或兄弟元素的位置,這是實際布局中最常用的布局方式之一。它靈活性大很多,當然屬性也多,操作難度也大,屬性之間產生沖突的的可能性也大,使用相對布局時要多做些測試。
下面我們用相對布局再做一次上面的例子,首先放置一個圖片,其它兩個文本分別相對上一個元素定位:
XML/HTML代碼:
<?xml version="1.0" encoding="utf-8"?><RelativeLayout android:id="@+id/RelativeLayout01"
android:layout_width="fill_parent"
android:layout_height="fill_parent"
android:background="#fff"
xmlns:android="http://schemas.android.com/apk/res/android"><ImageView android:id="@+id/ImageView01"
android:src="@drawable/android"
android:layout_width="fill_parent"
android:layout_height="wrap_content"
android:layout_marginTop="40dip"
>
</ImageView>
<TextView
android:layout_height="wrap_content"
android:layout_width="wrap_content"
android:id="@+id/TextView01"
android:text="Android2.2 學習指南"
android:textColor="#0f0"
android:textSize="28dip"
android:layout_below="@id/ImageView01"
android:layout_centerHorizontal="true"
android:layout_marginTop="10dip">
</TextView>
<TextView
android:layout_height="wrap_content"
android:layout_width="wrap_content"
android:id="@+id/TextView02"
android:text="圖文並茂,理論清晰,操作性強"
android:textColor="#333"
android:textSize="18dip"
android:layout_below="@id/TextView01"
android:layout_centerHorizontal="true"
android:layout_marginTop="5dip“>
</TextView>
</RelativeLayout>
讓我們看一下在WQVGA的模擬器下的顯示效果:
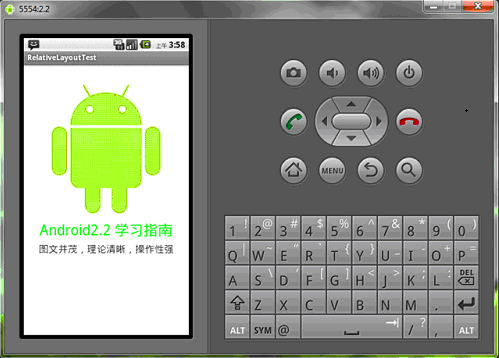
再看一下在更大屏幕(WVGA800)模擬器上的顯示效果:
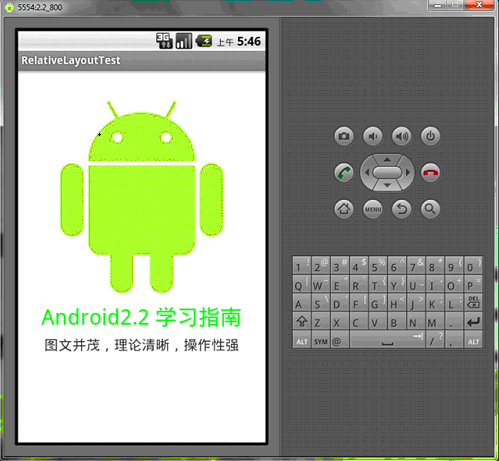
從上圖可以看到界面效果基本保持了一致,而不是像絕對定位一樣龜縮在左上角;同學們看到自動縮放的功能是采用了dip做單位帶來的好處。
下面介紹一下RelativeLayout用到的一些重要的屬性:
第一類:屬性值為true或false
android:layout_centerHrizontal 水平居中
android:layout_centerVertical 垂直居中
android:layout_centerInparent 相對於父元素完全居中
android:layout_alignParentBottom 貼緊父元素的下邊緣
android:layout_alignParentLeft 貼緊父元素的左邊緣
android:layout_alignParentRight 貼緊父元素的右邊緣
android:layout_alignParentTop 貼緊父元素的上邊緣
android:layout_alignWithParentIfMissing 如果對應的兄弟元素找不到的話就以父元素做參照物
第二類:屬性值必須為id的引用名“@id/id-name"
android:layout_below 在某元素的下方
android:layout_above 在某元素的的上方
android:layout_toLeftOf 在某元素的左邊
android:layout_toRightOf 在某元素的右邊
android:layout_alignTop 本元素的上邊緣和某元素的的上邊緣對齊
android:layout_alignLeft 本元素的左邊緣和某元素的的左邊緣對齊
android:layout_alignBottom 本元素的下邊緣和某元素的的下邊緣對齊
android:layout_alignRight 本元素的右邊緣和某元素的的右邊緣對齊
第三類:屬性值為具體的像素值,如30dip,40px
android:layout_marginBottom 離某元素底邊緣的距離
android:layout_marginLeft 離某元素左邊緣的距離
android:layout_marginRight 離某元素右邊緣的距離
android:layout_marginTop 離某元素上邊緣的距離
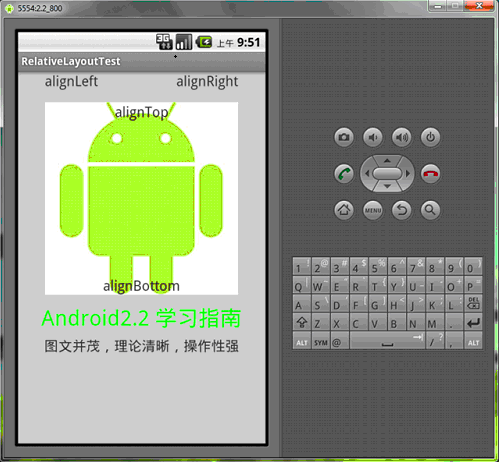
我們再把上面的例子重新做一遍,這一次多放一些屬性在裡面,大家試驗一下:
XML/HTML代碼:
<?xml version="1.0" encoding="utf-8"?><RelativeLayout android:id="@+id/RelativeLayout01"
android:layout_width="fill_parent"
android:layout_height="fill_parent"
android:background="#cfff" 色彩的設置是argb,第一個c是透明度
xmlns:android="http://schemas.android.com/apk/res/android">
<ImageView android:id="@+id/ImageView01"
android:src="@drawable/android"
android:layout_width="wrap_content"
android:layout_height="wrap_content"
android:layout_marginTop="40dip"
android:layout_centerHorizontal="true">
</ImageView><TextView
android:layout_height="wrap_content"
android:layout_width="wrap_content"
android:id="@+id/TextView01"
android:text="Android2.2 學習指南"
android:textColor="#0f0"
android:textSize="28dip"
android:layout_below="@id/ImageView01"
android:layout_centerHorizontal="true"
android:layout_marginTop="10dip">
</TextView><TextView
android:layout_height="wrap_content"
android:layout_width="wrap_content"
android:id="@+id/TextView02"
android:text="圖文並茂,理論清晰,操作性強"
android:textColor="#333"
android:textSize="18dip"
android:layout_below="@id/TextView01"
android:layout_centerHorizontal="true"
android:layout_marginTop="5dip">
</TextView>
<TextView
android:layout_height="wrap_content"
android:layout_width="wrap_content"
android:id="@+id/TextView03"
android:text="alignTop"
android:textColor="#333"
android:textSize="18dip"
android:layout_alignTop="@id/ImageView01" 和ImageView01上邊緣對齊
android:layout_centerHorizontal="true">
</TextView><TextView
android:layout_height="wrap_content"
android:layout_width="wrap_content"
android:id="@+id/TextView04"
android:text="alignLeft"
android:textColor="#333"
android:textSize="18dip"
android:layout_alignLeft="@id/ImageView01"
android:layout_centerHorizontal="true">
</TextView><TextView
android:layout_height="wrap_content"
android:layout_width="wrap_content"
android:id="@+id/TextView05"
android:text="alignRight"
android:textColor="#333"
android:textSize="18dip"
android:layout_alignRight="@id/ImageView01"
android:layout_centerHorizontal="true">
</TextView><TextView
android:layout_height="wrap_content"
android:layout_width="wrap_content"
android:id="@+id/TextView06"
android:text="alignBottom"
android:textColor="#333"
android:textSize="18dip"
android:layout_alignBottom="@id/ImageView01"
android:layout_centerHorizontal="true">
</TextView>
</RelativeLayout>
絕對布局AbsoluteLayout和相對布局RelativeLayout的內容就講完了,希望本文所述對大家Android程序設計有所幫助。
 Android操作SQLite數據庫(增、刪、改、查、分頁等)及ListView顯示數據的方法詳解
本文實例講述了Android操作SQLite數據庫(增、刪、改、查、分頁等)及ListView顯示數據的方法。分享給大家供大家參考,具體如下:由於剛接觸android開發
 Android通訊錄管理一之聯系人獲取
正如我們知道的一樣,Android的通訊錄和短信管理是通過contentprovider來向開發者來開發接口的。必須從ContentResolver入手去解決。其中通訊錄
 微信理財通收益計算 微信理財通收益如何
你現在還是把錢都存在余額寶?相信你也注意到,現在理財方式越來越多,余額寶的收益也越來越低,如今微信也有理財通,也很多朋友加入購買。對微信理財通手機以了解?下
 android開源項目:圖片下載緩存庫picasso
picasso是Square公司開源的一個Android圖形緩存庫,地址http://square.github.io/picasso/,可以實現圖片下載和緩存功能。