編輯:關於Android編程
本文詳細分析了Android中Service服務。分享給大家供大家參考,具體如下:
一、Service簡介
Service是Android中實現程序後台運行的解決方案,適用於去執行那些不需要和用戶交互而且還要求長期運行的任務。Service是android 系統中的四大組件之一(Activity、Service、BroadcastReceiver、ContentProvider),它跟Activity的級別差不多,但不能自己運行只能後台運行,並且可以和其他組件進行交互。
Service並不是運行在一個獨立的進程當中的,而是依賴於創建服務時所在的應用程序進程。當某個應用程序進程被殺掉時,所有依賴於該進程的服務也會停止運行。
二、Service初實踐
創建一個Android項目TestService。
1、新建一個服務
package com.example.testservice;
import android.app.Service;
import android.content.Intent;
import android.os.IBinder;
import android.widget.Toast;
public class MyService extends Service {
  @Override
  public IBinder onBind(Intent arg0) {
    return null;
  }
  /**
   * 服務第一次創建的時候調用
   */
  @Override
  public void onCreate() {
    super.onCreate();
    Toast.makeText(this, "服務的onCreate方法被調用", Toast.LENGTH_SHORT).show();
  }
  /**
   * 服務每一次啟動的時候調用
   */
  @Override
  public int onStartCommand(Intent intent, int flags, int startId) {
    Toast.makeText(this, "服務的onStartCommand方法被調用", Toast.LENGTH_SHORT).show();
    return super.onStartCommand(intent, flags, startId);
  }
  @Override
  public void onDestroy() {
    Toast.makeText(this, "服務的onDestroy方法被調用", Toast.LENGTH_SHORT).show();
    super.onDestroy();
  }
}
在創建一個服務時,繼承Service類,重寫了onCreate方法,onStartCommand方法以及onDestroy方法。
2、修改AndroidManifest.xml
當新建完一個服務後,需要在AndroidManifest.xml中進行注冊,如下:
<?xml version="1.0" encoding="utf-8"?>
<manifest xmlns:android="http://schemas.android.com/apk/res/android"
  package="com.example.testservice"
  android:versionCode="1"
  android:versionName="1.0" >
  <uses-sdk
    android:minSdkVersion="8"
    android:targetSdkVersion="17" />
  <application
    android:allowBackup="true"
    android:icon="@drawable/ic_launcher"
    android:label="@string/app_name"
    android:theme="@style/AppTheme" >
    <activity
      android:name="com.example.testservice.MainActivity"
      android:label="@string/app_name" >
      <intent-filter>
        <action android:name="android.intent.action.MAIN" />
        <category android:name="android.intent.category.LAUNCHER" />
      </intent-filter>
    </activity>
    <!-- 注冊服務 -->
    <service android:name=".MyService"></service>
  </application>
</manifest>
3、布局文件activity_main.xml
<LinearLayout xmlns:android="http://schemas.android.com/apk/res/android"
  android:layout_width="fill_parent"
  android:layout_height="fill_parent"
  android:orientation="vertical" >
  <Button
    android:id="@+id/button1"
    android:layout_width="match_parent"
    android:layout_height="wrap_content"
    android:text="啟動服務" />
  <Button
    android:id="@+id/button2"
    android:layout_width="match_parent"
    android:layout_height="wrap_content"
    android:text="停止服務" />
</LinearLayout>
4、MainActivity.java文件
package com.example.testservice;
import android.app.Activity;
import android.content.Intent;
import android.os.Bundle;
import android.view.Menu;
import android.view.View;
import android.view.View.OnClickListener;
import android.widget.Button;
public class MainActivity extends Activity implements OnClickListener{
  private Button startService_Button;
  private Button stopService_Button;
  @Override
  protected void onCreate(Bundle savedInstanceState) {
    super.onCreate(savedInstanceState);
    setContentView(R.layout.activity_main);
    //獲取開啟服務按鈕
    startService_Button = (Button) findViewById(R.id.button1);
    //獲取停止服務按鈕
    stopService_Button = (Button) findViewById(R.id.button2);
    //調用點擊事件
    startService_Button.setOnClickListener(this);
    stopService_Button.setOnClickListener(this);
  }
  /**
   * 點擊事件
   */
  @Override
  public void onClick(View view) {
    switch(view.getId()){
    case R.id.button1:
      //"開啟服務"按鈕
      Intent startIntent = new Intent(this,MyService.class);
      //開啟服務
      startService(startIntent);
      break;
    case R.id.button2:
      //"停止服務"按鈕
      Intent stopIntent = new Intent(this,MyService.class);
      //停止服務
      stopService(stopIntent);
      break;
    default:
      break;
    }
  }
  @Override
  public boolean onCreateOptionsMenu(Menu menu) {
    // Inflate the menu; this adds items to the action bar if it is present.
    getMenuInflater().inflate(R.menu.main, menu);
    return true;
  }
}
三、測試結果
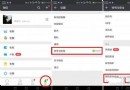
發布項目後,如下所示:

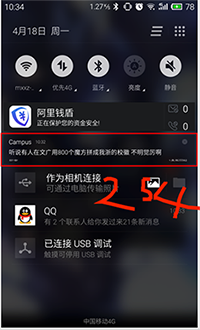
當點擊"啟動服務"按鈕後,會依次彈出如下:


並且,此時你多次點擊"啟動服務"按鈕,只會彈出上方右圖,而不再彈出上方左圖。因為僅僅在服務創建的時候會調用onCreate方法,但當服務啟動的時候每次都會調用onStartCommand方法。
當點擊"停止服務"後,如下:

總結:Android Service服務的啟動流程如下:
調用Context的startService方法---》onCreate方法---》onStartCommand方法---》服務運行。
Android服務的停止流程如下:
服務運行---》調用Context的stopService方法--》onDestroy方法---》服務停止。
更多關於Android組件相關內容感興趣的讀者可查看本站專題:《Android基本組件用法總結》
希望本文所述對大家Android程序設計有所幫助。
 android webview 簡單浏覽器實現代碼
文件main.java復制代碼 代碼如下:package com.HHBrowser.android;import android.app.Activity;import
 Android存儲五大方式
Android存儲五大方式:1 使用SharedPreferences存儲數據2 文件存儲數據3 SQLite數據庫存儲數據4 使用ContentProvider存儲數據
 ViewPager的setOnPageChangeListener方法詳解
背景最近需要實現一個自定義Notification的功能。網上找了找代碼,解決方案就是通過RemoteViews來實現。但是在實現過程中遇到不少問題,網上也沒有很好的文章
 Android官方開發文檔Training系列課程中文版:OpenGL繪圖之圖形繪制
原文地址:http://android.xsoftlab.net/training/graphics/opengl/draw.html在定義了圖形之後,你接下來需要做的就