編輯:關於Android編程
以前編程的時候,遇到倒計時的功能時,經常自己去寫,但其實Android已經幫封裝好了一個倒計時類CountDownTimer,其實是將後台線程的創建和Handler隊列封裝成為了一個方便的類調用。
閃屏頁用到了handler和CountDownTimer類,還需配置一下Activity的主題,這裡是:android:theme="@android:style/Theme.NoTitleBar.Fullscreen" 全屏主題的意思。
給大家展示下效果圖:

代碼如下所示:
package com.example.shanping;
import java.lang.ref.WeakReference;
import com.example.shanping.MyActivity.MyCountDownTimer;
import android.os.Bundle;
import android.os.CountDownTimer;
import android.os.Handler;
import android.os.Message;
import android.app.Activity;
import android.content.Intent;
import android.util.Log;
import android.view.Menu;
import android.widget.TextView;
public class MainActivity extends Activity {
private MyCountDownTimer mc;
private TextView tv;
@Override
protected void onCreate(Bundle savedInstanceState) {
super.onCreate(savedInstanceState);
setContentView(R.layout.activity_main);
tv = (TextView) findViewById(R.id.textView1);
mc = new MyCountDownTimer(3000, 1000);
mc.start();
handler.postDelayed(new Runnable() {
@Override
public void run() {
Intent intent=new Intent(MainActivity.this,MyActivity.class);
startActivity(intent);
}
}, 3000);
}
private Handler handler=new Handler();
/**
* 繼承 CountDownTimer 防范
*
* 重寫 父類的方法 onTick() 、 onFinish()
*/
class MyCountDownTimer extends CountDownTimer {
/**
*
* @param millisInFuture
* 表示以毫秒為單位 倒計時的總數
*
* 例如 millisInFuture=1000 表示1秒
*
* @param countDownInterval
* 表示 間隔 多少微秒 調用一次 onTick 方法
*
* 例如: countDownInterval =1000 ; 表示每1000毫秒調用一次onTick()
*
*/
public MyCountDownTimer(long millisInFuture, long countDownInterval) {
super(millisInFuture, countDownInterval);
}
public void onFinish() {
tv.setText("正在跳轉");
}
public void onTick(long millisUntilFinished) {
tv.setText("倒計時(" + millisUntilFinished / 1000 + ")");
}
}
}
下面給大家分享一段代碼關於Android實現啟動閃屏界面效果
閃屏,就是SplashScreen,也可以說是啟動畫面,就是啟動的時候,閃(展示)一下,持續數秒後,自動關閉。
android的實現非常簡單,使用Handler對象的postDelayed方法就可以實現。在這個方法裡傳遞一個Runnable對象和一個延遲的時間。該方法實現了一個延遲執行的效果,延遲的時間由第2個參數指定,單位是毫秒。第一個參數是Runnable對象,裡面包含了延遲後需要執行的操作。demo代碼如下:
java code:
package com.mstar;
import android.app.Activity;
import android.content.Intent;
import android.os.Bundle;
import android.os.Handler;
public class ActSplashScreen extends Activity{
@Override
protected void onCreate(Bundle savedInstanceState) {
super.onCreate(savedInstanceState);
setContentView(R.layout.shan);
// 閃屏的核心代碼
new Handler().postDelayed(new Runnable() {
@Override
public void run() {
Intent intent = new Intent(ActSplashScreen.this,DialogTest.class); //從啟動動畫ui跳轉到主ui
startActivity(intent);
ActSplashScreen.this.finish(); // 結束啟動動畫界面
}
}, 3000); //啟動動畫持續3秒鐘
}
}
xml code:
<?xml version="1.0" encoding="UTF-8"?>
<LinearLayout xmlns:android="http://schemas.android.com/apk/res/android"
android:orientation="vertical"
android:layout_width="fill_parent"
android:layout_height="fill_parent"
>
<TextView
android:layout_width="fill_parent"
android:layout_height="fill_parent"
android:text="閃一下"
>
</TextView>
</LinearLayout>
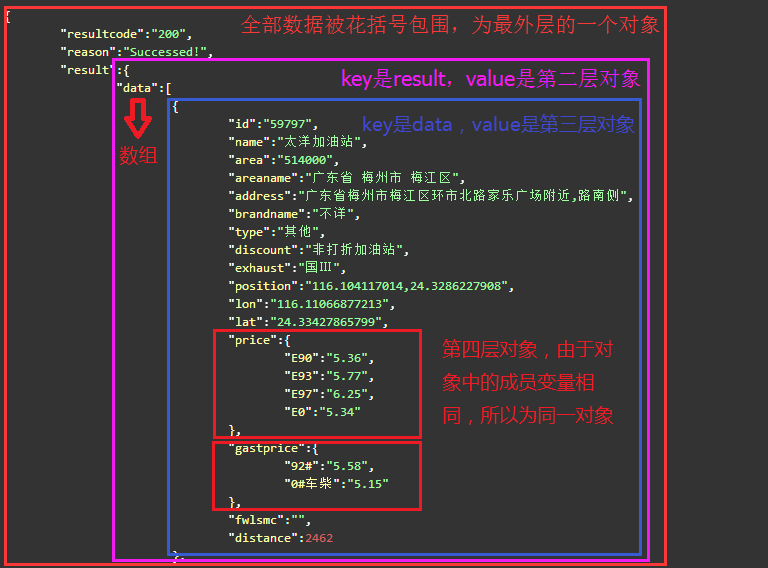 Android基礎——JSON數據的全方位解析
本篇文章包括以下內容: JSON是什麼 JSONObject的解析和存儲 JSONObject的解析和存儲(抽象) JSONArray的解析和存儲 模擬周邊加油站JSO
 Android性能優化之Splash頁應該這樣設計
目前SplashActivity的設計目前市場上的應用在啟動時基本上都會先啟動一個SplashActivity,作為一個歡迎界面,為什麼這樣設計呢?個人總結有三個優點:1
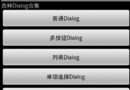 Android開發必知 九種對話框的實現方法
在開發過程中,與用戶交互式免不了會用到對話框以實現更好的用戶體驗,所以掌握幾種對話框的實現方法還是非常有必要的。在看具體實例之前先對AlertDialog做一個簡單介紹。
 Android啟動引導頁使用ViewPager實現
我們在安裝某個APP的時候,基本都會有一個引導頁的提示,他們可以打廣告,或者介紹新功能的加入和使用說明等。一般都支持滑動並且下面有幾個點,顯示共有多少頁和當前圖片的位置,