編輯:關於Android編程
一.摘要
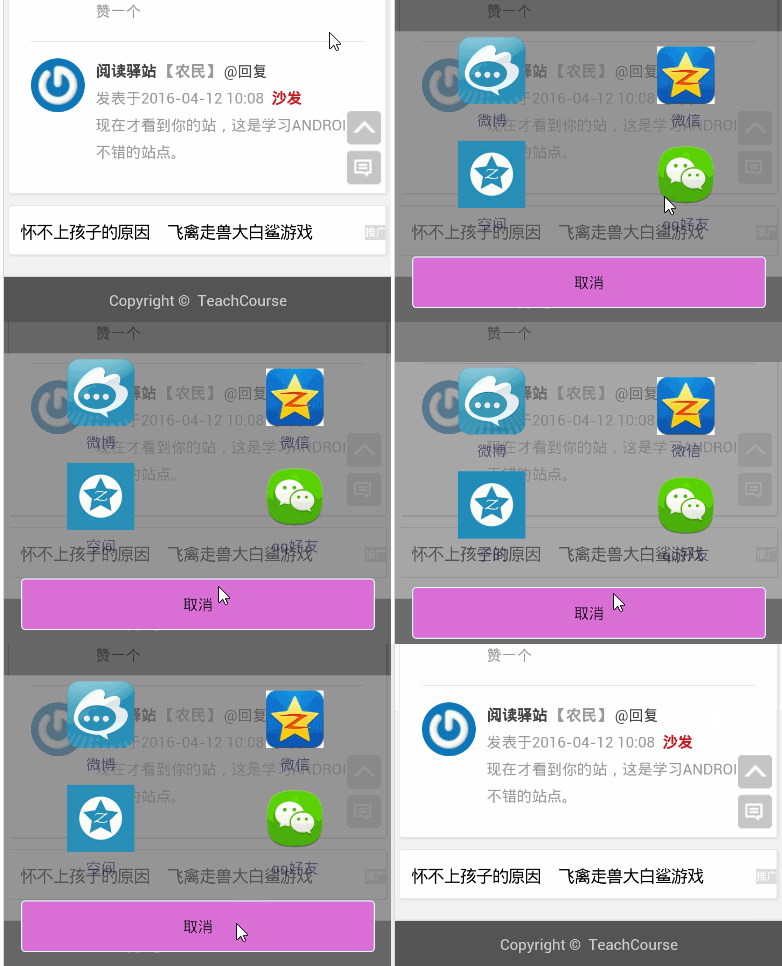
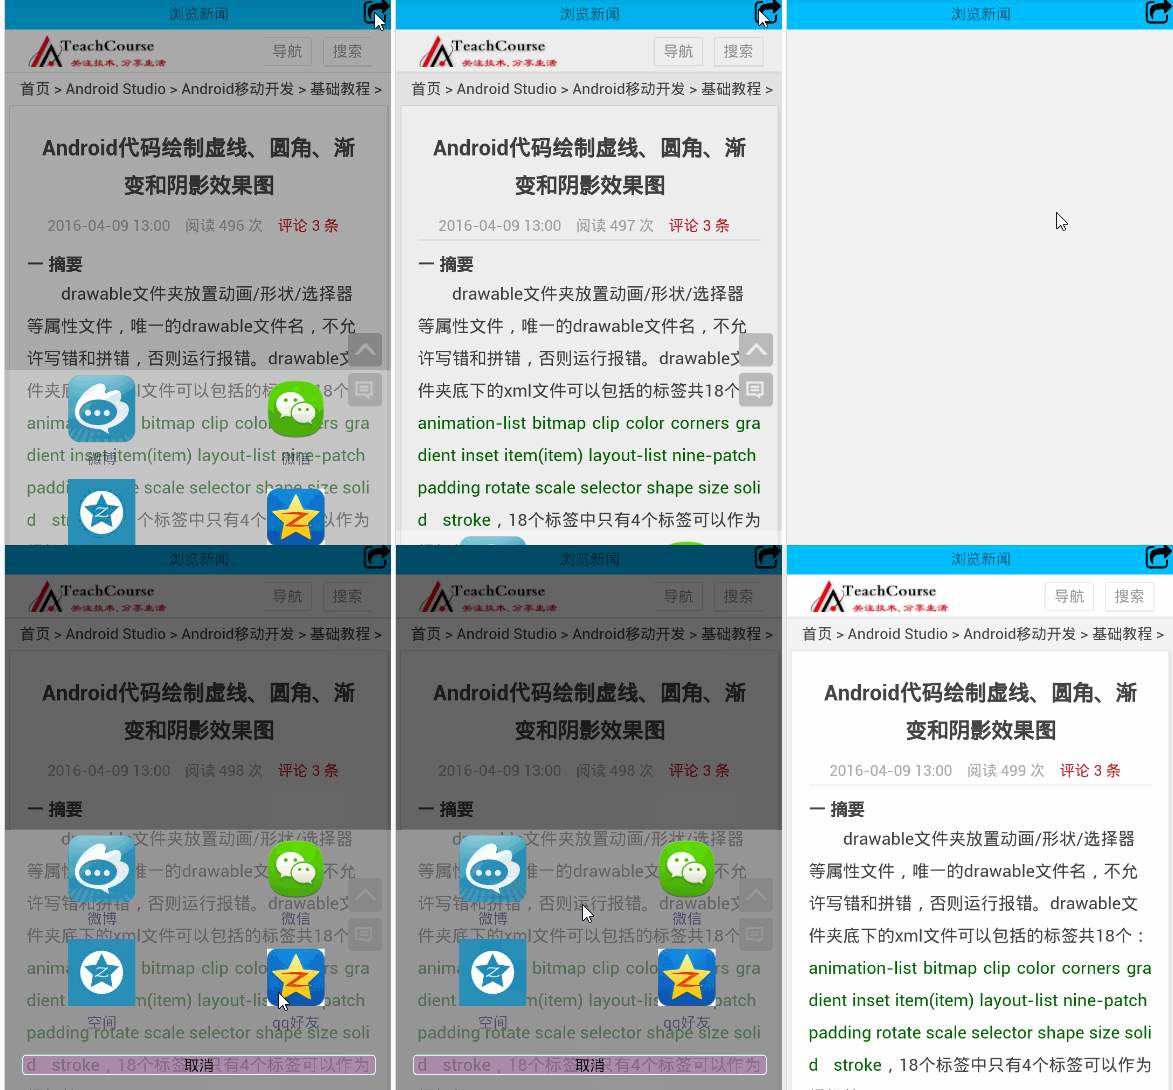
彈窗通常用於提示用戶進行某種操作,比如:點擊分享按鈕,彈窗分享對話框;雙擊返回按鈕,彈窗退出對話框;下載文件,提示下載對話框等等,分享對話框/退出對話框/下載對話框,都可以直接使用AlertDialog實現,類似的效果如下圖:

二.AlertDialog基礎知識
AlertDialog無法直接通過new關鍵字獲取對象,調用方法:new AlertDialog.Builder.create()獲取AlertDialog對象,這個時候容易讓人疑惑的是:如何設置對話框的屬性?比如:對話框標題,對話框消息,對話框按鈕等等
設置對話框屬性的兩種方式
第一種:設置AlertDialog對象屬性,具體代碼如下:
private void showDialog() {
    AlertDialog mDialog = null;
    mDialog = new AlertDialog.Builder(this).create();;

    mDialog.setIcon(R.drawable.ic_launcher);
    mDialog.setTitle("系統提示");
    mDialog.setMessage("你確定要退出嗎?");
    mDialog.setButton(DialogInterface.BUTTON_POSITIVE,"確定", new DialogInterface.OnClickListener() {

      @Override
      public void onClick(DialogInterface dialog, int which) {

        finishMyself();
      }

    });
    mDialog.setButton(DialogInterface.BUTTON_NEGATIVE,"取消", new DialogInterface.OnClickListener() {

      @Override
      public void onClick(DialogInterface dialog, int which) {
        Toast.makeText(MainActivity.this, "再按一次退出程序", (int) touchTime)
        .show();

      }
    });

    mDialog.show();

  }
第二種:設置Builder對象屬性,具體代碼如下:
private void showDialog() {
    AlertDialog mDialog = null;
    Builder mBuilder = new AlertDialog.Builder(this);

    mBuilder.setIcon(R.drawable.ic_launcher);
    mBuilder.setTitle("系統提示");
    mBuilder.setMessage("你確定要退出嗎?");
    mBuilder.setPositiveButton("確定", new DialogInterface.OnClickListener() {

      @Override
      public void onClick(DialogInterface dialog, int which) {

        finish();
      }

    });
    mBuilder.setNegativeButton("取消", new DialogInterface.OnClickListener() {

      @Override
      public void onClick(DialogInterface dialog, int which) {
        Toast.makeText(MainActivity.this, "再按一次退出程序", (int) touchTime)
            .show();

      }
    });

    mDialog = mBuilder.create();//創建AlertDialog對象

    mDialog.show();//顯示創建的AlertDialog

  }
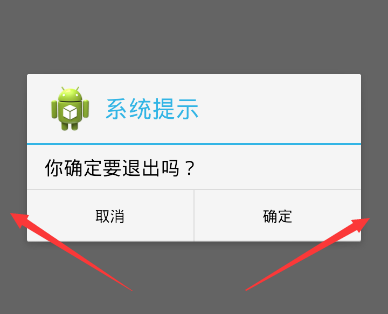
這兩種方式的對話框展示默認屬性——對話框水平垂直居中顯示,對話框與左右窗體之間有一小段距離,效果圖如下:

如何修改默認對話框屬性?
如何修改AlertDialog對話框默認屬性,然後實現對話框內容寬度布滿屏幕,高度根據內容自適應,類似文章開頭點擊分享按鈕,從底部彈出彈窗的效果。首先創建AlertDialog對話框,然後自定義對話框的布局View,最後設置Window對象屬性。
設置Window對象屏幕寬度/高度的三種方式
第一種方式:setLayout()
獲得Window對象後,設置Window對象的布局參數,即調用setLayout(int width,int height)方法,width取值:android.view.WindowManager.LayoutParams.MATCH_PARENT/android.view.WindowManager.LayoutParams.WRAP_CONTENT,同理height取值:android.view.WindowManager.LayoutParams.MATCH_PARENT/android.view.WindowManager.LayoutParams.WRAP_CONTENT,具體代碼如下:
View view = getLayoutInflater().inflate(R.layout.popup_dialog, null);
AlertDialog mDialog = new AlertDialog.Builder(this).create();
    mDialog.show();// 顯示創建的AlertDialog,並顯示,必須放在Window設置屬性之前

/**
 *設置mDialog窗口屬性:MATCH_PARENT/WRAP_CONTENT
 *
 */
Window window =mDialog.getWindow();
    window.setGravity(Gravity.BOTTOM); // 此處可以設置dialog顯示的位置
    window.setLayout(android.view.WindowManager.LayoutParams.MATCH_PARENT,
        android.view.WindowManager.LayoutParams.WRAP_CONTENT);
第二種方式:setAttributes()
獲得Window對象後,設置Window對象的屬性值,即調用setAttributes(LayoutParams)方法,LayoutParams的width變量取值:android.view.WindowManager.LayoutParams.MATCH_PARENT/android.view.WindowManager.LayoutParams.WRAP_CONTENT,同理height變量取值:android.view.WindowManager.LayoutParams.MATCH_PARENT/android.view.WindowManager.LayoutParams.WRAP_CONTENT,具體代碼如下:
View view = getLayoutInflater().inflate(R.layout.popup_dialog, null);
AlertDialog mDialog = new AlertDialog.Builder(this).create();
    mDialog.show();// 顯示創建的AlertDialog,並顯示,必須放在Window設置屬性之前

Window window =mDialog.getWindow();
     window.setGravity(Gravity.BOTTOM); // 此處可以設置dialog顯示的位置
WindowManager.LayoutParams mParams = window.getAttributes();
     mParams.width = android.view.WindowManager.LayoutParams.MATCH_PARENT;
     mParams.height = android.view.WindowManager.LayoutParams.WRAP_CONTENT;
     window.setGravity(Gravity.BOTTOM); // 此處可以設置dialog顯示的位置
     window.setAttributes(mParams);
第三種方式:setLayout()
具體代碼如下:
View view = getLayoutInflater().inflate(R.layout.popup_dialog, null);
AlertDialog mDialog = new AlertDialog.Builder(this).create();
    mDialog.show();// 顯示創建的AlertDialog,並顯示,必須放在Window設置屬性之前

Window window =mDialog.getWindow();
    window.setGravity(Gravity.BOTTOM); // 此處可以設置dialog顯示的位置
WindowManager manager = getWindowManager();
     Display display = manager.getDefaultDisplay();
     int width = display.getWidth();//獲取當前屏幕寬度
     int height = 300;//自定義高度值,比如:300dp
     window.setGravity(Gravity.BOTTOM); // 此處可以設置dialog顯示的位置
     window.setLayout(width, height);
三.彈窗動畫基礎知識
Android的基本動畫包括:漸變動畫/平移動畫/縮放動畫/旋轉動畫/組合動畫,點擊“分享”按鈕,彈窗從底部彈窗,再次點擊彈窗消失,設置的動畫——平移動畫,代碼如下:
<?xml version="1.0" encoding="utf-8"?>
<!--enter_dialog_anim.xml,彈窗進入動畫-->
<translate xmlns:android="http://schemas.android.com/apk/res/android"
  android:duration="300"
  android:fromYDelta="100%">

</translate>
<?xml version="1.0" encoding="utf-8"?>
<!--exit_dialog_anim.xml,彈窗退出動畫-->
<translate xmlns:android="http://schemas.android.com/apk/res/android"
  android:duration="300"
  android:toYDelta="100%" >

</translate>
在style.xml文件中添加Window進入和退出分別引用的動畫類型,代碼如下:
<!-- 分享功能彈窗動畫 -->
<style name="popup_style" parent="android:Animation">
    <item name="@android:windowEnterAnimation">@anim/enter_dialog_anim</item>
    <item name="@android:windowExitAnimation">@anim/exit_dialog_anim</item>
</style>
在Window屬性設置中調用setContentView()指定View對象,同時調用setWindowAnimations()指定添加的動畫,代碼如下:
window.setContentView(view);//這一步必須指定,否則不出現彈窗
window.setWindowAnimations(R.style.popup_style); // 添加動畫
四.自定義彈窗:MyDialogActivity
自定義MyDialogActivity實現AlertDialog同樣的功能,點擊“分享按鈕”,從窗口底部彈出彈窗,點擊“取消”彈窗消息,最終效果和AlertDialog實現的彈窗效果一模一樣,如下圖:

開發步驟:
1.定義布局popup_main.xml。popup_main.xml定義彈窗最終展示的樣子,可以放置多個平台的分享按鈕,比如:微信/微博/空間/人人等,代碼如下:
<?xml version="1.0" encoding="utf-8"?>
<!-- 底部彈窗布局 -->
<LinearLayout xmlns:android="http://schemas.android.com/apk/res/android"
  android:layout_width="match_parent"
  android:layout_height="match_parent"
  android:background="@color/transparent"
  android:orientation="vertical" >

  <LinearLayout
    android:layout_width="match_parent"
    android:layout_height="wrap_content"
    android:orientation="horizontal" >

    <TextView
      android:id="@+id/share_weibo_tv"
      android:layout_width="0dp"
      android:layout_height="wrap_content"
      android:layout_margin="@dimen/share_padding"
      android:layout_weight="1"
      android:gravity="center_horizontal"
      android:text="@string/weibo" />

    <TextView
      android:id="@+id/share_weixin_tv"
      android:layout_width="0dp"
      android:layout_height="wrap_content"
      android:layout_margin="@dimen/share_padding"
      android:layout_weight="1"
      android:gravity="center_horizontal"
      android:text="@string/weixin" />
  </LinearLayout>

  <LinearLayout
    android:layout_width="match_parent"
    android:layout_height="wrap_content"
    android:orientation="horizontal" >

    <TextView
      android:id="@+id/share_kongjian_tv"
      android:layout_width="0dp"
      android:layout_height="wrap_content"
      android:layout_margin="@dimen/share_padding"
      android:layout_weight="1"
      android:gravity="center_horizontal"
      android:text="@string/kongjian" />

    <TextView
      android:id="@+id/share_qq_tv"
      android:layout_width="0dp"
      android:layout_height="wrap_content"
      android:layout_margin="@dimen/share_padding"
      android:layout_weight="1"
      android:gravity="center_horizontal"
      android:text="@string/qq" />
  </LinearLayout>

  <Button
    android:id="@+id/cancel_btn"
    android:layout_width="match_parent"
    android:layout_height="wrap_content"
    android:layout_margin="@dimen/activity_vertical_margin"
    android:background="@drawable/btn_bg"
    android:text="@string/cancel" />

</LinearLayout>
2.定義Theme樣式。Theme樣式定義在style.xml文件中,在AndroidManifest.xml文件中的標簽的android:theme=""屬性中引用,代碼如下:
<!-- MyDialogActivity自定義Threme -->
<style name="Theme.CustomDialog" parent="@android:style/Theme.Dialog">
    <item name="android:windowNoTitle">true</item>
    <!-- 設置title -->
    <item name="android:windowBackground">@android:color/transparent</item>
    <item name="android:windowFrame">@null</item>
    <!-- 設置邊框 -->
    <item name="android:windowIsTranslucent">true</item>
    <!-- 設置半透明 -->
    <item name="android:windowFullscreen">true</item>
    <!-- 設置全屏 -->
</style>
<activity android:name="MyDialogActivity" android:theme="@style/Theme.CustomDialog"/>
3.實現MyDialogActivity具體功能。
package cn.teachcourse.main;

import android.annotation.SuppressLint;
import android.app.Activity;
import android.graphics.Bitmap;
import android.graphics.BitmapFactory;
import android.graphics.drawable.BitmapDrawable;
import android.graphics.drawable.Drawable;
import android.os.Bundle;
import android.view.Gravity;
import android.view.View;
import android.view.View.OnClickListener;
import android.view.Window;
import android.widget.Button;
import android.widget.TextView;

/*
 @author [email protected]
 @date 創建於:2016-4-14
 */
public class MyDialogActivity extends Activity implements OnClickListener {
  private View view;

  @Override
  protected void onCreate(Bundle savedInstanceState) {
    // TODO Auto-generated method stub
    super.onCreate(savedInstanceState);
    view = getLayoutInflater().inflate(R.layout.popup_main, null, false);
    setContentView(view);
    initView();
  }

  private void initView() {
    Window window = getWindow();
    window.setLayout(android.view.ViewGroup.LayoutParams.MATCH_PARENT,
        android.view.ViewGroup.LayoutParams.WRAP_CONTENT);
    window.setGravity(Gravity.BOTTOM);
    window.setWindowAnimations(R.style.popup_style); // 添加動畫

    TextView weibo_tv = (TextView) view.findViewById(R.id.share_weibo_tv);
    TextView weixin_tv = (TextView) view.findViewById(R.id.share_weixin_tv);
    TextView qq_tv = (TextView) view.findViewById(R.id.share_qq_tv);
    TextView kongjian_tv = (TextView) view
        .findViewById(R.id.share_kongjian_tv);
    Button cancel_btn = (Button) view.findViewById(R.id.cancel_btn);
    // 添加控件事件
    weibo_tv.setOnClickListener(this);
    weixin_tv.setOnClickListener(this);
    qq_tv.setOnClickListener(this);
    kongjian_tv.setOnClickListener(this);
    cancel_btn.setOnClickListener(this);

    // 調整圖片的大小/位置
    abjustDrawablePos(weibo_tv, R.drawable.share_weibo);
    abjustDrawablePos(weixin_tv, R.drawable.share_weixin);
    abjustDrawablePos(kongjian_tv, R.drawable.share_kongjian);
    abjustDrawablePos(qq_tv, R.drawable.share_qq);

  }

  /**
   * 添加圖標和調整位置
   *
   * @param tv
   * @param draw
   */
  @SuppressLint("ResourceAsColor")
  private void abjustDrawablePos(TextView tv, int draw) {
    Bitmap mBitmap = BitmapFactory.decodeResource(getResources(), draw);
    mBitmap = centerSquareScaleBitmap(mBitmap, 250);
    Drawable drawable = new BitmapDrawable(mBitmap);
    drawable.setBounds(0, 48, 0, 48);// 設置圖片的邊界
    tv.setTextColor(R.color.fontcolor);
    tv.setCompoundDrawables(null, drawable, null, null);// setCompoundDrawables()和setBounds()方法一起使用
    // 添加TextView圖標
    tv.setCompoundDrawablesWithIntrinsicBounds(null, drawable, null, null);
    tv.setCompoundDrawablePadding(10);// 設置圖片和text之間的間距
    if (mBitmap != null) {
      mBitmap = null;
      drawable = null;
    }
  }

  /**
   *
   * @param bitmap
   *      原圖
   * @param edgeLength
   *      希望得到的正方形部分的邊長
   * @return 縮放截取正中部分後的位圖。
   */
  public static Bitmap centerSquareScaleBitmap(Bitmap bitmap, int edgeLength) {
    if (null == bitmap || edgeLength <= 0) {
      return null;
    }

    Bitmap result = bitmap;
    int widthOrg = bitmap.getWidth();
    int heightOrg = bitmap.getHeight();

    if (widthOrg >= edgeLength && heightOrg >= edgeLength) {
      // 壓縮到一個最小長度是edgeLength的bitmap
      int longerEdge = (int) (edgeLength * Math.max(widthOrg, heightOrg) / Math
          .min(widthOrg, heightOrg));

      int scaledWidth = widthOrg > heightOrg ? longerEdge : edgeLength;
      int scaledHeight = widthOrg > heightOrg ? edgeLength : longerEdge;
      Bitmap scaledBitmap;

      try {
        scaledBitmap = Bitmap.createScaledBitmap(bitmap, scaledWidth,
            scaledHeight, true);
      } catch (Exception e) {
        return null;
      }

      // 從圖中截取正中間的正方形部分。
      int xTopLeft = (scaledWidth - edgeLength) / 2;
      int yTopLeft = (scaledHeight - edgeLength) / 2;

      try {
        result = Bitmap.createBitmap(scaledBitmap, xTopLeft, yTopLeft,
            edgeLength, edgeLength);
        scaledBitmap.recycle();
      } catch (Exception e) {
        return null;
      }
    }

    return result;
  }

  @Override
  public void onClick(View v) {
    switch (v.getId()) {
    /**
     * 點擊分享圖標,彈出分享界面
     */
    case R.id.share_to_btn:

      break;
    case R.id.share_weibo_tv:

      break;
    case R.id.share_weixin_tv:

      break;
    case R.id.share_qq_tv:

      break;
    case R.id.share_kongjian_tv:

      break;
    case R.id.cancel_btn:
      finish();

      break;

    default:
      break;
    }

  }
}
4.彈出彈窗,調用startActivity(this,MyDialogActivity.class)。
以上就是本文的全部內容,希望對大家學習Android軟件編程有所幫助。
 Android 源碼系列之(九)從源碼的角度深入理解Activity的launchModel特性
隨著公司新業務的起步由於原有APP_A的包已經很大了,所以上邊要求另外開發一款APP_B,要求是APP_A和APP_B賬號通用且兩個APP可以相互打開。賬號通用也就是說在
 android開發之自定義AutoCompleteTextView
AutoCompleteTextView,很多人都用過,有些情況下使用Google提供的ArrayAdapter作為適配器就可以完成需求,但是在實際開發中,我們經常需要開
 Android自定義組合控件--底部多按鈕切換
效果圖: 現在市場上大多數軟件都是類似於上面的結構,底部有幾個按鈕用於切換到不同的界面。基於OOP思想,我想把下面的一整塊布局封裝成一個類,也就是我們的自定義組合控件&
 (Android)畫布的移動和翻轉
Android畫布翻轉是個利器,尤其在圖像處理上,不需要數組的轉置顛倒一堆線性變化就可以輕松實現原點的改變。就像醬紫,開始的時候,畫布妹妹是和顯示區哥哥重疊在一起的,默契