編輯:關於Android編程
1. SurfaceView的定義
通常情況程序的View和用戶響應都是在同一個線程中處理的,這也是為什麼處理長時間事件(例如訪問網絡)需要放到另外的線程中去(防止阻塞當前UI線程的操作和繪制)。但是在其他線程中卻不能修改UI元素,例如用後台線程更新自定義View(調用View的在自定義View中的onDraw函數)是不允許的。
如果需要在另外的線程繪制界面、需要迅速的更新界面或則渲染UI界面需要較長的時間,這種情況就要使用SurfaceView了。SurfaceView中包含一個Surface對象,而Surface是可以在後台線程中繪制的。SurfaceView的性質決定了其比較適合一些場景:需要界面迅速更新、對幀率要求較高的情況。使用SurfaceView需要注意以下幾點情況:
SurfaceView和SurfaceHolder.Callback函數都從當前SurfaceView窗口線程中調用(一般而言就是程序的主線程)。有關資源狀態要注意和繪制線程之間的同步。
在繪制線程中必須先合法的獲取Surface才能開始繪制內容,在SurfaceHolder.Callback.surfaceCreated() 和SurfaceHolder.Callback.surfaceDestroyed()之間的狀態為合法的,另外在Surface類型為SURFACE_TYPE_PUSH_BUFFERS時候是不合法的。
額外的繪制線程會消耗系統的資源,在使用SurfaceView的時候要注意這點。
2. SurfaceView的使用
首先繼承SurfaceView,並實現SurfaceHolder.Callback接口,實現它的三個方法:surfaceCreated,surfaceChanged,surfaceDestroyed。
(1)surfaceCreated(SurfaceHolder holder):surface創建的時候調用,一般在該方法中啟動繪圖的線程。
(2)surfaceChanged(SurfaceHolder holder, int format, int width,int height):surface尺寸發生改變的時候調用,如橫豎屏切換。
(3)surfaceDestroyed(SurfaceHolder holder) :surface被銷毀的時候調用,如退出游戲畫面,一般在該方法中停止繪圖線程。
還需要獲得SurfaceHolder,並添加回調函數,這樣這三個方法才會執行。
只要繼承SurfaceView類並實現SurfaceHolder.Callback接口就可以實現一個自定義的SurfaceView了,SurfaceHolder.Callback在底層的Surface狀態發生變化的時候通知View,SurfaceHolder.Callback具有如下的接口:
(1)surfaceCreated(SurfaceHolder holder):當Surface第一次創建後會立即調用該函數。程序可以在該函數中做些和繪制界面相關的初始化工作,一般情況下都是在另外的線程來繪制界面,所以不要在這個函數中繪制Surface。
(2)surfaceChanged(SurfaceHolder holder, int format, int width,int height):當Surface的狀態(大小和格式)發生變化的時候會調用該函數,在surfaceCreated調用後該函數至少會被調用一次。
(3)surfaceDestroyed(SurfaceHolder holder):當Surface被摧毀前會調用該函數,該函數被調用後就不能繼續使用Surface了,一般在該函數中來清理使用的資源。
通過SurfaceView的getHolder()函數可以獲取SurfaceHolder對象,Surface 就在SurfaceHolder對象內。雖然Surface保存了當前窗口的像素數據,但是在使用過程中是不直接和Surface打交道的,由SurfaceHolder的Canvas lockCanvas()或則Canvas lockCanvas(Rect dirty)函數來獲取Canvas對象,通過在Canvas上繪制內容來修改Surface中的數據。如果Surface不可編輯或則尚未創建調用該函數會返回null,在 unlockCanvas() 和 lockCanvas()中Surface的內容是不緩存的,所以需要完全重繪Surface的內容,為了提高效率只重繪變化的部分則可以調用lockCanvas(Rect dirty)函數來指定一個dirty區域,這樣該區域外的內容會緩存起來。在調用lockCanvas函數獲取Canvas後,SurfaceView會獲取Surface的一個同步鎖直到調用unlockCanvasAndPost(Canvas canvas)函數才釋放該鎖,這裡的同步機制保證在Surface繪制過程中不會被改變(被摧毀、修改)。
當在Canvas中繪制完成後,調用函數unlockCanvasAndPost(Canvas canvas)來通知系統Surface已經繪制完成,這樣系統會把繪制完的內容顯示出來。為了充分利用不同平台的資源,發揮平台的最優效果可以通過SurfaceHolder的setType函數來設置繪制的類型,目前接收如下的參數:
(1)SURFACE_TYPE_NORMAL:用RAM緩存原生數據的普通Surface
(2)SURFACE_TYPE_HARDWARE:適用於DMA(Direct memory access )引擎和硬件加速的Surface
(3)SURFACE_TYPE_GPU:適用於GPU加速的Surface
(4)SURFACE_TYPE_PUSH_BUFFERS:表明該Surface不包含原生數據,Surface用到的數據由其他對象提供,在Camera圖像預覽中就使用該類型的Surface,有Camera負責提供給預覽Surface數據,這樣圖像預覽會比較流暢。如果設置這種類型則就不能調用lockCanvas來獲取Canvas對象了。
訪問SurfaceView的底層圖形是通過SurfaceHolder接口來實現的,通過getHolder()方法可以得到這個SurfaceHolder對象。你應該實現surfaceCreated(SurfaceHolder)和surfaceDestroyed(SurfaceHolder)方法來知道在這個Surface在窗口的顯示和隱藏過程中是什麼時候創建和銷毀的。
注意:一個SurfaceView只在SurfaceHolder.Callback.surfaceCreated() 和 SurfaceHolder.Callback.surfaceDestroyed()調用之間是可用的,其他時間是得不到它的Canvas對象的(null)。
3. SurfaceView實戰
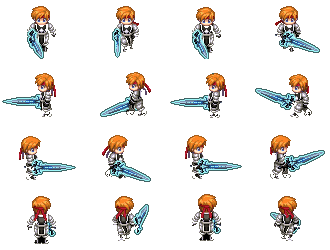
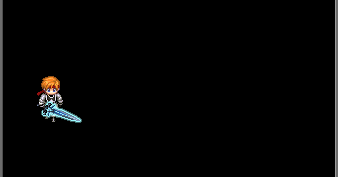
下面通過一個小demo來學習SurfaceView在實際項目中的使用,繪制一個精靈,該精靈有四個方向的行走動畫,讓精靈沿著屏幕四周不停的行走。游戲中精靈素材和最終實現的效果圖:
首先創建核心類GameView.java,源碼如下:
public class GameView extends SurfaceView implements
    SurfaceHolder.Callback {

  //屏幕寬高
  public static int SCREEN_WIDTH;
  public static int SCREEN_HEIGHT;

  private Context mContext;
  private SurfaceHolder mHolder;
  //最大幀數 (1000 / 30)
  private static final int DRAW_INTERVAL = 30;

  private DrawThread mDrawThread;
  private FrameAnimation []spriteAnimations;
  private Sprite mSprite;
  private int spriteWidth = 0;
  private int spriteHeight = 0;
  private float spriteSpeed = (float)((500 * SCREEN_WIDTH / 480) * 0.001);
  private int row = 4;
  private int col = 4;

  public GameSurfaceView(Context context) {
    super(context);
    this.mContext = context;
    mHolder = this.getHolder();
    mHolder.addCallback(this);
    initResources();

    mSprite = new Sprite(spriteAnimations,0,0,spriteWidth,spriteHeight,spriteSpeed);
  }

  private void initResources() {
    Bitmap[][] spriteImgs = generateBitmapArray(mContext, R.drawable.sprite, row, col);
    spriteAnimations = new FrameAnimation[row];
    for(int i = 0; i < row; i ++) {
      Bitmap []spriteImg = spriteImgs[i];
      FrameAnimation spriteAnimation = new FrameAnimation(spriteImg,new int[]{150,150,150,150},true);
      spriteAnimations[i] = spriteAnimation;
    }
  }

  public Bitmap decodeBitmapFromRes(Context context, int resourseId) {
    BitmapFactory.Options opt = new BitmapFactory.Options();
    opt.inPreferredConfig = Bitmap.Config.RGB_565;
    opt.inPurgeable = true;
    opt.inInputShareable = true;

    InputStream is = context.getResources().openRawResource(resourseId);
    return BitmapFactory.decodeStream(is, null, opt);
  }

  public Bitmap createBitmap(Context context, Bitmap source, int row,
      int col, int rowTotal, int colTotal) {
    Bitmap bitmap = Bitmap.createBitmap(source,
        (col - 1) * source.getWidth() / colTotal,
        (row - 1) * source.getHeight() / rowTotal, source.getWidth()
            / colTotal, source.getHeight() / rowTotal);
    return bitmap;
  }

  public Bitmap[][] generateBitmapArray(Context context, int resourseId,
      int row, int col) {
    Bitmap bitmaps[][] = new Bitmap[row][col];
    Bitmap source = decodeBitmapFromRes(context, resourseId);
    this.spriteWidth = source.getWidth() / col;
    this.spriteHeight = source.getHeight() / row;
    for (int i = 1; i <= row; i++) {
      for (int j = 1; j <= col; j++) {
        bitmaps[i - 1][j - 1] = createBitmap(context, source, i, j,
            row, col);
      }
    }
    if (source != null && !source.isRecycled()) {
      source.recycle();
      source = null;
    }
    return bitmaps;
  }

  public void surfaceChanged(SurfaceHolder holder, int format, int width,
      int height) {
  }

  public void surfaceCreated(SurfaceHolder holder) {
    if(null == mDrawThread) {
      mDrawThread = new DrawThread();
      mDrawThread.start();
    }
  }

  public void surfaceDestroyed(SurfaceHolder holder) {
    if(null != mDrawThread) {
      mDrawThread.stopThread();
    }
  }

  private class DrawThread extends Thread {
    public boolean isRunning = false;

    public DrawThread() {
      isRunning = true;
    }

    public void stopThread() {
      isRunning = false;
      boolean workIsNotFinish = true;
      while (workIsNotFinish) {
        try {
          this.join();// 保證run方法執行完畢
        } catch (InterruptedException e) {
          // TODO Auto-generated catch block
          e.printStackTrace();
        }
        workIsNotFinish = false;
      }
    }

    public void run() {
      long deltaTime = 0;
      long tickTime = 0;
      tickTime = System.currentTimeMillis();
      while (isRunning) {
        Canvas canvas = null;
        try {
          synchronized (mHolder) {
            canvas = mHolder.lockCanvas();
            //設置方向
            mSprite.setDirection();
            //更新精靈位置
            mSprite.updatePosition(deltaTime);
            drawSprite(canvas);
          }
        } catch (Exception e) {
          e.printStackTrace();
        } finally {
          if (null != mHolder) {
            mHolder.unlockCanvasAndPost(canvas);
          }
        }

        deltaTime = System.currentTimeMillis() - tickTime;
        if(deltaTime < DRAW_INTERVAL) {
          try {
            Thread.sleep(DRAW_INTERVAL - deltaTime);
          } catch (InterruptedException e) {
            e.printStackTrace();
          }
        }
        tickTime = System.currentTimeMillis();
      }

    }
  }

  private void drawSprite(Canvas canvas) {
    //清屏操作
    canvas.drawColor(Color.BLACK);
    mSprite.draw(canvas);
  }

}
GameView.java中包含了一個繪圖線程DrawThread,在線程的run方法中鎖定Canvas、繪制精靈、更新精靈位置、釋放Canvas等操作。因為精靈素材是一張大圖,所以這裡進行了裁剪生成一個二維數組。使用這個二維數組初始化了精靈四個方向的動畫,下面看Sprite.java的源碼。
public class Sprite {

  public static final int DOWN = 0;
  public static final int LEFT = 1;
  public static final int RIGHT = 2;
  public static final int UP = 3;

  public float x;
  public float y;
  public int width;
  public int height;
  //精靈行走速度
  public double speed;
  //精靈當前行走方向
  public int direction;
  //精靈四個方向的動畫
  public FrameAnimation[] frameAnimations;

  public Sprite(FrameAnimation[] frameAnimations, int positionX,
      int positionY, int width, int height, float speed) {
    this.frameAnimations = frameAnimations;
    this.x = positionX;
    this.y = positionY;
    this.width = width;
    this.height = height;
    this.speed = speed;
  }

  public void updatePosition(long deltaTime) {
    switch (direction) {
    case LEFT:
      //讓物體的移動速度不受機器性能的影響,每幀精靈需要移動的距離為:移動速度*時間間隔
      this.x = this.x - (float) (this.speed * deltaTime);
      break;
    case DOWN:
      this.y = this.y + (float) (this.speed * deltaTime);
      break;
    case RIGHT:
      this.x = this.x + (float) (this.speed * deltaTime);
      break;
    case UP:
      this.y = this.y - (float) (this.speed * deltaTime);
      break;
    }
  }

  /**
   * 根據精靈的當前位置判斷是否改變行走方向
   */
  public void setDirection() {
    if (this.x <= 0
        && (this.y + this.height) < GameSurfaceView.SCREEN_HEIGHT) {
      if (this.x < 0)
        this.x = 0;
      this.direction = Sprite.DOWN;
    } else if ((this.y + this.height) >= GameSurfaceView.SCREEN_HEIGHT
        && (this.x + this.width) < GameSurfaceView.SCREEN_WIDTH) {
      if ((this.y + this.height) > GameSurfaceView.SCREEN_HEIGHT)
        this.y = GameSurfaceView.SCREEN_HEIGHT - this.height;
      this.direction = Sprite.RIGHT;
    } else if ((this.x + this.width) >= GameSurfaceView.SCREEN_WIDTH
        && this.y > 0) {
      if ((this.x + this.width) > GameSurfaceView.SCREEN_WIDTH)
        this.x = GameSurfaceView.SCREEN_WIDTH - this.width;
      this.direction = Sprite.UP;
    } else {
      if (this.y < 0)
        this.y = 0;
      this.direction = Sprite.LEFT;
    }

  }

  public void draw(Canvas canvas) {
    FrameAnimation frameAnimation = frameAnimations[this.direction];
    Bitmap bitmap = frameAnimation.nextFrame();
    if (null != bitmap) {
      canvas.drawBitmap(bitmap, x, y, null);
    }
  }
}
精靈類主要是根據當前位置判斷行走的方向,然後根據行走的方向更新精靈的位置,再繪制自身的動畫。由於精靈的動畫是一幀一幀的播放圖片,所以這裡封裝了FrameAnimation.java,源碼如下:
public class FrameAnimation{
  /**動畫顯示的需要的資源 */
  private Bitmap[] bitmaps;
  /**動畫每幀顯示的時間 */
  private int[] duration;
  /**動畫上一幀顯示的時間 */
  protected Long lastBitmapTime;
  /**動畫顯示的索引值,防止數組越界 */
  protected int step;
  /**動畫是否重復播放 */
  protected boolean repeat;
  /**動畫重復播放的次數*/
  protected int repeatCount;

  /**
   * @param bitmap:顯示的圖片<br/>
   * @param duration:圖片顯示的時間<br/>
   * @param repeat:是否重復動畫過程<br/>
   */
  public FrameAnimation(Bitmap[] bitmaps, int duration[], boolean repeat) {
    this.bitmaps = bitmaps;
    this.duration = duration;
    this.repeat = repeat;
    lastBitmapTime = null;
    step = 0;
  }

  public Bitmap nextFrame() {
    // 判斷step是否越界
    if (step >= bitmaps.length) {
      //如果不無限循環
      if( !repeat ) {
        return null;
      } else {
        lastBitmapTime = null;
      }
    }

    if (null == lastBitmapTime) {
      // 第一次執行
      lastBitmapTime = System.currentTimeMillis();
      return bitmaps[step = 0];
    }

    // 第X次執行
    long nowTime = System.currentTimeMillis();
    if (nowTime - lastBitmapTime <= duration[step]) {
      // 如果還在duration的時間段內,則繼續返回當前Bitmap
      // 如果duration的值小於0,則表明永遠不失效,一般用於背景
      return bitmaps[step];
    }
    lastBitmapTime = nowTime;
    return bitmaps[step++];// 返回下一Bitmap
  }

}
FrameAnimation根據每一幀的顯示時間返回當前的圖片幀,若沒有超過指定的時間則繼續返回當前幀,否則返回下一幀。
接下來需要做的是讓Activty顯示的View為我們之前創建的GameView,然後設置全屏顯示。
public void onCreate(Bundle savedInstanceState) {
   super.onCreate(savedInstanceState);

   getWindow().setFlags(WindowManager.LayoutParams.FLAG_FULLSCREEN,
       WindowManager.LayoutParams.FLAG_FULLSCREEN);
   requestWindowFeature(Window.FEATURE_NO_TITLE);
   getWindow().setFlags(WindowManager.LayoutParams.FLAG_KEEP_SCREEN_ON,
       WindowManager.LayoutParams.FLAG_KEEP_SCREEN_ON);

   DisplayMetrics outMetrics = new DisplayMetrics();
   this.getWindowManager().getDefaultDisplay().getMetrics(outMetrics);
   GameSurfaceView.SCREEN_WIDTH = outMetrics.widthPixels;
   GameSurfaceView.SCREEN_HEIGHT = outMetrics.heightPixels;
   GameSurfaceView gameView = new GameSurfaceView(this);
   setContentView(gameView);
 }
現在運行Android工程,應該就可以看到一個手持寶劍的武士在沿著屏幕不停的走了。
 Android UI設計之(十一)自定義ViewGroup,打造通用的關閉鍵盤小控件ImeObserverLayout
我們平時開發中總會遇見一些奇葩的需求,為了實現這些需求我們往往絞盡腦汁有時候還茶不思飯不香的,有點誇張了(*^__^*)……我印象最深的一個需
 華為p9怎麼隱藏導航欄
華為p9怎麼隱藏導航欄?華為p9隱藏導航欄方法是什麼?華為p9是華為今年推出的一款高端機,華為p9有許多方便好用的功能,比如你可以隱藏手機導航欄,那麼華為p
 Android資源圖片讀取機制
在新建一個Android項目時,在res目錄下會自動生成幾個drawable文件夾,drawable-ldpi,drawable-mdpi,drawable-hdpi,一
 (17)web開發/tomcat/HTTP協議
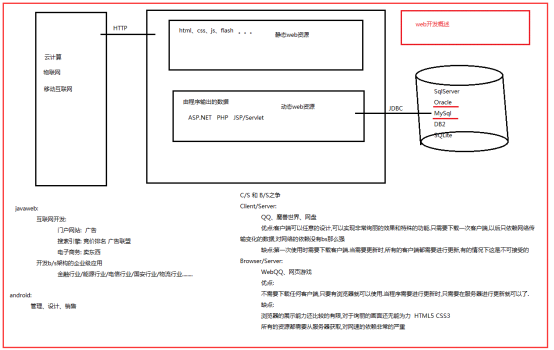
web開發概述 靜態web資源:內容是靜態的,不同的人在不同的時間來訪問時都是相同的內容。HTML、CSS、JS動態web資源:內容是由程序生成的,