編輯:關於Android編程
Android會為每個apk進程分配一個單獨的空間(比如只能訪問/data/data/自己包名下面的文件),一般情況下apk之間是禁止相互訪問數據的。通過Shared User id,擁有同一個User id的多個APK可以配置成運行在同一個進程中.所以默認就是可以互相訪問任意數據. 也可以配置成運行成不同的進程, 同時可以訪問其他APK的數據目錄下的數據庫和文件.就像訪問本程序的數據一樣(使用IPC機制,不同進程之間,比如AIDL)。
一、使用同一個shareuserid,多個apk運行到同一個進程,實現多個apk之間的數據訪問
實現效果:把A.apk assets目錄下的session.log拷貝到/data/data/A包名/目錄下面
A.apk
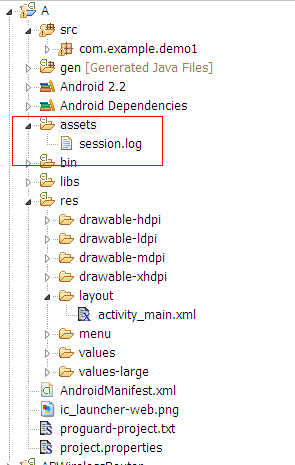
AndroidManifest.xml
<manifest xmlns:android="http://schemas.android.com/apk/res/android"
  package="com.example.demo1"
  android:sharedUserId="com.example"
  android:versionCode="1"
  android:versionName="1.0" >
  <uses-sdk
    android:minSdkVersion="8"
    android:targetSdkVersion="15" />
  <application
    android:icon="@drawable/ic_launcher"
    android:label="@string/app_name"
    android:theme="@style/AppTheme" >
    <activity
      android:name=".MainActivity"
      android:label="@string/title_activity_main" >
      <intent-filter>
        <action android:name="android.intent.action.MAIN" />

        <category android:name="android.intent.category.LAUNCHER" />
      </intent-filter>
    </activity>
  </application>

</manifest>
B.apk(實現訪問資源並且拷貝)
MainActivity.java
package com.example.demo2;

import java.io.File;
import java.io.FileOutputStream;
import java.io.IOException;
import java.io.InputStream;
import java.io.OutputStream;

import android.os.Bundle;
import android.app.Activity;
import android.content.Context;
import android.content.pm.PackageManager.NameNotFoundException;
import android.view.Menu;
import android.view.MenuItem;
import android.support.v4.app.NavUtils;

public class MainActivity extends Activity {

  @Override
  public void onCreate(Bundle savedInstanceState) {
    super.onCreate(savedInstanceState);
    setContentView(R.layout.activity_main);
    Context context = null;
    InputStream input = null;
    OutputStream output = null;
    try {
      context = this.createPackageContext("com.example.demo1",
          Context.CONTEXT_IGNORE_SECURITY);

      File file = new File("/data/data/com.example.demo1/session.log");
      if (!file.exists()) {

        file.createNewFile();
      }
      input = context.getAssets().open("session.log");
      output = new FileOutputStream(file);
      byte[] buffer = new byte[1024];
      int readLength = 0;
      while((readLength = input.read(buffer)) != -1){
        output.write(buffer, 0, readLength);
      }
    } catch (Exception e) {
      // TODO Auto-generated catch block
      e.printStackTrace();
    }
    finally{
      try {
        if(input!=null || output!= null){
          input.close();
          output.close();
          input = null;
          output = null;
        }
      } catch (Exception e2) {
        // TODO: handle exception
      }
    }
  }

  @Override
  public boolean onCreateOptionsMenu(Menu menu) {
    getMenuInflater().inflate(R.menu.activity_main, menu);
    return true;
  }

}
AndroidManifest.xml
<manifest xmlns:android="http://schemas.android.com/apk/res/android"
  package="com.example.demo2"
  android:versionCode="1"
  android:versionName="1.0"
  android:sharedUserId="com.example">
  <uses-sdk
    android:minSdkVersion="8"
    android:targetSdkVersion="15" />
  <application
    android:icon="@drawable/ic_launcher"
    android:label="@string/app_name"
    android:theme="@style/AppTheme" >
    <activity
      android:name=".MainActivity"
      android:label="@string/title_activity_main" >
      <intent-filter>
        <action android:name="android.intent.action.MAIN" />

        <category android:name="android.intent.category.LAUNCHER" />
      </intent-filter>
    </activity>
  </application>

</manifest>
A.apk,B.apk使用同一個shareduserid:com.example
實現效果:

二、通過shareduserid來獲取系統權限
(1)在AndroidManifest.xml中添加android:sharedUserId="android.uid.system"
(2)在Android.mk文件裡面添加LOCAL_CERTIFICATE := platform(使用系統簽名)
(3)在源碼下面進行mm編譯
這樣生成的apk能夠獲取system權限,可以在任意system權限目錄下面進行目錄或者文件的創建,以及訪問其他apk資源等(注意創建的文件(夾)只有創建者(比如system,root除外)擁有可讀可寫權限-rw-------)。
三、擴展
系統中所有使用android.uid.system作為共享UID的APK,都會首先在manifest節點中增加android:sharedUserId="android.uid.system",然後在Android.mk中增加LOCAL_CERTIFICATE := platform。可以參見Settings等
系統中所有使用android.uid.shared作為共享UID的APK,都會在manifest節點中增加android:sharedUserId="android.uid.shared",然後在Android.mk中增加LOCAL_CERTIFICATE := shared。可以參見Launcher等
系統中所有使用android.media作為共享UID的APK,都會在manifest節點中增加android:sharedUserId="android.media",然後在Android.mk中增加LOCAL_CERTIFICATE := media。可以參見Gallery等。
四、問題解決
最後還說下,這個android:sharedUserId屬性不只可以把apk放到系統進程中,也可以配置多個APK運行在一個進程中,這樣可以共享數據,應該會很有用的
在AndroidMenifest.xml中我們可以看到android:sharedUserId="android.uid.system"
但是有了這句後,就無法對sd卡進行讀寫操作,比如在SD卡中創建一個新文件夾,是創建不成功的。但是如果把android:sharedUserId="android.uid.system"注釋掉,就可以在SD卡進行IO操作了。
在Settings中android:sharedUserId="android.uid.system"是不可少的,少了它很多Settings下應用直接開不了,或一開就報錯。
解決方法一:
vold 模塊裡的 Volume.cpp文件
在調用doMount的語句裡做一下修改~
doMount(devicePath, path, false, false, false,1000, 1015, 0702, true)
↓
doMount(devicePath, path, false, true, false,1000, 1015, 0002, true)
編譯以後試試
解決方法二:
把SD卡操作的功能獨立出去,做成一個獨立的APK,然後在原項目中調用改功能就可以了。
 Android成長之路(7)——關於隱式Intent的用法
Android其中最重要的特性之一,就是一個應用可以基於“action”來切換到另一個應用。比如,你的應用想要查找地方,在地圖上顯示。但是不一定要
 Android中Service 全解析
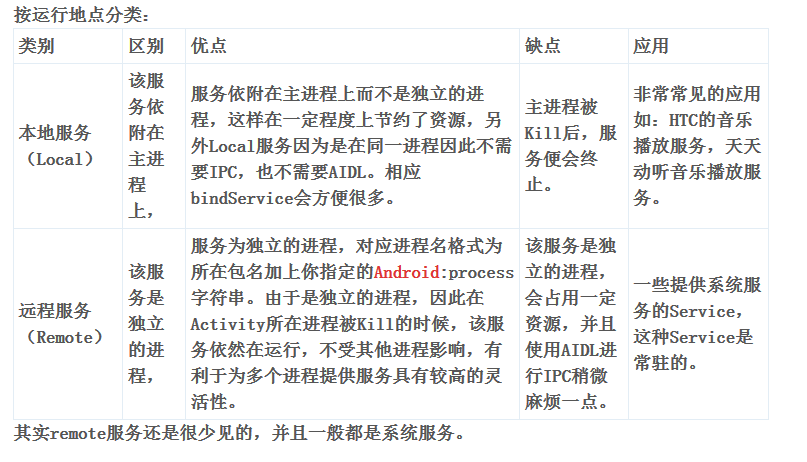
在學習Android四大模塊的時候在service的學習是必須要掌握的,而且個人感覺相當重要!很多場合都有需要的!首先我們看看Service的種類按運行地點分類 以上面三
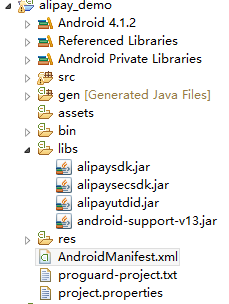 Android支付寶支付
接入流程及說明官方地址:https://doc.open.alipay.com/docs/doc.htm?spm=a219a.7629140.0.0.erBW90&
 Android自定義水平進度條的圓角進度
平時項目中經常用到自定義進度條樣式,我們一般實現的也是下面的第一種,至於第二種的圓角進度,網上介紹的資料也不是很多,這裡一起展示一下這兩種的實現。下面開始看代碼,先從主界