編輯:關於Android編程
由於移動設備物理顯示空間一般有限,不可能一次性的把所有要顯示的內容都顯示在屏幕上。所以各大平台一般會提供一些可滾動的視圖來向用戶展示數據。Android平台框架中為我們提供了諸如ListView、GirdView、ScrollView等滾動視圖控件,這幾個視圖控件也是我們平常使用最多的。下面介紹一下HorizontalScrollView的使用和需要注意的點:
HorizontalScrollView是一個FrameLayout ,這意味著你只能在它下面放置一個子控件,這個子控件可以包含很多數據內容。有可能這個子控件本身就是一個布局控件,可以包含非常多的其他用來展示數據的控件。這個布局控件一般使用的是一個水平布局的LinearLayout 。TextView也是一個可滾動的視圖控件,所以一般不需要HorizontalScrollView
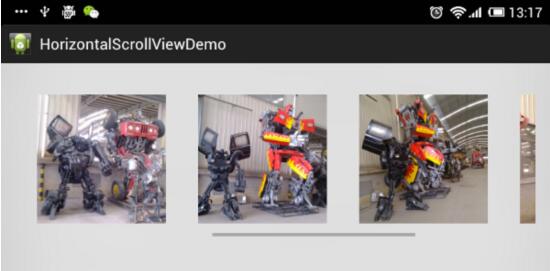
下面介紹一個HorizontalScrollView中包含許多圖片,並且可以滾動浏覽的示例
 @Override
 protected void onCreate(Bundle savedInstanceState) {
  super.onCreate(savedInstanceState);
  setContentView(R.layout. activity_main);

  mLinearLayout = (LinearLayout) findViewById(R.id.mygallery);

  File externalDir = Environment. getExternalStorageDirectory();
  String photosPath = externalDir.getAbsolutePath() + "/test/";
  File photosFile = new File(photosPath);

  for (File photoFile : photosFile.listFiles()) {
    mLinearLayout.addView(getImageView(photoFile.getAbsolutePath()));
  }

}

 private View getImageView(String absolutePath) {

  Bitmap bitmap = decodeBitmapFromFile(absolutePath, 200, 200);
 LinearLayout layout = new LinearLayout(getApplicationContext());
 layout.setLayoutParams( new LayoutParams(250, 250));
 layout.setGravity(Gravity. CENTER);

  ImageView imageView = new ImageView(this);
  imageView.setLayoutParams( new LayoutParams(200,200));
  imageView.setScaleType(ImageView.ScaleType. CENTER_CROP);
  imageView.setImageBitmap(bitmap);
  layout.addView(imageView);

  return layout;
}

 private Bitmap decodeBitmapFromFile(String absolutePath, int reqWidth, int reqHeight) {
 Bitmap bm = null;

  // First decode with inJustDecodeBounds=true to check dimensions
  final BitmapFactory.Options options = new BitmapFactory.Options();
  options. inJustDecodeBounds = true ;
  BitmapFactory. decodeFile(absolutePath, options);

  // Calculate inSampleSize
  options. inSampleSize = calculateInSampleSize(options, reqWidth, reqHeight);

  // Decode bitmap with inSampleSize set
  options. inJustDecodeBounds = false ;
  bm = BitmapFactory. decodeFile(absolutePath, options);

  return bm;
}

 private int calculateInSampleSize(Options options, int reqWidth,
    int reqHeight) {
  // Raw height and width of image
  final int height = options.outHeight;
  final int width = options.outWidth;
  int inSampleSize = 1;

  if (height > reqHeight || width > reqWidth) {
  if (width > height) {
  inSampleSize = Math. round((float)height / ( float)reqHeight);
  } else {
  inSampleSize = Math. round((float)width / ( float)reqWidth);
  }
  }

  return inSampleSize;
}
要顯示的圖片放在外置SDCard中test目錄下,上面的示例程序只是顯示了一張張大圖片的縮略版本,對這方面不懂的可以參看:
Android如何高效顯示較大的Bitmaps
HorizontalScrollView還可以設置滾動到一個指定的位置(x,0),它的子控件也會跟隨著滾動。
new Handler().postDelayed(new Runnable() {
 @Override
 public void run() {
  // 水平直接滾動800px,如果想效果更平滑可以使用smoothScrollTo(int x, int y)
  hsv.scrollTo(800, 0);
 }
}, 2000);
效果圖:
以上就是本文的全部內容,希望對大家學習Android軟件編程有所幫助。
 Anroid ListView分組和懸浮Header實現方法
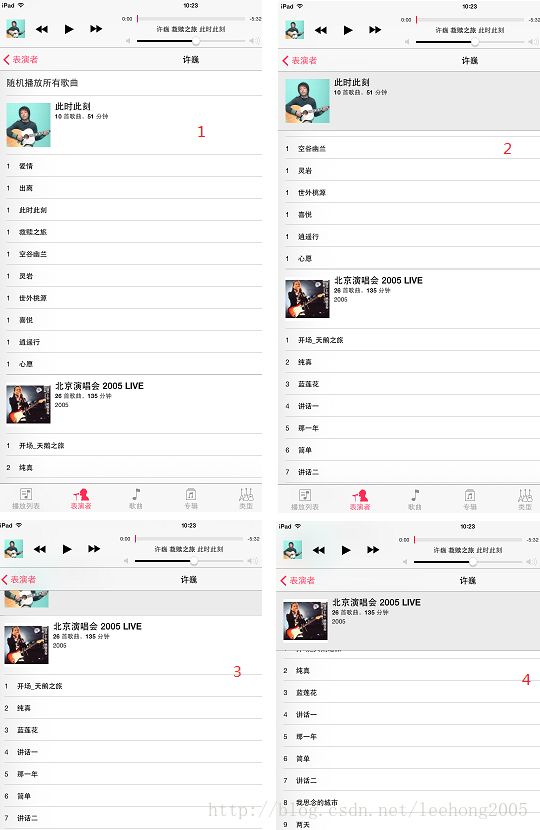
之前在使用iOS時,看到過一種分組的View,每一組都有一個Header,在上下滑動的時候,會有一個懸浮的Header,這種體驗覺得很不錯,請看下圖:上圖中標紅的1,2,
 android-如何在子線程中更新ui
正如我們知道的,android是不讓在子線程中更新ui的。在子線程中更新ui會直接拋出異常Only the original thread that created a
 Android實現圖片上傳功能
最近在開發中,涉及到用戶的意見反饋功能這一方面的開發,需要用戶輸入的文字或者提交的圖片,效果大概類似於微信朋友圈那樣的圖片選擇器,一開始自己找了個用universal-i
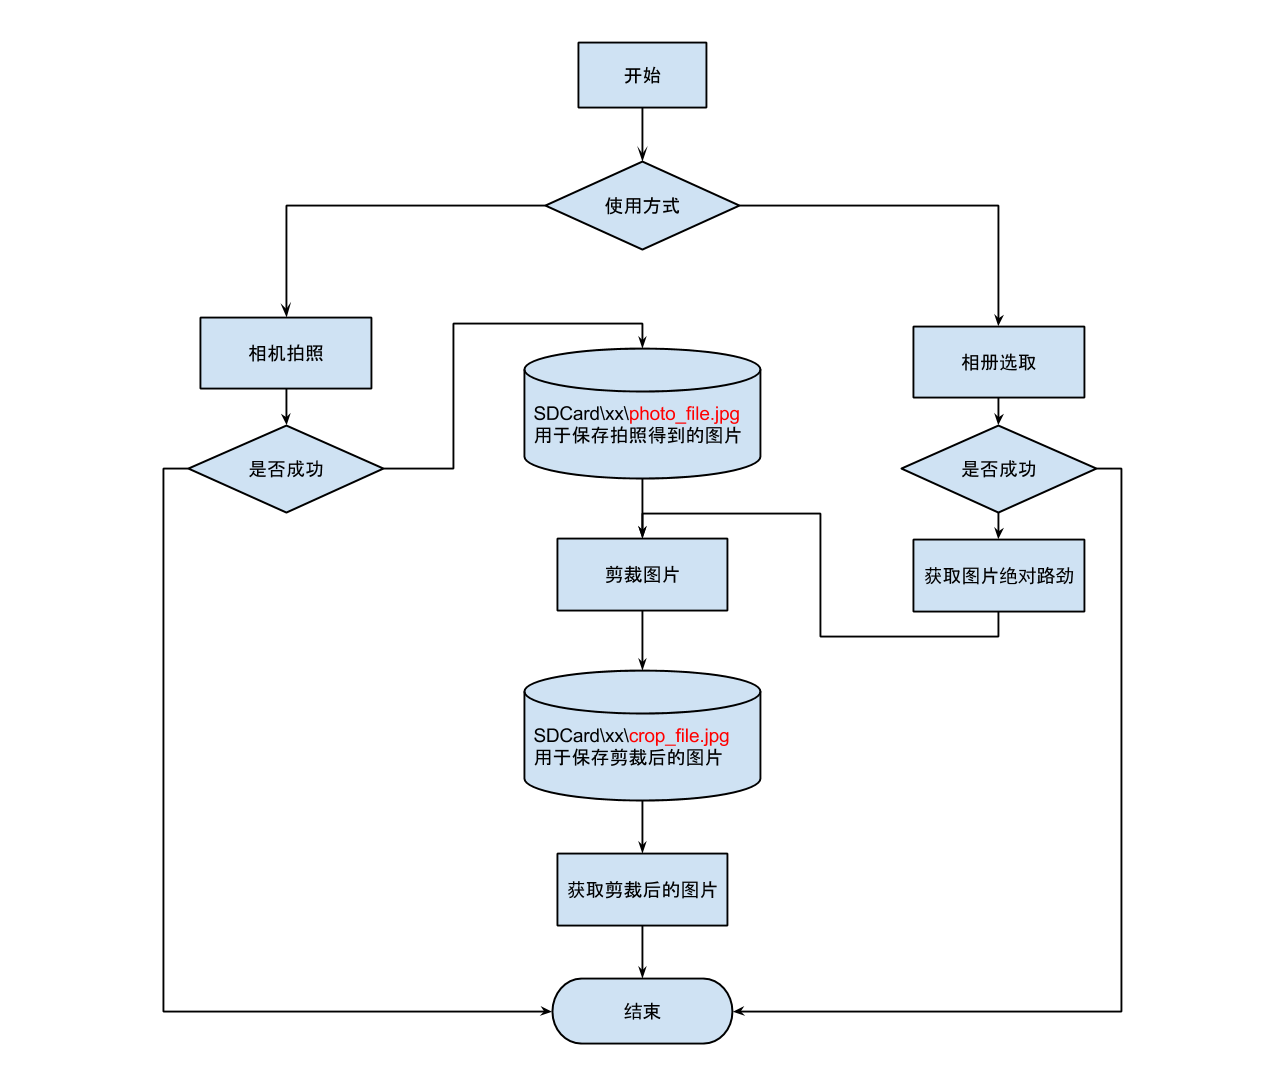 Android實現讀取相機(相冊)圖片並進行剪裁
我們先說一下思路,在android系統中就自帶了圖片剪切的應用,所以,我們只需要將我們獲取到的相片傳給圖片剪切應用,再將剪切好的相片返回到我們自己的界面顯示就ok了在開發