編輯:關於Android編程
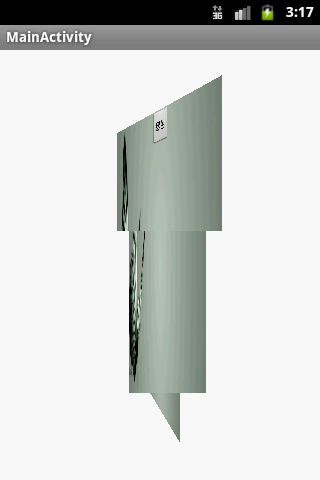
最近做了一個簡單的3D效果翻頁特效,先說說我的思路吧,首先我這個翻頁效果並不是兩個Activity之間的跳轉,而是在同一個activity類切換不同的view而已。我現在的做法是單擊一個button然後Gone當前的布局,然後把需要呈現的布局visible,在隱藏當前布局的時候啟動動畫,然後給動畫添加監聽,在動畫結束時開始另外一個view的入場動畫就行了。
下面來看下我的主頁面的布局文件:
<FrameLayout xmlns:android="http://schemas.android.com/apk/res/android"
 android:id="@+id/container"
 android:layout_width="fill_parent"
 android:layout_height="fill_parent" >

 <include
 android:layout_width="fill_parent"
 android:layout_height="fill_parent"
 layout="@layout/layout2" />

 <include
 android:layout_width="fill_parent"
 android:layout_height="fill_parent"
 layout="@layout/layout1" />

</FrameLayout>
我這個布局文件使用<include>標簽包含了另外2個布局文件,這些布局文件才是呈現數據的,下面是另外2個布局文件:
layout1:
<?xml version="1.0" encoding="utf-8"?>
<LinearLayout xmlns:android="http://schemas.android.com/apk/res/android"
 android:layout_width="match_parent"
 android:layout_height="match_parent"
 android:background="@drawable/test1"
 android:orientation="vertical"
 android:id="@+id/container1"
 >

 <Button
 android:id="@+id/bt_towhile"
 android:layout_width="wrap_content"
 android:layout_height="wrap_content"
 android:layout_gravity="center"
 android:text="白色" />

</LinearLayout>
layout2:
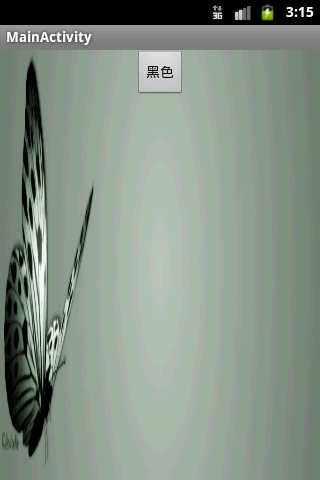
<?xml version="1.0" encoding="utf-8"?>
<LinearLayout xmlns:android="http://schemas.android.com/apk/res/android"
 android:id="@+id/container2"
 android:layout_width="match_parent"
 android:layout_height="match_parent"
 android:background="@drawable/test2"
 android:orientation="vertical" >

 <Button
 android:id="@+id/bt_toblack"
 android:layout_width="wrap_content"
 android:layout_height="wrap_content"
 android:layout_gravity="center"
 android:text="黑色" />

</LinearLayout>
我這裡只是舉個例子並沒有放什麼實際的類容,只是放了2個button,當我點擊其中一個跳轉到另外一個layout。
有了布局文件那我們就開始要實現功能了,我們的想法是點擊按鈕的時候開始一個動畫等動畫結束時再開啟另外一個動畫並隱藏和展示layout1和layout2。
下面是我寫的一個動畫工具類源碼:
package com.test.view;

import android.view.View;
import android.view.ViewGroup;
import android.view.animation.Animation;
import android.view.animation.DecelerateInterpolator;

public class RotateAnimationUtil {

 private ViewGroup context;

 private View[] views;

 public RotateAnimationUtil(ViewGroup context, View... views) {
 super();
 this.context = context;
 this.views = views;
 }

 /**
 * 應用自定義的Rotate3DAnimation動畫
 *
 * @param flag
 *  當前控件的順序坐標
 * @param startDegress
 *  開始的角度
 * @param endDegress
 *  結束的角度
 */
 public void applyRotateAnimation(int flag, float startDegress,
  float endDegress) {
 final float centerX = context.getWidth() / 2.0f;
 final float centerY = context.getHeight() / 2.0f;

 Rotate3DAnimation rotate = new Rotate3DAnimation(startDegress,
  endDegress, centerX, centerY, 310.0f, true);
 rotate.setDuration(1000);
 rotate.setFillAfter(false);
 rotate.setInterpolator(new DecelerateInterpolator());

 rotate.setAnimationListener(new DisplayNextView(flag));
 context.startAnimation(rotate);
 }

 private final class DisplayNextView implements Animation.AnimationListener {

 private final int mFlag;

 private DisplayNextView(int flag) {
  mFlag = flag;
 }

 public void onAnimationStart(Animation animation) {

 }

 // 動畫結束

 public void onAnimationEnd(Animation animation) {
  context.post(new SwapViews(mFlag));
 }

 public void onAnimationRepeat(Animation animation) {

 }
 }

 /**
 * 新開一個線程動畫結束後再開始一次動畫效果實現翻屏特效
 *
 * @author yangzhiqiang
 *
 */
 private final class SwapViews implements Runnable {

 private final int mFlag;

 public SwapViews(int mFlag) {
  this.mFlag = mFlag;
 }

 public void run() {
  final float centerX = context.getWidth() / 2.0f;
  final float centerY = context.getHeight() / 2.0f;
  Rotate3DAnimation rotation;
  if (mFlag > -1) {
  views[0].setVisibility(View.GONE);
  views[1].setVisibility(View.VISIBLE);
  views[1].requestFocus();
  rotation = new Rotate3DAnimation(270, 360, centerX, centerY,
   310.0f, false);
  } else {
  views[1].setVisibility(View.GONE);
  views[0].setVisibility(View.VISIBLE);
  views[0].requestFocus();
  rotation = new Rotate3DAnimation(90, 0, centerX, centerY,
   310.0f, false);
  }
  rotation.setDuration(1000);
  rotation.setFillAfter(false);
  rotation.setInterpolator(new DecelerateInterpolator());
  // 開始動畫
  context.startAnimation(rotation);

 }

 }

}
解釋一下這個類的構造方法:
public RotateAnimationUtil(ViewGroup context, View... views) {
 super();
 this.context = context;
 this.views = views;
 }
有2個參數,第一個參數就是我們的主布局頁面的FrameLayout,第2個參數就是我們要進行動畫切換的2個子layout,我這使用的是一個可變長參數只是為了方便而已。
public void applyRotateAnimation(int flag, float startDegress,float endDegress)方法第一個參數是標記當前是第是從哪個個layout跳轉,因外我們必須知道當前開始跳轉的layout才能推算角度。
下面是我自定義動畫的源碼:
package com.test.view;

import android.graphics.Camera;
import android.graphics.Matrix;
import android.view.animation.Animation;
import android.view.animation.Transformation;

public class Rotate3DAnimation extends Animation {

 private final float mFormDegress;

 private final float mToDegress;

 private final float mCenterX;

 private final float mCenterY;

 /**
 * 控制z軸的一個常量值,主要是控制動畫的升降距離
 */
 private final float mDepthz;

 /**
 * 控制z軸是像上移動還是向下移動,從而實現升降效果
 */
 private final boolean mReverse;

 private Camera mCamera;

 public Rotate3DAnimation(float formDegress, float toDegress, float centerX,
  float centerY, float depthz, boolean reverse) {
 super();
 this.mFormDegress = formDegress;
 this.mToDegress = toDegress;
 this.mCenterX = centerX;
 this.mCenterY = centerY;
 this.mDepthz = depthz;
 this.mReverse = reverse;
 }

 @Override
 public void initialize(int width, int height, int parentWidth,
  int parentHeight) {
 super.initialize(width, height, parentWidth, parentHeight);
 mCamera = new Camera();
 }

 /**
 * interpolatedTime 取值范圍是0-1之間當每次,當動畫啟動後會系統會不停的調用applyTransformation方法,
 * 並改變interpolatedTime的值
 */
 @Override
 protected void applyTransformation(float interpolatedTime, Transformation t) {
 final float formDegress = mFormDegress;
 // 通過差點值計算出轉變的角度
 float degress = formDegress
  + ((mToDegress - formDegress) * interpolatedTime);
 final float centerX = mCenterX;
 final float centerY = mCenterY;
 final Camera camera = mCamera;

 // 得到當前矩陣
 Matrix matrix = t.getMatrix();
 // 報錯當前屏幕的狀態
 camera.save();
 // 判斷是降還是升
 if (mReverse) {
  // 正向改變Z軸角度
  camera.translate(0.0f, 0.0f, mDepthz * interpolatedTime);
 } else {
  // 反向改變Z軸角度
  camera.translate(0.0f, 0.0f, mDepthz * (1.0f - interpolatedTime));
 }
 // 旋轉Y軸角度
 camera.rotateY(degress);
 // 把當前改變後的矩陣信息復制給Transformation的Matrix
 camera.getMatrix(matrix);
 // 根據改變後的矩陣信息從新恢復屏幕
 camera.restore();

 // 讓動畫在屏幕中間運行
 matrix.preTranslate(-centerX, -centerY);
 matrix.postTranslate(centerX, centerY);
 }
}
如果你不需要沉降效果那麼你把下面的代碼刪除掉即可:
if (mReverse) {
  // 正向改變Z軸角度
  camera.translate(0.0f, 0.0f, mDepthz * interpolatedTime);
 } else {
  // 反向改變Z軸角度
  camera.translate(0.0f, 0.0f, mDepthz * (1.0f - interpolatedTime));
 }
好了核心代碼已經上完,下面是主界面代碼:
package com.test.rotateanimation;

import android.app.Activity;
import android.os.Bundle;
import android.view.Menu;
import android.view.View;
import android.view.ViewGroup;
import android.widget.Button;
import android.widget.FrameLayout;
import android.widget.LinearLayout;

import com.test.view.RotateAnimationUtil;

public class MainActivity extends Activity {

 private FrameLayout container;

 private LinearLayout container1;

 private LinearLayout container2;

 private RotateAnimationUtil rotateAnimationUtil;

 private Button bt_towhile;

 private Button bt_toblack;

 @Override
 public void onCreate(Bundle savedInstanceState) {
 super.onCreate(savedInstanceState);
 setContentView(R.layout.activity_main);
 initView();

 bt_towhile.setOnClickListener(new View.OnClickListener() {

  @Override
  public void onClick(View v) {
  rotateAnimationUtil.applyRotateAnimation(1, 0, 90);
  }
 });
 bt_toblack.setOnClickListener(new View.OnClickListener() {

  @Override
  public void onClick(View v) {
  rotateAnimationUtil.applyRotateAnimation(-1, 0, -90);
  }
 });

 // 設置當前View控件的緩存
 container
  .setPersistentDrawingCache(ViewGroup.PERSISTENT_ANIMATION_CACHE);
 }

 private void initView() {
 container = (FrameLayout) findViewById(R.id.container);
 bt_toblack = (Button) findViewById(R.id.bt_toblack);
 bt_towhile = (Button) findViewById(R.id.bt_towhile);

 container1 = (LinearLayout) findViewById(R.id.container1);
 container2 = (LinearLayout) findViewById(R.id.container2);

 rotateAnimationUtil = new RotateAnimationUtil(container, container1,
  container2);
 }

 @Override
 public boolean onCreateOptionsMenu(Menu menu) {
 getMenuInflater().inflate(R.menu.activity_main, menu);
 return true;
 }

}
下面是運行效果,剪切效果不好,呵呵.

源碼下載:http://xiazai.jb51.net/201606/yuanma/RotateAnimation(jb51.net).rar
以上就是本文的全部內容,希望對大家的學習有所幫助,也希望大家多多支持本站。
 自定義控件三部曲之繪圖篇(十六)——給控件添加陰影效果與發光效果
這節我們將學到如下內容:傳統地給按鈕添加陰影的方法如何給已有控件添加陰影如何給圖片添加陰影一、layerlist給按鈕添加陰影效果給控件添加陰影有很多方法,但平常我們給按
 Android拼圖游戲 玩轉從基礎到應用手勢變化
相信大家在小的時候都玩過拼圖游戲,現如今,手機普及,能在手機上玩的游戲越來越多,於是乎,重溫小時候,編寫這個簡易拼圖游戲,而且也能進一步加深Android的一些基礎知識。
 [Cordova] 改進InAppBrowser插件(WebView),讓其(input type=file)支持選擇文件
1、支持幾乎所有安卓版本,從安卓2.x~7.0安卓4.4、4.4.1和4.4.2是無法支持的,因為當時Google說WebView上傳文件不安全,就去掉了。所以這3個版本
 圖文詳解Andorid中用Shape定義GradientDrawable
Android中提供了各種類型的Drawable,也可以用XML定義各種Drawable。本文重點講述如何用XML中的shape節點定義GradientDrawable。