編輯:關於Android編程
本文實例講述了android通知欄的實現方法。分享給大家供大家參考,具體如下:
這幾天一直在修改twigee的源代碼,其中一個要加入的功能是常駐Notification欄,以前寫的時候只能出現 在“通知”這一組中,想把它放在“正在運行”組中卻不知道怎麼放,查了下官方文檔,找到了方法,在notification的flags字段中加一下 “FLAG_ONGOING_EVENT”就可以了。同時我也把Notification的使用方法給總結了一下。詳見下文:
(1)、使用系統定義的Notification
以下是使用示例代碼:
//創建一個NotificationManager的引用
String ns = Context.NOTIFICATION_SERVICE;
NotificationManager mNotificationManager = (NotificationManager)getSystemService(ns);
// 定義Notification的各種屬性
int icon = R.drawable.icon; //通知圖標
CharSequence tickerText = "Hello"; //狀態欄顯示的通知文本提示
long when = System.currentTimeMillis(); //通知產生的時間,會在通知信息裡顯示
//用上面的屬性初始化 Nofification
Notification notification = new Notification(icon,tickerText,when);
/*
* 添加聲音
* notification.defaults |=Notification.DEFAULT_SOUND;
* 或者使用以下幾種方式
* notification.sound = Uri.parse("file:///sdcard/notification/ringer.mp3");
* notification.sound = Uri.withAppendedPath(Audio.Media.INTERNAL_CONTENT_URI, "6");
* 如果想要讓聲音持續重復直到用戶對通知做出反應,則可以在notification的flags字段增加"FLAG_INSISTENT"
* 如果notification的defaults字段包括了"DEFAULT_SOUND"屬性,則這個屬性將覆蓋sound字段中定義的聲音
*/
/*
* 添加振動
* notification.defaults |= Notification.DEFAULT_VIBRATE;
* 或者可以定義自己的振動模式:
* long[] vibrate = {0,100,200,300}; //0毫秒後開始振動,振動100毫秒後停止,再過200毫秒後再次振動300毫秒
* notification.vibrate = vibrate;
* long數組可以定義成想要的任何長度
* 如果notification的defaults字段包括了"DEFAULT_VIBRATE",則這個屬性將覆蓋vibrate字段中定義的振動
*/
/*
* 添加LED燈提醒
* notification.defaults |= Notification.DEFAULT_LIGHTS;
* 或者可以自己的LED提醒模式:
* notification.ledARGB = 0xff00ff00;
* notification.ledOnMS = 300; //亮的時間
* notification.ledOffMS = 1000; //滅的時間
* notification.flags |= Notification.FLAG_SHOW_LIGHTS;
*/
/*
* 更多的特征屬性
* notification.flags |= FLAG_AUTO_CANCEL; //在通知欄上點擊此通知後自動清除此通知
* notification.flags |= FLAG_INSISTENT; //重復發出聲音,直到用戶響應此通知
* notification.flags |= FLAG_ONGOING_EVENT; //將此通知放到通知欄的"Ongoing"即"正在運行"組中
* notification.flags |= FLAG_NO_CLEAR; //表明在點擊了通知欄中的"清除通知"後,此通知不清除,
* //經常與FLAG_ONGOING_EVENT一起使用
* notification.number = 1; //number字段表示此通知代表的當前事件數量,它將覆蓋在狀態欄圖標的頂部
* //如果要使用此字段,必須從1開始
* notification.iconLevel = ; //
*/
//設置通知的事件消息
Context context = getApplicationContext(); //上下文
CharSequence contentTitle = "My Notification"; //通知欄標題
CharSequence contentText = "Hello World!"; //通知欄內容
Intent notificationIntent = new Intent(this,Main.class); //點擊該通知後要跳轉的Activity
PendingIntent contentIntent = PendingIntent.getActivity(this,0,notificationIntent,0);
notification.setLatestEventInfo(context, contentTitle, contentText, contentIntent);
//把Notification傳遞給 NotificationManager
mNotificationManager.notify(0,notification);
如果想要更新一個通知,只需要在設置好notification之後,再次調用 setLatestEventInfo(),然後重新發送一次通知即可,即再次調用notify()。
(2)、使用自定義的 Notification
要 創建一個自定義的Notification,可以使用RemoteViews。要定義自己的擴展消息,首先 要初始化一個RemoteViews對象,然後將它傳遞給Notification的contentView字段,再把PendingIntent傳遞給 contentIntent字段。以下示例代碼是完整步驟:
1、創建一個自 定義的消息布局 view.xml
<?xml version="1.0" encoding="utf-8"?>
<LinearLayout xmlns:android="http://schemas.android.com/apk/res/android"
android:layout_width="fill_parent" android:layout_height="fill_parent">
<ImageView android:id="@+id/image" android:layout_width="wrap_content"
android:layout_height="fill_parent" android:layout_marginRight="10dp" />
<TextView android:id="@+id/text" android:layout_width="wrap_content"
android:layout_height="fill_parent" android:textColor="#000" />
</LinearLayout>
2、 在程序代碼中使用RemoteViews的方法來定義image和text。然後把RemoteViews對象傳到contentView字段
RemoteViews contentView = new RemoteViews(getPackageName(),R.layout.view);
contentView.setImageViewResource(R.id.image,R.drawable.icon);
contentView.setTextViewText(R.id.text,”Hello,this message is in a custom expanded view”);
notification.contentView = contentView;
3、 為Notification的contentIntent字段定義一個Intent(注意,使用自定義View不需要 setLatestEventInfo()方法)
Intent notificationIntent = new Intent(this,Main.class);
PendingIntent contentIntent = PendingIntent.getActivity(this,0,notificationIntent,0);
notification.contentIntent = contentIntent;
4、發送通知
mNotificationManager.notify(2,notification);
以下是全部示例代碼:
//創建一個 NotificationManager的引用
String ns = Context.NOTIFICATION_SERVICE;
NotificationManager mNotificationManager = (NotificationManager)getSystemService(ns);
// 定義Notification的各種屬性
int icon = R.drawable.icon; //通知圖標
CharSequence tickerText = "Hello"; //狀態欄顯示的通知文本提示
long when = System.currentTimeMillis(); //通知產生的時間,會在通知信息裡顯示
//用上面的屬性初始化 Nofification
Notification notification = new Notification(icon,tickerText,when);
RemoteViews contentView = new RemoteViews(getPackageName(),R.layout.view);
contentView.setImageViewResource(R.id.image, R.drawable.iconempty);
contentView.setTextViewText(R.id.text, "Hello,this is JC");
notification.contentView = contentView;
Intent notificationIntent = new Intent(this,Main.class);
PendingIntent contentIntent = PendingIntent.getActivity(this,0,notificationIntent,0);
notification.contentIntent = contentIntent;
//把Notification傳遞給NotificationManager
mNotificationManager.notify(0,notification);
更多關於Android相關內容感興趣的讀者可查看本站專題:《Android開發入門與進階教程》、《Android調試技巧與常見問題解決方法匯總》、《Android多媒體操作技巧匯總(音頻,視頻,錄音等)》、《Android基本組件用法總結》、《Android視圖View技巧總結》、《Android布局layout技巧總結》及《Android控件用法總結》
希望本文所述對大家Android程序設計有所幫助。
 Android性能優化之Bitmap的內存優化
1、BitmapFactory解析Bitmap的原理BitmapFactory提供的解析Bitmap的靜態工廠方法有以下五種:Bitmap decodeFile(...)
 華為p9怎麼隱藏導航欄
華為p9怎麼隱藏導航欄?華為p9隱藏導航欄方法是什麼?華為p9是華為今年推出的一款高端機,華為p9有許多方便好用的功能,比如你可以隱藏手機導航欄,那麼華為p
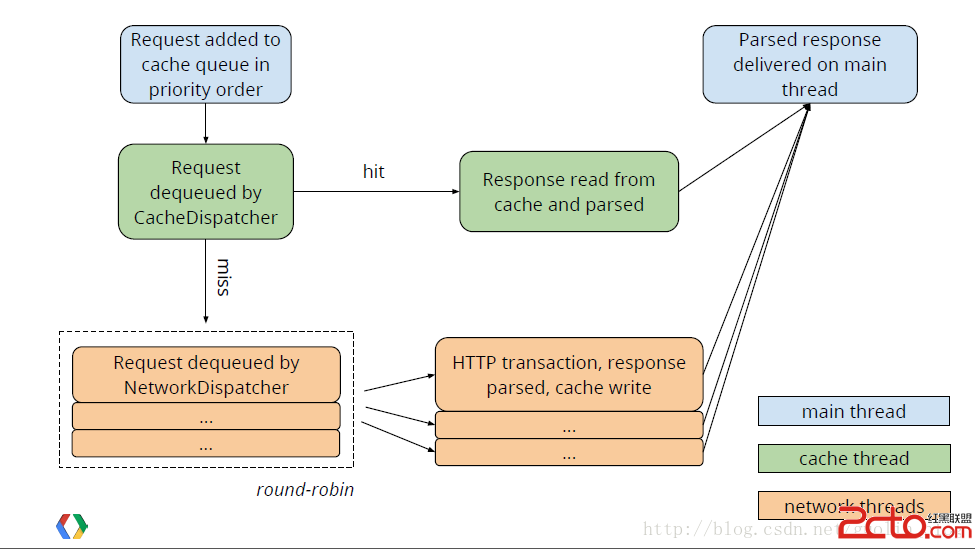 Android:Volley源碼解析
簡單實例Volley是一個封裝HttpUrlConnection和HttpClient的網絡通信框架,集AsyncHttpClient和Universal-Image-L
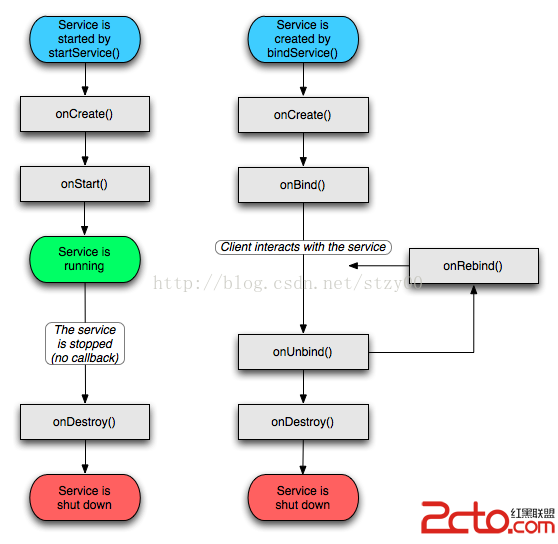 android四大組件之Service和子類IntentService
四大組件中, Service跟Activity的生命周期非常類似,它也是可執行的.甚至可看做是沒有界面的Activity, 因為它的運行,用戶並不會像Act