編輯:關於Android編程
在前面幾篇文章中,我們詳細介紹了Android系統進程間通信機制Binder的原理,並且深入分析了系統提供的Binder運行庫和驅動程序的源代碼。細心的讀者會發現,這幾篇文章分析的Binder接口都是基於C/C++語言來實現的,但是我們在編寫應用程序都是基於Java語言的,那麼,我們如何使用Java語言來使用系統的Binder機制來進行進程間通信呢?這就是本文要介紹的Android系統應用程序框架層的用Java語言來實現的Binder接口了。
熟悉Android系統的讀者,應該能想到應用程序框架中的基於Java語言的Binder接口是通過JNI來調用基於C/C++語言的Binder運行庫來為Java應用程序提供進程間通信服務的了。JNI在Android系統中用得相當普遍,SDK中的Java接口API很多只是簡單地通過JNI來調用底層的C/C++運行庫從而為應用程序服務的。
這裡,我們仍然是通過具體的例子來說明Binder機制在應用程序框架層中的Java接口,主要就是Service Manager、Server和Client這三個角色的實現了。通常,在應用程序中,我們都是把Server實現為Service的形式,並且通過IServiceManager.addService接口來把這個Service添加到Service Manager,Client也是通過IServiceManager.getService接口來獲得Service接口,接著就可以使用這個Service提供的功能了,這個與運行時庫的Binder接口是一致的。
前面我們學習Android硬件抽象層時,曾經在應用程序框架層中提供了一個硬件訪問服務HelloService,這個Service運行在一個獨立的進程中充當Server的角色,使用這個Service的Client運行在另一個進程中,它們之間就是通過Binder機制來通信的了。這裡,我們就使用HelloService這個例子來分析Android系統進程間通信Binder機制在應用程序框架層的Java接口源代碼。所以希望讀者在閱讀下面的內容之前,先了解一下前面在Ubuntu上為Android系統的Application Frameworks層增加硬件訪問服務這篇文章。
這篇文章通過五個情景來學習Android系統進程間通信Binder機制在應用程序框架層的Java接口:1. 獲取Service Manager的Java遠程接口的過程;2. HelloService接口的定義;3. HelloService的啟動過程;4. Client獲取HelloService的Java遠程接口的過程;5. Client通過HelloService的Java遠程接口來使用HelloService提供的服務的過程。
一. 獲取Service Manager的Java遠程接口
我們要獲取的Service Manager的Java遠程接口是一個ServiceManagerProxy對象的IServiceManager接口。我們現在就來看看ServiceManagerProxy類是長什麼樣子的:

這裡可以看出,ServiceManagerProxy類實現了IServiceManager接口,IServiceManager提供了getService和addService兩個成員函數來管理系統中的Service。從ServiceManagerProxy類的構造函數可以看出,它需要一個BinderProxy對象的IBinder接口來作為參數。因此,要獲取Service Manager的Java遠程接口ServiceManagerProxy,首先要有一個BinderProxy對象。下面將會看到這個BinderProxy對象是如何獲得的。
再來看一下是通過什麼路徑來獲取Service Manager的Java遠程接口ServiceManagerProxy的。這個主角就是ServiceManager了,我們也先看一下ServiceManager是長什麼樣子的:

ServiceManager類有一個靜態成員函數getIServiceManager,它的作用就是用來獲取Service Manager的Java遠程接口了,而這個函數又是通過ServiceManagerNative來獲取Service Manager的Java遠程接口的。
接下來,我們就看一下ServiceManager.getIServiceManager這個函數的實現,這個函數定義在frameworks/base/core/java/android/os/ServiceManager.java文件中:
public final class ServiceManager {
  ......
  private static IServiceManager sServiceManager;
  ......
  private static IServiceManager getIServiceManager() {
    if (sServiceManager != null) {
      return sServiceManager;
    }

    // Find the service manager
    sServiceManager = ServiceManagerNative.asInterface(BinderInternal.getContextObject());
    return sServiceManager;
  }
  ......
}
如果其靜態成員變量sServiceManager尚未創建,那麼就調用ServiceManagerNative.asInterface函數來創建。在調用ServiceManagerNative.asInterface函數之前,首先要通過BinderInternal.getContextObject函數來獲得一個BinderProxy對象。
我們來看一下BinderInternal.getContextObject的實現,這個函數定義在frameworks/base/core/java/com/android/internal/os/BinderInternal.java文件中:
public class BinderInternal {
  ......
  /**
  * Return the global "context object" of the system. This is usually
  * an implementation of IServiceManager, which you can use to find
  * other services.
  */
  public static final native IBinder getContextObject();

  ......
}
這裡可以看出,BinderInternal.getContextObject是一個JNI方法,它實現在frameworks/base/core/jni/android_util_Binder.cpp文件中:
static jobject android_os_BinderInternal_getContextObject(JNIEnv* env, jobject clazz)
{
  sp<IBinder> b = ProcessState::self()->getContextObject(NULL);
  return javaObjectForIBinder(env, b);
}
這裡看到我們熟悉的ProcessState::self()->getContextObject函數,具體可以參考淺談Android系統進程間通信(IPC)機制Binder中的Server和Client獲得Service Manager接口之路一文。ProcessState::self()->getContextObject函數返回一個BpBinder對象,它的句柄值是0,即下面語句:
sp<IBinder> b = ProcessState::self()->getContextObject(NULL);
相當於是:
sp<IBinder> b = new BpBinder(0);
接著調用javaObjectForIBinder把這個BpBinder對象轉換成一個BinderProxy對象:
jobject javaObjectForIBinder(JNIEnv* env, const sp<IBinder>& val)
{
  if (val == NULL) return NULL;

  if (val->checkSubclass(&gBinderOffsets)) {
    // One of our own!
    jobject object = static_cast<JavaBBinder*>(val.get())->object();
    //printf("objectForBinder %p: it's our own %p!\n", val.get(), object);
    return object;
  }

  // For the rest of the function we will hold this lock, to serialize
  // looking/creation of Java proxies for native Binder proxies.
  AutoMutex _l(mProxyLock);

  // Someone else's... do we know about it?
  jobject object = (jobject)val->findObject(&gBinderProxyOffsets);
  if (object != NULL) {
    jobject res = env->CallObjectMethod(object, gWeakReferenceOffsets.mGet);
    if (res != NULL) {
      LOGV("objectForBinder %p: found existing %p!\n", val.get(), res);
      return res;
    }
    LOGV("Proxy object %p of IBinder %p no longer in working set!!!", object, val.get());
    android_atomic_dec(&gNumProxyRefs);
    val->detachObject(&gBinderProxyOffsets);
    env->DeleteGlobalRef(object);
  }

  object = env->NewObject(gBinderProxyOffsets.mClass, gBinderProxyOffsets.mConstructor);
  if (object != NULL) {
    LOGV("objectForBinder %p: created new %p!\n", val.get(), object);
    // The proxy holds a reference to the native object.
    env->SetIntField(object, gBinderProxyOffsets.mObject, (int)val.get());
    val->incStrong(object);

    // The native object needs to hold a weak reference back to the
    // proxy, so we can retrieve the same proxy if it is still active.
    jobject refObject = env->NewGlobalRef(
        env->GetObjectField(object, gBinderProxyOffsets.mSelf));
    val->attachObject(&gBinderProxyOffsets, refObject,
        jnienv_to_javavm(env), proxy_cleanup);

    // Note that a new object reference has been created.
    android_atomic_inc(&gNumProxyRefs);
    incRefsCreated(env);
  }

  return object;
}
在介紹這個函數之前,先來看兩個變量gBinderOffsets和gBinderProxyOffsets的定義。
先看gBinderOffsets的定義:
static struct bindernative_offsets_t
{
  // Class state.
  jclass mClass;
  jmethodID mExecTransact;

  // Object state.
  jfieldID mObject;

} gBinderOffsets;
簡單來說,gBinderOffsets變量是用來記錄上面第二個類圖中的Binder類的相關信息的,它是在注冊Binder類的JNI方法的int_register_android_os_Binder函數初始化的:
const char* const kBinderPathName = "android/os/Binder";

static int int_register_android_os_Binder(JNIEnv* env)
{
  jclass clazz;

  clazz = env->FindClass(kBinderPathName);
  LOG_FATAL_IF(clazz == NULL, "Unable to find class android.os.Binder");

  gBinderOffsets.mClass = (jclass) env->NewGlobalRef(clazz);
  gBinderOffsets.mExecTransact
    = env->GetMethodID(clazz, "execTransact", "(IIII)Z");
  assert(gBinderOffsets.mExecTransact);

  gBinderOffsets.mObject
    = env->GetFieldID(clazz, "mObject", "I");
  assert(gBinderOffsets.mObject);

  return AndroidRuntime::registerNativeMethods(
    env, kBinderPathName,
    gBinderMethods, NELEM(gBinderMethods));
}
再來看gBinderProxyOffsets的定義:
static struct binderproxy_offsets_t
{
  // Class state.
  jclass mClass;
  jmethodID mConstructor;
  jmethodID mSendDeathNotice;

  // Object state.
  jfieldID mObject;
  jfieldID mSelf;

} gBinderProxyOffsets;
簡單來說,gBinderProxyOffsets是用來變量是用來記錄上面第一個圖中的BinderProxy類的相關信息的,它是在注冊BinderProxy類的JNI方法的int_register_android_os_BinderProxy函數初始化的:
const char* const kBinderProxyPathName = "android/os/BinderProxy";

static int int_register_android_os_BinderProxy(JNIEnv* env)
{
  jclass clazz;

  clazz = env->FindClass("java/lang/ref/WeakReference");
  LOG_FATAL_IF(clazz == NULL, "Unable to find class java.lang.ref.WeakReference");
  gWeakReferenceOffsets.mClass = (jclass) env->NewGlobalRef(clazz);
  gWeakReferenceOffsets.mGet
    = env->GetMethodID(clazz, "get", "()Ljava/lang/Object;");
  assert(gWeakReferenceOffsets.mGet);

  clazz = env->FindClass("java/lang/Error");
  LOG_FATAL_IF(clazz == NULL, "Unable to find class java.lang.Error");
  gErrorOffsets.mClass = (jclass) env->NewGlobalRef(clazz);

  clazz = env->FindClass(kBinderProxyPathName);
  LOG_FATAL_IF(clazz == NULL, "Unable to find class android.os.BinderProxy");

  gBinderProxyOffsets.mClass = (jclass) env->NewGlobalRef(clazz);
  gBinderProxyOffsets.mConstructor
    = env->GetMethodID(clazz, "<init>", "()V");
  assert(gBinderProxyOffsets.mConstructor);
  gBinderProxyOffsets.mSendDeathNotice
    = env->GetStaticMethodID(clazz, "sendDeathNotice", "(Landroid/os/IBinder$DeathRecipient;)V");
  assert(gBinderProxyOffsets.mSendDeathNotice);

  gBinderProxyOffsets.mObject
    = env->GetFieldID(clazz, "mObject", "I");
  assert(gBinderProxyOffsets.mObject);
  gBinderProxyOffsets.mSelf
    = env->GetFieldID(clazz, "mSelf", "Ljava/lang/ref/WeakReference;");
  assert(gBinderProxyOffsets.mSelf);

  return AndroidRuntime::registerNativeMethods(
    env, kBinderProxyPathName,
    gBinderProxyMethods, NELEM(gBinderProxyMethods));
}
回到前面的javaObjectForIBinder函數中,下面這段代碼:
if (val->checkSubclass(&gBinderOffsets)) {
  // One of our own!
  jobject object = static_cast<JavaBBinder*>(val.get())->object();
  //printf("objectForBinder %p: it's our own %p!\n", val.get(), object);
  return object;
}
前面說過,這裡傳進來的參數是一個BpBinder的指針,而BpBinder::checkSubclass繼承於父類IBinder::checkSubclass,它什麼也不做就返回false。
於是函數繼續往下執行:
jobject object = (jobject)val->findObject(&gBinderProxyOffsets);
由於這個BpBinder對象是第一創建,它裡面什麼對象也沒有,因此,這裡返回的object為NULL。
於是函數又繼續往下執行:
object = env->NewObject(gBinderProxyOffsets.mClass, gBinderProxyOffsets.mConstructor);
這裡,就創建了一個BinderProxy對象了。創建了之後,要把這個BpBinder對象和這個BinderProxy對象關聯起來:
env->SetIntField(object, gBinderProxyOffsets.mObject, (int)val.get());
就是通過BinderProxy.mObject成員變量來關聯的了,BinderProxy.mObject成員變量記錄了這個BpBinder對象的地址。
接下去,還要把它放到BpBinder裡面去,下次就要使用時,就可以在上一步調用BpBinder::findObj把它找回來了:
val->attachObject(&gBinderProxyOffsets, refObject,
jnienv_to_javavm(env), proxy_cleanup);
最後,就把這個BinderProxy返回到android_os_BinderInternal_getContextObject函數,最終返回到最開始的ServiceManager.getIServiceManager函數中來了,於是,我們就獲得一個BinderProxy對象了。
回到ServiceManager.getIServiceManager中,從下面語句返回:
sServiceManager = ServiceManagerNative.asInterface(BinderInternal.getContextObject());
相當於是:
sServiceManager = ServiceManagerNative.asInterface(new BinderProxy());
接下去就是調用ServiceManagerNative.asInterface函數了,這個函數定義在frameworks/base/core/java/android/os/ServiceManagerNative.java文件中:
public abstract class ServiceManagerNative ......
{
  ......
  static public IServiceManager asInterface(IBinder obj)
  {
    if (obj == null) {
      return null;
    }
    IServiceManager in =
      (IServiceManager)obj.queryLocalInterface(descriptor);
    if (in != null) {
      return in;
    }

    return new ServiceManagerProxy(obj);
  }
  ......
}
這裡的參數obj是一個BinderProxy對象,它的queryLocalInterface函數返回null。因此,最終以這個BinderProxy對象為參數創建一個ServiceManagerProxy對象。
返回到ServiceManager.getIServiceManager中,從下面語句返回:
sServiceManager = ServiceManagerNative.asInterface(new BinderProxy());
就相當於是:
sServiceManager = new ServiceManagerProxy(new BinderProxy());
於是,我們的目標終於完成了。
總結一下,就是在Java層,我們擁有了一個Service Manager遠程接口ServiceManagerProxy,而這個ServiceManagerProxy對象在JNI層有一個句柄值為0的BpBinder對象與之通過gBinderProxyOffsets關聯起來。
這樣獲取Service Manager的Java遠程接口的過程就完成了。
二. HelloService接口的定義
前面我們在學習Android系統的硬件抽象層(HAL)時,在在Ubuntu上為Android系統的Application Frameworks層增加硬件訪問服務這篇文章中,我們編寫了一個硬件服務HelloService,它的服務接口定義在frameworks/base/core/java/android/os/IHelloService.aidl文件中:
package android.os;

interface IHelloService
{
  void setVal(int val);
  int getVal();
}
這個服務接口很簡單,只有兩個函數,分別用來讀寫硬件寄存器。
注意,這是一個aidl文件,編譯後會生成一個IHelloService.java。我們來看一下這個文件的內容隱藏著什麼奧秘,可以這麼神奇地支持進程間通信。
/*
 * This file is auto-generated. DO NOT MODIFY.
 * Original file: frameworks/base/core/java/android/os/IHelloService.aidl
 */
package android.os;
public interface IHelloService extends android.os.IInterface
{
  /** Local-side IPC implementation stub class. */
  public static abstract class Stub extends android.os.Binder implements android.os.IHelloService
  {
    private static final java.lang.String DESCRIPTOR = "android.os.IHelloService";
    /** Construct the stub at attach it to the interface. */
    public Stub()
    {
      this.attachInterface(this, DESCRIPTOR);
    }

    /**
    * Cast an IBinder object into an android.os.IHelloService interface,
    * generating a proxy if needed.
    */
    public static android.os.IHelloService asInterface(android.os.IBinder obj)
    {
      if ((obj==null)) {
        return null;
      }
      android.os.IInterface iin = (android.os.IInterface)obj.queryLocalInterface(DESCRIPTOR);
      if (((iin!=null)&&(iin instanceof android.os.IHelloService))) {
        return ((android.os.IHelloService)iin);
      }
      return new android.os.IHelloService.Stub.Proxy(obj);
    }

    public android.os.IBinder asBinder()
    {
      return this;
    }

    @Override
    public boolean onTransact(int code, android.os.Parcel data, android.os.Parcel reply, int flags) throws android.os.RemoteException
    {
      switch (code)
      {
        case INTERFACE_TRANSACTION:
        {
          reply.writeString(DESCRIPTOR);
          return true;
        }
        case TRANSACTION_setVal:
        {
          data.enforceInterface(DESCRIPTOR);
          int _arg0;
          _arg0 = data.readInt();
          this.setVal(_arg0);
          reply.writeNoException();
          return true;
        }
        case TRANSACTION_getVal:
        {
          data.enforceInterface(DESCRIPTOR);
          int _result = this.getVal();
          reply.writeNoException();
          reply.writeInt(_result);
          return true;
        }
      }
      return super.onTransact(code, data, reply, flags);
    }

    private static class Proxy implements android.os.IHelloService
    {
      private android.os.IBinder mRemote;

      Proxy(android.os.IBinder remote)
      {
        mRemote = remote;
      }

      public android.os.IBinder asBinder()
      {
        return mRemote;
      }

      public java.lang.String getInterfaceDescriptor()
      {
        return DESCRIPTOR;
      }

      public void setVal(int val) throws android.os.RemoteException
      {
        android.os.Parcel _data = android.os.Parcel.obtain();
        android.os.Parcel _reply = android.os.Parcel.obtain();
        try {
          _data.writeInterfaceToken(DESCRIPTOR);
          _data.writeInt(val);
          mRemote.transact(Stub.TRANSACTION_setVal, _data, _reply, 0);
          _reply.readException();
        }
        finally {
          _reply.recycle();
          _data.recycle();
        }
      }

      public int getVal() throws android.os.RemoteException
      {
        android.os.Parcel _data = android.os.Parcel.obtain();
        android.os.Parcel _reply = android.os.Parcel.obtain();
        int _result;
        try {
          _data.writeInterfaceToken(DESCRIPTOR);
          mRemote.transact(Stub.TRANSACTION_getVal, _data, _reply, 0);
          _reply.readException();
          _result = _reply.readInt();
        }
        finally {
          _reply.recycle();
          _data.recycle();
        }
        return _result;
      }
    }

    static final int TRANSACTION_setVal = (android.os.IBinder.FIRST_CALL_TRANSACTION + 0);
    static final int TRANSACTION_getVal = (android.os.IBinder.FIRST_CALL_TRANSACTION + 1);
  }

  public void setVal(int val) throws android.os.RemoteException;
  public int getVal() throws android.os.RemoteException;
}
這裡我們可以看到IHelloService.aidl這個文件編譯後的真面目,原來就是根據IHelloService接口的定義生成相應的Stub和Proxy類,這個就是我們熟悉的Binder機制的內容了,即實現這個HelloService的Server必須繼續於這裡的IHelloService.Stub類,而這個HelloService的遠程接口就是這裡的IHelloService.Stub.Proxy對象獲得的IHelloService接口。接下來的內容,我們就可以看到IHelloService.Stub和IHelloService.Stub.Proxy是怎麼創建或者使用的。
三. HelloService的啟動過程
在討論HelloService的啟動過程之前,我們先來看一下實現HelloService接口的Server是怎麼定義的。
回憶在Ubuntu上為Android系統的Application Frameworks層增加硬件訪問服務一文,我們在frameworks/base/services/java/com/android/server目錄下新增了一個HelloService.java文件:
package com.android.server;

import android.content.Context;
import android.os.IHelloService;
import android.util.Slog;

public class HelloService extends IHelloService.Stub {
  private static final String TAG = "HelloService";

  HelloService() {
    init_native();
  }

  public void setVal(int val) {
    setVal_native(val);
  }

  public int getVal() {
    return getVal_native();
  }

  private static native boolean init_native();
    private static native void setVal_native(int val);
  private static native int getVal_native();
}
這裡,我們可以看到,HelloService繼續了IHelloService.Stub類,它通過本地方法調用實現了getVal和setVal兩個函數。我們不關心這兩個函數的具體實現,有興趣的讀者可以參考在Ubuntu上為Android系統的Application Frameworks層增加硬件訪問服務一文。
有了HelloService這個Server類後,下一步就是考慮怎麼樣把它啟動起來了。在frameworks/base/services/java/com/android/server/SystemServer.java文件中,定義了SystemServer類。SystemServer對象是在系統啟動的時候創建的,它被創建的時候會啟動一個線程來創建HelloService,並且把它添加到Service Manager中去。
我們來看一下這部份的代碼:
class ServerThread extends Thread {
  ......

  @Override
  public void run() {

    ......

    Looper.prepare();

    ......

    try {
      Slog.i(TAG, "Hello Service");
      ServiceManager.addService("hello", new HelloService());
    } catch (Throwable e) {
      Slog.e(TAG, "Failure starting Hello Service", e);
    }

    ......

    Looper.loop();

    ......
  }
}

......

public class SystemServer
{
  ......

  /**
  * This method is called from Zygote to initialize the system. This will cause the native
  * services (SurfaceFlinger, AudioFlinger, etc..) to be started. After that it will call back
  * up into init2() to start the Android services.
  */
  native public static void init1(String[] args);

  ......

  public static final void init2() {
    Slog.i(TAG, "Entered the Android system server!");
    Thread thr = new ServerThread();
    thr.setName("android.server.ServerThread");
    thr.start();
  }
  ......
}
這裡,我們可以看到,在ServerThread.run函數中,執行了下面代碼把HelloService添加到Service Manager中去。這裡我們關注把HelloService添加到Service Manager中去的代碼:
try {
  Slog.i(TAG, "Hello Service");
  ServiceManager.addService("hello", new HelloService());
} catch (Throwable e) {
  Slog.e(TAG, "Failure starting Hello Service", e);
}
通過調用ServiceManager.addService把一個HelloService實例添加到Service Manager中去。
我們先來看一下HelloService的創建過程:
new HelloService();
這個語句會調用HelloService類的構造函數,而HelloService類繼承於IHelloService.Stub類,IHelloService.Stub類又繼承了Binder類,因此,最後會調用Binder類的構造函數:
public class Binder implements IBinder {
  ......

  private int mObject;

  ......


  public Binder() {
    init();
    ......
  }


  private native final void init();


  ......
}
這裡調用了一個JNI方法init來初始化這個Binder對象,這個JNI方法定義在frameworks/base/core/jni/android_util_Binder.cpp文件中:
static void android_os_Binder_init(JNIEnv* env, jobject clazz)
{
  JavaBBinderHolder* jbh = new JavaBBinderHolder(env, clazz);
  if (jbh == NULL) {
    jniThrowException(env, "java/lang/OutOfMemoryError", NULL);
    return;
  }
  LOGV("Java Binder %p: acquiring first ref on holder %p", clazz, jbh);
  jbh->incStrong(clazz);
  env->SetIntField(clazz, gBinderOffsets.mObject, (int)jbh);
}
它實際上只做了一件事情,就是創建一個JavaBBinderHolder對象jbh,然後把這個對象的地址保存在上面的Binder類的mObject成員變量中,後面我們會用到。
回到ServerThread.run函數中,我們再來看一下ServiceManager.addService函數的實現:
public final class ServiceManager {
  ......

  private static IServiceManager sServiceManager;

  ......

  public static void addService(String name, IBinder service) {
    try {
      getIServiceManager().addService(name, service);
    } catch (RemoteException e) {
      Log.e(TAG, "error in addService", e);
    }
  }

  ......

}
這裡的getIServiceManager函數我們在前面已經分析過了,它返回的是一個ServiceManagerProxy對象的IServiceManager接口。因此,我們進入到ServiceManagerProxy.addService中去看看:
class ServiceManagerProxy implements IServiceManager {
  public ServiceManagerProxy(IBinder remote) {
    mRemote = remote;
  }

  ......

  public void addService(String name, IBinder service)
    throws RemoteException {
      Parcel data = Parcel.obtain();
      Parcel reply = Parcel.obtain();
      data.writeInterfaceToken(IServiceManager.descriptor);
      data.writeString(name);
      data.writeStrongBinder(service);
      mRemote.transact(ADD_SERVICE_TRANSACTION, data, reply, 0);
      reply.recycle();
      data.recycle();
  }

  ......

  private IBinder mRemote;
}
這裡的Parcel類是用Java來實現的,它跟我們前面幾篇文章介紹Binder機制時提到的用C++實現的Parcel類的作用是一樣的,即用來在兩個進程之間傳遞數據。
這裡我們關注是如何把參數service寫到data這個Parcel對象中去的:
data.writeStrongBinder(service);
我們來看看Parcel.writeStrongBinder函數的實現:
public final class Parcel {
  ......

  /**
  * Write an object into the parcel at the current dataPosition(),
  * growing dataCapacity() if needed.
  */
  public final native void writeStrongBinder(IBinder val);

  ......
}
這裡的writeStrongBinder函數又是一個JNI方法,它定義在frameworks/base/core/jni/android_util_Binder.cpp文件中:
static void android_os_Parcel_writeStrongBinder(JNIEnv* env, jobject clazz, jobject object)
{
  Parcel* parcel = parcelForJavaObject(env, clazz);
  if (parcel != NULL) {
    const status_t err = parcel->writeStrongBinder(ibinderForJavaObject(env, object));
    if (err != NO_ERROR) {
      jniThrowException(env, "java/lang/OutOfMemoryError", NULL);
    }
  }
}
這裡的clazz參數是一個Java語言實現的Parcel對象,通過parcelForJavaObject把它轉換成C++語言實現的Parcel對象。這個函數的實現我們就不看了,有興趣的讀者可以研究一下,這個函數也是實現在frameworks/base/core/jni/android_util_Binder.cpp這個文件中。
這裡的object參數是一個Java語言實現的Binder對象,在調用C++語言實現的Parcel::writeStrongBinder把這個對象寫入到parcel對象時,首先通過ibinderForJavaObject函數把這個Java語言實現的Binder對象轉換為C++語言實現的JavaBBinderHolder對象:
sp<IBinder> ibinderForJavaObject(JNIEnv* env, jobject obj)
{
  if (obj == NULL) return NULL;

  if (env->IsInstanceOf(obj, gBinderOffsets.mClass)) {
    JavaBBinderHolder* jbh = (JavaBBinderHolder*)
      env->GetIntField(obj, gBinderOffsets.mObject);
    return jbh != NULL ? jbh->get(env) : NULL;
  }

  if (env->IsInstanceOf(obj, gBinderProxyOffsets.mClass)) {
    return (IBinder*)
      env->GetIntField(obj, gBinderProxyOffsets.mObject);
  }

  LOGW("ibinderForJavaObject: %p is not a Binder object", obj);
  return NULL;
}
我們知道,這裡的obj參數是一個Binder類的實例,因此,這裡會進入到第一個if語句中去。
在前面創建HelloService對象,曾經在調用到HelloService的父類Binder中,曾經在JNI層創建了一個JavaBBinderHolder對象,然後把這個對象的地址保存在Binder類的mObject成員變量中,因此,這裡把obj對象的mObject成員變量強制轉為JavaBBinderHolder對象。
到了這裡,這個函數的功課還未完成,還剩下最後關鍵的一步:
return jbh != NULL ? jbh->get(env) : NULL;
這裡就是jbh->get這個語句了。
在JavaBBinderHolder類中,有一個成員變量mBinder,它的類型為JavaBBinder,而JavaBBinder類繼承於BBinder類。在前面學習Binder機制的C++語言實現時,我們在Android系統進程間通信(IPC)機制Binder中的Server啟動過程源代碼分析這篇文章中,曾經介紹過,IPCThreadState類負責與Binder驅動程序進行交互,它把從Binder驅動程序讀出來的請求作簡單的處理後,最後把這個請求扔給BBinder的onTransact函數來進一步處理。
這裡,我們就是要把JavaBBinderHolder裡面的JavaBBinder類型Binder實體添加到Service Manager中去,以便使得這個HelloService有Client來請求服務時,由Binder驅動程序來喚醒這個Server線程,進而調用這個JavaBBinder類型Binder實體的onTransact函數來進一步處理,這個函數我們在後面會繼續介紹。
先來看一下JavaBBinderHolder::get函數的實現:
class JavaBBinderHolder : public RefBase
{
  ......

  JavaBBinderHolder(JNIEnv* env, jobject object)
    : mObject(object)
  {
    ......
  }

  ......

  sp<JavaBBinder> get(JNIEnv* env)
  {
    AutoMutex _l(mLock);
    sp<JavaBBinder> b = mBinder.promote();
    if (b == NULL) {
      b = new JavaBBinder(env, mObject);
      mBinder = b;
      ......
    }

    return b;
  }

  ......

  jobject     mObject;
  wp<JavaBBinder> mBinder;
};
這裡是第一次調用get函數,因此,會創建一個JavaBBinder對象,並且保存在mBinder成員變量中。注意,這裡的mObject就是上面創建的HelloService對象了,這是一個Java對象。這個HelloService對象最終也會保存在JavaBBinder對象的成員變量mObject中。
回到android_os_Parcel_writeStrongBinder函數中,下面這個語句:
const status_t err = parcel->writeStrongBinder(ibinderForJavaObject(env, object));
相當於是:
const status_t err = parcel->writeStrongBinder((JavaBBinderHodler*)(obj.mObject));
因此,這裡的效果相當於是寫入了一個JavaBBinder類型的Binder實體到parcel中去。這與我們前面介紹的Binder機制的C++實現是一致的。
接著,再回到ServiceManagerProxy.addService這個函數中,最後它通過其成員變量mRemote來執行進程間通信操作。前面我們在介紹如何獲取Service Manager遠程接口時提到,這裡的mRemote成員變量實際上是一個BinderProxy對象,因此,我們再來看看BinderProxy.transact函數的實現:
final class BinderProxy implements IBinder {
  ......

  public native boolean transact(int code, Parcel data, Parcel reply,
                int flags) throws RemoteException;

  ......
}
這裡的transact成員函數又是一個JNI方法,它定義在frameworks/base/core/jni/android_util_Binder.cpp文件中:
static jboolean android_os_BinderProxy_transact(JNIEnv* env, jobject obj,
            jint code, jobject dataObj,
            jobject replyObj, jint flags)
{
  ......

  Parcel* data = parcelForJavaObject(env, dataObj);
  if (data == NULL) {
    return JNI_FALSE;
  }
  Parcel* reply = parcelForJavaObject(env, replyObj);
  if (reply == NULL && replyObj != NULL) {
    return JNI_FALSE;
  }

  IBinder* target = (IBinder*)
    env->GetIntField(obj, gBinderProxyOffsets.mObject);
  if (target == NULL) {
    jniThrowException(env, "java/lang/IllegalStateException", "Binder has been finalized!");
    return JNI_FALSE;
  }

  ......

  status_t err = target->transact(code, *data, reply, flags);

  ......

  if (err == NO_ERROR) {
    return JNI_TRUE;
  } else if (err == UNKNOWN_TRANSACTION) {
    return JNI_FALSE;
  }

  signalExceptionForError(env, obj, err);
  return JNI_FALSE;
}
這裡傳進來的參數dataObj和replyObj是一個Java接口實現的Parcel類,由於這裡是JNI層,需要把它轉換為C++實現的Parcel類,它們就是通過我們前面說的parcelForJavaObject函數進行轉換的。
前面我們在分析如何獲取Service Manager遠程接口時,曾經說到,在JNI層中,創建了一個BpBinder對象,它的句柄值為0,它的地址保存在gBinderProxyOffsets.mObject中,因此,這裡通過下面語句得到這個BpBinder對象的IBinder接口:
IBinder* target = (IBinder*)
env->GetIntField(obj, gBinderProxyOffsets.mObject);
有了這個IBinder接口後,就和我們前面幾篇文章介紹Binder機制的C/C++實現一致了。
最後,通過BpBinder::transact函數進入到Binder驅動程序,然後Binder驅動程序喚醒Service Manager響應這個ADD_SERVICE_TRANSACTION請求:
status_t err = target->transact(code, *data, reply, flags);
具體可以參考Android系統進程間通信(IPC)機制Binder中的Server啟動過程源代碼分析一文。需要注意的是,這裡的data包含了一個JavaBBinderHolder類型的Binder實體對象,它就代表了我們上面創建的HelloService。Service Manager收到這個ADD_SERVICE_TRANSACTION請求時,就會把這個Binder實體納入到自己內部進行管理。
這樣,實現HelloService的Server的啟動過程就完成了。
四. Client獲取HelloService的Java遠程接口的過程
前面我們在學習Android系統硬件抽象層(HAL)時,在在Ubuntu上為Android系統內置Java應用程序測試Application Frameworks層的硬件服務這篇文章中,我們創建了一個應用程序,這個應用程序作為一個Client角色,借助Service Manager這個Java遠程接口來獲得HelloService的遠程接口,進而調用HelloService提供的服務。
我們看看它是如何借助Service Manager這個Java遠程接口來獲得HelloService的遠程接口的。在Hello這個Activity的onCreate函數,通過IServiceManager.getService函數來獲得HelloService的遠程接口:
public class Hello extends Activity implements OnClickListener {
  ......

  private IHelloService helloService = null;

  ......

  @Override
  public void onCreate(Bundle savedInstanceState) {

    helloService = IHelloService.Stub.asInterface(
              ServiceManager.getService("hello"));
  }

  ......
}
我們先來看ServiceManager.getService的實現。前面我們說過,這裡實際上是調用了ServiceManagerProxy.getService函數:
class ServiceManagerProxy implements IServiceManager {
  public ServiceManagerProxy(IBinder remote) {
    mRemote = remote;
  }

  ......

  public IBinder getService(String name) throws RemoteException {
    Parcel data = Parcel.obtain();
    Parcel reply = Parcel.obtain();
    data.writeInterfaceToken(IServiceManager.descriptor);
    data.writeString(name);
    mRemote.transact(GET_SERVICE_TRANSACTION, data, reply, 0);
    IBinder binder = reply.readStrongBinder();
    reply.recycle();
    data.recycle();
    return binder;
  }

  ......

  private IBinder mRemote;
}
最終通過mRemote.transact來執行實際操作。我們在前面已經介紹過了,這裡的mRemote實際上是一個BinderProxy對象,它的transact成員函數是一個JNI方法,實現在frameworks/base/core/jni/android_util_Binder.cpp文件中的android_os_BinderProxy_transact函數中。
這個函數前面我們已經看到了,這裡就不再列出來了。不過,當這個函數從:
status_t err = target->transact(code, *data, reply, flags);
這裡的reply變量裡面就包括了一個HelloService的引用了。注意,這裡的reply變量就是我們在ServiceManagerProxy.getService函數裡面傳進來的參數reply,它是一個Parcel對象。
回到ServiceManagerProxy.getService函數中,從下面語句返回:
mRemote.transact(GET_SERVICE_TRANSACTION, data, reply, 0);
接著,就通過下面語句將這個HelloService的引用讀出來:
IBinder binder = reply.readStrongBinder();
我們看看Parcel.readStrongBinder的實現:
public final class Parcel {
  ......

  /**
  * Read an object from the parcel at the current dataPosition().
  */
  public final native IBinder readStrongBinder();

  ......
}
它也是一個JNI方法,實現在frameworks/base/core/jni/android_util_Binder.cpp文件中:
static jobject android_os_Parcel_readStrongBinder(JNIEnv* env, jobject clazz)
{
  Parcel* parcel = parcelForJavaObject(env, clazz);
  if (parcel != NULL) {
    return javaObjectForIBinder(env, parcel->readStrongBinder());
  }
  return NULL;
}
這裡首先把Java語言實現的Parcel對象class轉換成C++語言實現的Parcel對象parcel,接著,通過parcel->readStrongBinder函數來獲得一個Binder引用。
我們在前面學習Binder機制時,在Android系統進程間通信(IPC)機制Binder中的Client獲得Server遠程接口過程源代碼分析這篇文章中,曾經分析過這個函數,它最終返回來的是一個BpBinder對象,因此,下面的語句:
return javaObjectForIBinder(env, parcel->readStrongBinder());
就相當於是:
return javaObjectForIBinder(env, new BpBinder(handle));
這裡的handle就是HelloService這個Binder實體在Client進程中的句柄了,它是由Binder驅動程序設置的,上層不用關心它的值具體是多少。至於javaObjectForIBinder這個函數,我們前面介紹如何獲取Service Manager的Java遠程接口時已經有詳細介紹,這裡就不累述了,它的作用就是創建一個BinderProxy對象,並且把剛才獲得的BpBinder對象的地址保存在這個BinderProxy對象的mObject成員變量中。
最後返回到Hello.onCreate函數中,從下面語句返回:
helloService = IHelloService.Stub.asInterface( ServiceManager.getService("hello"));
就相當於是:
helloService = IHelloService.Stub.asInterface(new BinderProxy()));
回憶一下前面介紹IHelloService接口的定義時,IHelloService.Stub.asInterface是這樣定義的:
public interface IHelloService extends android.os.IInterface
{
  /** Local-side IPC implementation stub class. */
  public static abstract class Stub extends android.os.Binder implements android.os.IHelloService
  {
    ......

    public static android.os.IHelloService asInterface(android.os.IBinder obj)
    {
      if ((obj==null)) {
        return null;
      }
      android.os.IInterface iin = (android.os.IInterface)obj.queryLocalInterface(DESCRIPTOR);
      if (((iin!=null)&&(iin instanceof android.os.IHelloService))) {
        return ((android.os.IHelloService)iin);
      }
      return new android.os.IHelloService.Stub.Proxy(obj);
    }

    ......
  }
}
這裡的obj是一個BinderProxy對象,它的queryLocalInterface返回null,於是調用下面語句獲得HelloService的遠程接口:
return new android.os.IHelloService.Stub.Proxy(obj);
相當於是:
return new android.os.IHelloService.Stub.Proxy(new BinderProxy());
這樣,我們就獲得了HelloService的遠程接口了,它實質上是一個實現了IHelloService接口的IHelloService.Stub.Proxy對象。
五. Client通過HelloService的Java遠程接口來使用HelloService提供的服務的過程
上面介紹的Hello這個Activity獲得了HelloService的遠程接口後,就可以使用它的服務了。
我們以使用IHelloService.getVal函數為例詳細說明。在Hello::onClick函數中調用了IHelloService.getVal函數:
public class Hello extends Activity implements OnClickListener {
  ......

  @Override
  public void onClick(View v) {
    if(v.equals(readButton)) {
      int val = helloService.getVal();
      ......
    }
    else if(v.equals(writeButton)) {
      ......
    }
    else if(v.equals(clearButton)) {
      ......
    }
  }

  ......
}
通知前面的分析,我們知道,這裡的helloService接口實際上是一個IHelloService.Stub.Proxy對象,因此,我們進入到IHelloService.Stub.Proxy類的getVal函數中:
public interface IHelloService extends android.os.IInterface
{
  /** Local-side IPC implementation stub class. */
  public static abstract class Stub extends android.os.Binder implements android.os.IHelloService
  {

    ......

    private static class Proxy implements android.os.IHelloService
    {
      private android.os.IBinder mRemote;

      ......

      public int getVal() throws android.os.RemoteException
      {
        android.os.Parcel _data = android.os.Parcel.obtain();
        android.os.Parcel _reply = android.os.Parcel.obtain();
        int _result;
        try {
          _data.writeInterfaceToken(DESCRIPTOR);
          mRemote.transact(Stub.TRANSACTION_getVal, _data, _reply, 0);
          _reply.readException();
          _result = _reply.readInt();
        }
        finally {
          _reply.recycle();
          _data.recycle();
        }
        return _result;
      }
    }

    ......
    static final int TRANSACTION_getVal = (android.os.IBinder.FIRST_CALL_TRANSACTION + 1);
  }

  ......
}
這裡我們可以看出,實際上是通過mRemote.transact來請求HelloService執行TRANSACTION_getVal操作。這裡的mRemote是一個BinderProxy對象,這是我們在前面獲取HelloService的Java遠程接口的過程中創建的。
BinderProxy.transact函數是一個JNI方法,我們在前面已經介紹過了,這裡不再累述。最過調用到Binder驅動程序,Binder驅動程序喚醒HelloService這個Server。前面我們在介紹HelloService的啟動過程時,曾經提到,HelloService這個Server線程被喚醒之後,就會調用JavaBBinder類的onTransact函數:
class JavaBBinder : public BBinder
{
  JavaBBinder(JNIEnv* env, jobject object)
    : mVM(jnienv_to_javavm(env)), mObject(env->NewGlobalRef(object))
  {
    ......
  }

  ......

  virtual status_t onTransact(
    uint32_t code, const Parcel& data, Parcel* reply, uint32_t flags = 0)
  {
    JNIEnv* env = javavm_to_jnienv(mVM);

    ......

    jboolean res = env->CallBooleanMethod(mObject, gBinderOffsets.mExecTransact,
      code, (int32_t)&data, (int32_t)reply, flags);

    ......

    return res != JNI_FALSE ? NO_ERROR : UNKNOWN_TRANSACTION;
  }

  ......

    JavaVM* const  mVM;
  jobject const  mObject;
};
前面我們在介紹HelloService的啟動過程時,曾經介紹過,JavaBBinder類裡面的成員變量mObject就是HelloService類的一個實例對象了。因此,這裡通過語句:
jboolean res = env->CallBooleanMethod(mObject, gBinderOffsets.mExecTransact,
code, (int32_t)&data, (int32_t)reply, flags);
就調用了HelloService.execTransact函數,而HelloService.execTransact函數繼承了Binder類的execTransact函數:
public class Binder implements IBinder {
  ......

  // Entry point from android_util_Binder.cpp's onTransact
  private boolean execTransact(int code, int dataObj, int replyObj, int flags) {
    Parcel data = Parcel.obtain(dataObj);
    Parcel reply = Parcel.obtain(replyObj);
    // theoretically, we should call transact, which will call onTransact,
    // but all that does is rewind it, and we just got these from an IPC,
    // so we'll just call it directly.
    boolean res;
    try {
      res = onTransact(code, data, reply, flags);
    } catch (RemoteException e) {
      reply.writeException(e);
      res = true;
    } catch (RuntimeException e) {
      reply.writeException(e);
      res = true;
    } catch (OutOfMemoryError e) {
      RuntimeException re = new RuntimeException("Out of memory", e);
      reply.writeException(re);
      res = true;
    }
    reply.recycle();
    data.recycle();
    return res;
  }
}
這裡又調用了onTransact函數來作進一步處理。由於HelloService類繼承了IHelloService.Stub類,而IHelloService.Stub類實現了onTransact函數,HelloService類沒有實現,因此,最終調用了IHelloService.Stub.onTransact函數:
public interface IHelloService extends android.os.IInterface
{
  /** Local-side IPC implementation stub class. */
  public static abstract class Stub extends android.os.Binder implements android.os.IHelloService
  {
    ......

    @Override
    public boolean onTransact(int code, android.os.Parcel data, android.os.Parcel reply, int flags) throws android.os.RemoteException
    {
      switch (code)
      {
      ......
      case TRANSACTION_getVal:
        {
          data.enforceInterface(DESCRIPTOR);
          int _result = this.getVal();
          reply.writeNoException();
          reply.writeInt(_result);
          return true;
        }
      }
      return super.onTransact(code, data, reply, flags);
    }

    ......

  }
}
函數最終又調用了HelloService.getVal函數:
public class HelloService extends IHelloService.Stub {
  ......

  public int getVal() {
    return getVal_native();
  }

  ......
  private static native int getVal_native();
}
最終,經過層層返回,就回到IHelloService.Stub.Proxy.getVal函數中來了,從下面語句返回:
mRemote.transact(Stub.TRANSACTION_getVal, _data, _reply, 0);
並將結果讀出來:
_result = _reply.readInt();
最後將這個結果返回到Hello.onClick函數中。
這樣,Client通過HelloService的Java遠程接口來使用HelloService提供的服務的過程就介紹完了。
至此,Android系統進程間通信Binder機制在應用程序框架層的Java接口源代碼分析也完成了,整個Binder機制的學習就結束了。
重新學習Android系統進程間通信Binder機制,請回到Android進程間通信(IPC)機制Binder簡要介紹和學習計劃一文。
以上就是Android 系統進程通信Binder 機制Java接口的源碼分析,謝謝大家對本站的支持,後續繼續補充相關知識!
 Android安全攻防戰,反編譯與混淆技術完全解析(上)
之前一直有猶豫過要不要寫這篇文章,畢竟去反編譯人家的程序並不是什麼值得驕傲的事情。不過單純從技術角度上來講,掌握反編譯功能確實是一項非常有用的技能,可能平常不太會用得到,
 Android MediaScannerJNI源碼詳解
1.簡介MediaScannerJNI的在MediaScanner中的地位可參考Android MediaScanner 總綱MediaScanner JNI文件名:an
 Android視圖狀態及重繪流程分析,帶你一步步深入了解View(三)
在前面一篇文章中,我帶著大家一起從源碼的層面上分析了視圖的繪制流程,了解了視圖繪制流程中onMeasure、onLayout、onDraw這三個最重要步驟的
 Android Framework應用框架層和HAL硬件抽象層以及Linux Kernel底層之間的關系
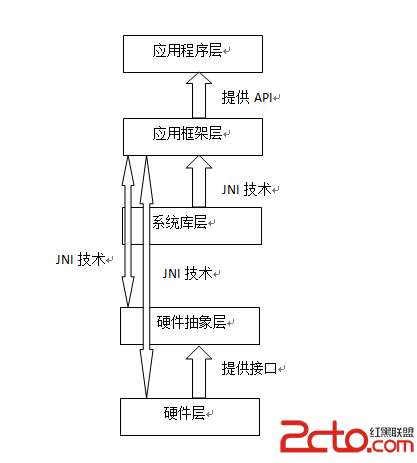
Android應用框架層和硬件抽象層以及底層之間的關系1. JNI技術:(1).JNI技術簡單的說就是在本地Java語言聲明本地方法和加載動態鏈接庫(.so文件)(2).