編輯:關於Android編程
ColaBox 登記收支記錄終於進入了復雜階段了。這個界面我也是查找了很多資料以及打開android的源代碼看了後才完成了,現在想來Google的開源真是明智的啊。
從前面的登錄頁面跳轉進入添加賬單頁面。這個頁面主要是用來登記收支記錄的。說白了就是往數據庫錄入明細。
表結構如下:
db.execSQL("CREATE TABLE bills ("
+ "_ID INTEGER PRIMARY KEY," //id
+ "fee integer," //費用
+"acctitemid integer," //賬目類型
+ "userid integer," //使用者
+ "sdate TEXT," //日期
+ "stime TEXT," //時間
+ "desc TEXT" //備注
+ ");");
可以看到主要是錄入這些數據。首先是布置界面,我目前想到的用個tablelayout來布局。
最後布局就是如下圖(圖1)這樣:
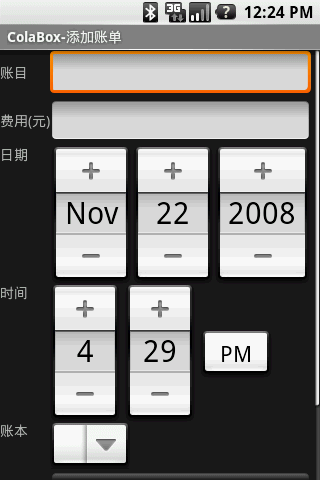
在這兒我首先需要設置賬目,前面我們已經初始化過賬目的數據。
賬目應該是一個ExpandableListActivity 2層的結構。需要從數據庫裡面讀取。我在賬目後面放了一個editview 只讀沒有光標的,也就是在這兒不可錄入,在該editview的onclick事件裡面我們打開賬目選擇界面。如下圖:
圖2 賬目選擇:
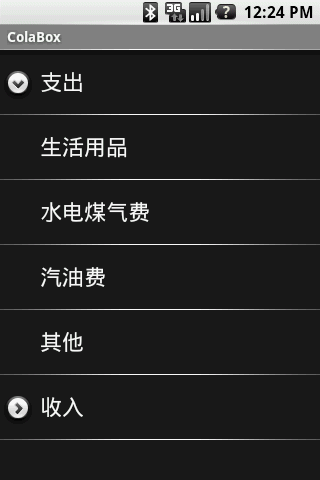
在這個界面中點擊子節點就返回前面界面,把選擇的賬目傳遞過去。在這有個問題,如果用戶需要錄入的賬目沒有怎麼辦?
所以我這沒有用dialog方式而是用了ExpandableListActivity。在這個界面中如果長點某個子節點就彈出管理賬目菜單,來維護賬目,如下圖所示:
圖3 賬目選擇菜單:
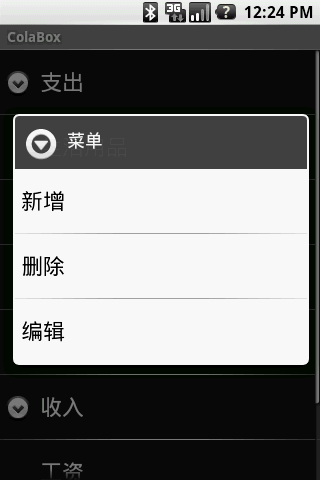
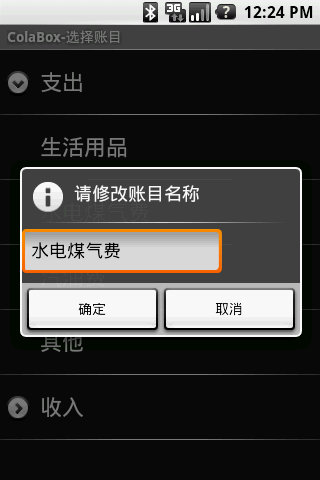
圖4 編輯賬目:
上面這些流程說起來很簡單,可是當我用andriod編寫時,遇到了很多問題,不過一個個都被我解決了,這正是編程的快樂所在。
關於ExpandableListActivity 大家可以參考android 裡面apidemos 裡面ExpandableList1、ExpandableList2、ExpandableList3。
這裡面對熟悉這個ui還是很有幫助的。在ExpandableList2 裡面就是從數據庫進行讀取的例子。當然android裡面那個我是沒太看明白因為他引用了import android.provider.Contacts.People; 聯系人部分的框架,而我目前對數據庫的操作和他不一樣,我都是直接sql訪問。
但是你只要搞定2個cursor就ok了,Cursor groupCursor childCursor ,其他都由SimpleCursorTreeAdapter幫你實現了。
下面我們來看看如何使用SimpleCursorTreeAdapter。
Java代碼
//首先要實現groupcursor就是父節點游標,這個其實就是我的acctitem表的
//select * from accitem where pid is null 的結果
Cursor groupCursor = billdb.getParentNode();
  // Cache the ID column index
mGroupIdColumnIndex = groupCursor.getColumnIndexOrThrow("_ID");
  // Set up our adapter
mAdapter = new MyExpandableListAdapter(groupCursor, this,  android.R.layout.simple_expandable_list_item_1,
 android.R.layout.simple_expandable_list_item_1,
  new String[] { "NAME" }, // Name for group layouts
  new int[] { android.R.id.text1 },
  new String[] { "NAME" }, //
  new int[] { android.R.id.text1 });
setListAdapter(mAdapter);
//然後我要實現childCursor
//其實就是select * from acctitem where id=pid 的結果
public class MyExpandableListAdapter extends SimpleCursorTreeAdapter {
public MyExpandableListAdapter(Cursor cursor, Context context,
    int groupLayout, int childLayout, String[] groupFrom,
    int[] groupTo, String[] childrenFrom, int[] childrenTo)
 {
   super(context, cursor, groupLayout, groupFrom, groupTo,
     childLayout, childrenFrom, childrenTo);
 }
protected Cursor getChildrenCursor(Cursor groupCursor) {
 String pid = groupCursor.getLong(mGroupIdColumnIndex) + "";
 // Log.v("cola","pid="+pid);
 return billdb.getChildenNode(pid);
 }
}
//我們看看Billdbhelper裡面的cursor
 public Cursor getParentNode(){
  return db.query("acctitem", new String[]{"_id", "name" }, "pid is null", null, null, null, "pid,_id");

 }

 public Cursor getChildenNode(String pid){
  Log.v("cola","run getchildenNode");
  return db.query("acctitem", new String[]{"_id", "name" }, "pid="+pid, null, null, null, "_id");
 }
//只要這幾步一個2級的tree list就可以出現了.
上面其實才是剛開始,後面我們需要使用一個自定義的Dialog 類似於一個inputBox,因為我們新增賬目是需要輸入賬目的名稱。就是上面圖4表現的。
雖然alertDialog提供了很多方法,可以選擇list、treelist、radio,可惜就是不能錄入text。
這裡我參考了api demos 裡面的 DateWidgets1.java 和源代碼裡面DatePickerDialog.java 。
我們可以從alertdialog 繼承,然後添加一個Editview 最後把數據返回出來。只要把上面我說的2個java看清楚了後處理起來就簡單了。
主要是一個回調函數的用法。下面看代碼:
Java代碼
//
public class Dialog_edit extends AlertDialog implements OnClickListener {
 private String text = "";
 private EditText edit;
 private OnDateSetListener mCallback; //定義回調函數
 private LinearLayout layout;
 public interface OnDateSetListener { //回調接口
  void onDateSet(String text);
 }
 protected Dialog_edit(Context context, String title, String value,
   OnDateSetListener Callback) {
  super(context);
  mCallback = Callback;
  TextView label = new TextView(context);
  label.setText("hint");
  // setView(label);
  edit = new EditText(context);
  edit.setText(value);
  layout = new LinearLayout(context);
  layout.setOrientation(LinearLayout.VERTICAL);
  // LinearLayout.LayoutParams param =
  // new LinearLayout.LayoutParams(100, 40);
  // layout.addView(label, param);
  LinearLayout.LayoutParams param2 = new LinearLayout.LayoutParams(200,
    50);
  layout.addView(edit, param2);
  //添加edit
  setView(layout);
  setTitle(title);
  setButton("確定", this);
  setButton2("取消", (OnClickListener) null);
 }
 public void onClick(DialogInterface dialog, int which) {
  // Log.v("cola","U click which="+which);
  text = edit.getText().toString();
  Log.v("cola", "U click text=" + text);
  if (mCallback != null)
   mCallback.onDateSet(text); //使用回調返回錄入的數據
 }
}
這樣我們就完成了自定義的dialog 我們可以使用它來新增和編輯賬目。對於賬目的增刪改就是sql的事情了。
在這我又遇到一個問題就是我新增一個賬目後如何來刷新界面,從而反映賬目修改後的變化。
在這我開始以為只要使用getExpandableListView().invalidate(); 就可以了。
因為我之前在ExpandableList1.java例子裡面,使用它可以刷新界面。
在那個例子裡面我修改了數組後調用該方法,界面就刷新了,而在這SimpleCursorTreeAdapter就行不通了,我想
應該只要刷新cursor應該就可以了,後來找到了notifyDataSetChanged,呵呵,果然可以了。 這樣賬目的錄入和管理就搞定了。
下面給出目前最新的代碼。
首先是賬目管理:
Java代碼
package com.cola.ui;
import android.app.AlertDialog;
import android.app.ExpandableListActivity;
import android.content.Context;
import android.content.DialogInterface;
import android.content.Intent;
import android.database.Cursor;
import android.os.Bundle;
import android.provider.Contacts.People;
import android.util.Log;
import android.view.ContextMenu;
import android.view.MenuItem;
import android.view.View;
import android.view.ContextMenu.ContextMenuInfo;
import android.widget.ExpandableListAdapter;
import android.widget.ExpandableListView;
import android.widget.SimpleCursorTreeAdapter;
import android.widget.TextView;
import android.widget.ExpandableListView.ExpandableListContextMenuInfo;
/**
 * Demonstrates expandable lists backed by Cursors
 */
public class Frm_Editacctitem extends ExpandableListActivity {
 private int mGroupIdColumnIndex;
 private String mPhoneNumberProjection[] = new String[] { People.Phones._ID,
   People.Phones.NUMBER };
 private ExpandableListAdapter mAdapter;
 BilldbHelper billdb;
 Dialog_edit newdialog;


 private ExpandableListContextMenuInfo info;


 @Override
 public void onCreate(Bundle savedInstanceState) {
  super.onCreate(savedInstanceState);
  setTitle("ColaBox-選擇賬目");
  billdb = new BilldbHelper(this);
  // Query for people
  Cursor groupCursor = billdb.getParentNode();
  // Cache the ID column index
  mGroupIdColumnIndex = groupCursor.getColumnIndexOrThrow("_ID");
  // Set up our adapter
  mAdapter = new MyExpandableListAdapter(groupCursor, this,
    android.R.layout.simple_expandable_list_item_1,
    android.R.layout.simple_expandable_list_item_1,
    new String[] { "NAME" }, // Name for group layouts
    new int[] { android.R.id.text1 }, new String[] { "NAME" }, //
    new int[] { android.R.id.text1 });
  setListAdapter(mAdapter);
  registerForContextMenu(getExpandableListView());
 }

 @Override
 public boolean onChildClick(ExpandableListView parent, View v, int groupPosition, int childPosition, long id)
 {
  Bundle bundle = new Bundle();
  bundle.putString("DataKey", ((TextView)v).getText().toString());//給bundle 寫入數據
  Intent mIntent = new Intent();
  mIntent.putExtras(bundle);
  setResult(RESULT_OK, mIntent);
  billdb.close();
  finish();
  return true;
 }
 @Override
 public void onCreateContextMenu(ContextMenu menu, View v,
   ContextMenuInfo menuInfo) {
  super.onCreateOptionsMenu(menu);
  if (ExpandableListView
    .getPackedPositionType(((ExpandableListContextMenuInfo) menuInfo).packedPosition) == 1) {
   Log.v("cola", "run menu");
   menu.setHeaderTitle("菜單");
   menu.add(0, 1, 0, "新 增");
   menu.add(0, 2, 0, "刪 除");
   menu.add(0, 3, 0, "編 輯");
  }
 }
 @Override
 public boolean onContextItemSelected(MenuItem item) {
  info = (ExpandableListContextMenuInfo) item.getMenuInfo();
  if (item.getItemId() == 1) {
   // Log.v("cola","id"+info.id);
   newdialog = new Dialog_edit(this, "請輸入新增賬目的名稱", "",
     mDialogClick_new);
   newdialog.show();
  } else if (item.getItemId() == 2) {
   new AlertDialog.Builder(this).setTitle("提示").setMessage("確定要刪除'"+((TextView)info.targetView).getText().toString()+"'這個賬目嗎?")
     .setIcon(R.drawable.quit).setPositiveButton("確定",
       new DialogInterface.OnClickListener() {
        public void onClick(DialogInterface dialog,
          int whichButton) {
         billdb.Acctitem_delitem((int)info.id);
         updatedisplay();
        }
       }).setNegativeButton("取消",
       new DialogInterface.OnClickListener() {
        public void onClick(DialogInterface dialog,
          int whichButton) {
         // 取消按鈕事件
        }
       }).show();
  } else if (item.getItemId() == 3) {
   newdialog = new Dialog_edit(this, "請修改賬目名稱",
     ((TextView) info.targetView).getText().toString(),
     mDialogClick_edit);
   newdialog.show();
  }
  return false;
 }
 private Dialog_edit.OnDateSetListener mDialogClick_new = new Dialog_edit.OnDateSetListener() {
  public void onDateSet(String text) {
   Log.v("cola", "new acctitem");
   billdb.Acctitem_newitem(text,ExpandableListView.getPackedPositionGroup(info.packedPosition));
   updatedisplay();
  }
 };

 private Dialog_edit.OnDateSetListener mDialogClick_edit = new Dialog_edit.OnDateSetListener() {
  public void onDateSet(String text) {
   billdb.Acctitem_edititem(text,(int)info.id);
   updatedisplay();
  }
 };
 private void updatedisplay(){
  Log.v("cola", "update display");
  ((MyExpandableListAdapter)mAdapter).notifyDataSetChanged();
 }

 public class MyExpandableListAdapter extends SimpleCursorTreeAdapter {
  public MyExpandableListAdapter(Cursor cursor, Context context,
    int groupLayout, int childLayout, String[] groupFrom,
    int[] groupTo, String[] childrenFrom, int[] childrenTo) {
   super(context, cursor, groupLayout, groupFrom, groupTo,
     childLayout, childrenFrom, childrenTo);
  }
  @Override
  protected Cursor getChildrenCursor(Cursor groupCursor) {
   String pid = groupCursor.getLong(mGroupIdColumnIndex) + "";
   // Log.v("cola","pid="+pid);
   return billdb.getChildenNode(pid);
  }
  @Override
  public long getGroupId(int groupPosition) {
   // Log.v("cola", "getGroupId " + groupPosition);
   Cursor groupCursor = (Cursor) getGroup(groupPosition);
   return groupCursor.getLong(mGroupIdColumnIndex);
  }
  @Override
  public long getChildId(int groupPosition, int childPosition) {
   // Log.v("cola", "getChildId " + groupPosition + "," +
   // childPosition);
   Cursor childCursor = (Cursor) getChild(groupPosition, childPosition);
   return childCursor.getLong(0);
  }
 }
}
自定義對話框:
Java代碼
package com.cola.ui;
import android.app.AlertDialog;
import android.content.Context;
import android.content.DialogInterface;
import android.content.DialogInterface.OnClickListener;
import android.util.Log;
import android.widget.EditText;
import android.widget.LinearLayout;
import android.widget.TextView;
public class Dialog_edit extends AlertDialog implements OnClickListener {
 private String text = "";
 private EditText edit;
 private OnDateSetListener mCallback;
 private LinearLayout layout;
 public interface OnDateSetListener {
  void onDateSet(String text);
 }
 protected Dialog_edit(Context context, String title, String value,
   OnDateSetListener Callback) {
  super(context);
  mCallback = Callback;
  TextView label = new TextView(context);
  label.setText("hint");
  // setView(label);
  edit = new EditText(context);
  edit.setText(value);
  layout = new LinearLayout(context);
  layout.setOrientation(LinearLayout.VERTICAL);
  // LinearLayout.LayoutParams param =
  // new LinearLayout.LayoutParams(100, 40);
  // layout.addView(label, param);
  LinearLayout.LayoutParams param2 = new LinearLayout.LayoutParams(200,
    50);
  layout.addView(edit, param2);
  setView(layout);
  setTitle(title);
  setButton("確定", this);
  setButton2("取消", (OnClickListener) null);
 }
 public void onClick(DialogInterface dialog, int which) {
  // Log.v("cola","U click which="+which);
  text = edit.getText().toString();
  Log.v("cola", "U click text=" + text);
  if (mCallback != null)
   mCallback.onDateSet(text);
 }
}
數據庫管理代碼:
Java代碼
package com.cola.ui;
import android.content.Context;
import android.database.Cursor;
import android.database.sqlite.SQLiteDatabase;
import android.util.Log;
/**
 * Provides access to a database of notes. Each note has a title, the note
 * itself, a creation date and a modified data.
 */
public class BilldbHelper {
 private static final String TAG = "Cola_BilldbHelper";
 private static final String DATABASE_NAME = "cola.db";

 SQLiteDatabase db;
 Context context;

 BilldbHelper(Context _context) {
  context=_context;
  db=context.openOrCreateDatabase(DATABASE_NAME, 0, null);
  Log.v(TAG,"db path="+db.getPath());
 }

 public void CreateTable_acctitem() {
  try{
   db.execSQL("CREATE TABLE acctitem ("
     + "_ID INTEGER PRIMARY KEY,"
     + "PID integer,"
     + "NAME TEXT"
     + ");");
   Log.v("cola","Create Table acctitem ok");
  }catch(Exception e){
   Log.v("cola","Create Table acctitem err,table exists.");
  }
 }

 public void CreateTable_bills() {
  try{
   db.execSQL("CREATE TABLE bills ("
     + "_ID INTEGER PRIMARY KEY,"
     +" acctitemid integer,"
     + "fee integer,"
     + "userid integer,"
     + "sdate TEXT,"
     + "stime TEXT,"
     + "desc TEXT"
     + ");");

   Log.v("cola","Create Table acctitem ok");
  }catch(Exception e){
   Log.v("cola","Create Table acctitem err,table exists.");
  }
 }

 public void CreateTable_colaconfig() {
  try{
   db.execSQL("CREATE TABLE colaconfig ("
     + "_ID INTEGER PRIMARY KEY,"
     + "NAME TEXT"
     + ");");
   Log.v("cola","Create Table colaconfig ok");
  }catch(Exception e){
   Log.v("cola","Create Table acctitem err,table exists.");
  }
 }

 public void InitAcctitem() {
  try{
   //s.getBytes(encoding);
   db.execSQL("insert into acctitem values (1,null,'收入')");
   db.execSQL("insert into acctitem values (2,1,'工資')");
   db.execSQL("insert into acctitem values (9998,1,'其他')");
   db.execSQL("insert into acctitem values (0,null,'支出')");
   db.execSQL("insert into acctitem values (3,0,'生活用品')");
   db.execSQL("insert into acctitem values (4,0,'水電煤氣費')");
   db.execSQL("insert into acctitem values (5,0,'汽油費')");
   db.execSQL("insert into acctitem values (9999,0,'其他')");

   //db.execSQL("insert into bills values(100,135,10000,'','','備注')");
   Log.v("cola","insert into ok");
  }catch(Exception e)
  {
   Log.v("cola","init acctitem e="+e.getMessage());
  }

 }
 public void Acctitem_newitem(String text,int type){

  Cursor c =db.query("acctitem", new String[]{"max(_id)+1"}, "_id is not null and _id<9998", null, null, null, null);
  c.moveToFirst();
  int maxid=c.getInt(0);
  String sql="insert into acctitem values ("+maxid+","+type+",'"+text+"')";
  db.execSQL(sql);
  Log.v("cola","newitem ok text="+text+" id="+type+" sql="+sql);

 }

 public void Acctitem_edititem(String text,int id){
  db.execSQL("update acctitem set name='"+text+"' where _id="+id);
  Log.v("cola","edititem ok text="+text+" id="+id);
 }

 public void Acctitem_delitem(int id){

  db.execSQL("delete from acctitem where _id="+id);
  Log.v("cola","delitem ok id="+id);
 }

 public void QueryTable_acctitem(){

 }

 public void FirstStart(){
  try{
   String col[] = {"type", "name" };
   Cursor c =db.query("sqlite_master", col, "name='colaconfig'", null, null, null, null);
   int n=c.getCount();
   if (c.getCount()==0){
    CreateTable_acctitem();
    CreateTable_colaconfig();
    CreateTable_bills();
    InitAcctitem();
   }
   //getTree();
   Log.v("cola","c.getCount="+n+"");


  }catch(Exception e){
   Log.v("cola","e="+e.getMessage());
  }


 }


 public void close(){
  db.close();
 }

 public Cursor getParentNode(){
  return db.query("acctitem", new String[]{"_id", "name" }, "pid is null", null, null, null, "pid,_id");

 }

 public Cursor getChildenNode(String pid){
  Log.v("cola","run getchildenNode");
  return db.query("acctitem", new String[]{"_id", "name" }, "pid="+pid, null, null, null, "_id");
 }

}
系列文章:
Android 個人理財工具六:顯示賬單明細 下
Android 個人理財工具五:顯示賬單明細 上
Android 個人理財工具四:添加賬單頁面 下
Android 個人理財工具三:添加賬單頁面 上
Android 個人理財工具二:使用SQLite實現啟動時初始化數據
Android 個人理財工具一:項目概述與啟動界面的實現
以上就Android 開發個人理財工具 添加賬單頁面的講解,後續繼續更新相應文章,謝謝大家對本站的支持!
 四大組件之Activity(上)——Activity的生命周期、系統回收、系統配置改變的影響
第1節 Activity的使用Activity幾乎是每個應用必有的組件,所以任何安卓應用的開發幾乎都是從Activity開始的。比如,你希望設計一個計算器應用,要呈現這個
 Android分類列表菜單實現
菜單功能是點擊按鈕彈出分類菜單 看看效果圖 先說一下實現原理,彈出菜單采用的是Fragment實現,很方便且高效,上面的三個按鈕是RadioButton。 新建一個項目
 AndroidStudio如何修改編輯器字體?
AndroidStudio是谷歌推出的一款Android應用開發IDE,相對於Eclipse,AndroidStudio擁有更多優化,使用也更加方便,大大提高了開發效率,
 樹形ListView
第一次接觸樹形ListView是一年前,當時公司做的項目是一個企業的員工管理軟件,在展示員工時用到的,我花了大半天時間,才把樹形ListView搞明白,完成任務後就沒有然