編輯:關於Android編程
在Android開發中,經常需要加載顯示網頁,一般一個頁面在打開後,在等待數據加載的過程中,都需要花一點時間,這個時候往往需要顯示一個轉動的進度條(ProgressBar),接下來封裝了一個自定義控件和加載網頁的公共Activity,方便使用。
一般的做法是在layout.xml中添加ProgressBar,但我們不這樣做,主要是為了減少layout嵌套。
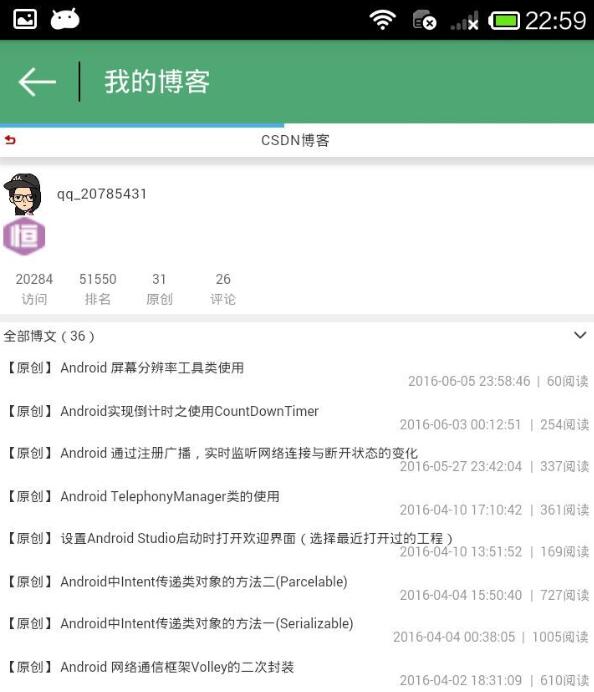
按照慣例我們先來看看最終的效果圖:
在調用的時候很簡單,就只需要傳遞一個url(加載網頁的url)和title(顯示標題)就可以了,如下所示:
Intent intent = new Intent(MainActivity.this, MainWebViewActivity.class);
  intent.putExtra("url", "http://blog.csdn.net/qq_20785431");
  intent.putExtra("title", "我的博客");
  startActivity(intent);
1.接下來主要還是看看重寫的帶加載條的webview
package com.per.loadingwebviewdome;

import android.content.Context;
import android.os.Environment;
import android.util.AttributeSet;
import android.webkit.WebView;
import android.webkit.WebViewClient;
import android.widget.ProgressBar;

/**
 * @author: xiaolijuan
 * @description: 帶加載條的webview
 * @date: 2016-06-03
 * @time: 23:34
 */
public class LoadingWebView extends WebView {

 private ProgressBar mProgressBar;
 /**
  * 網頁緩存目錄
  */
 private static final String cacheDirPath = Environment
   .getExternalStorageDirectory() + "/LoadingWebViewDome/webCache/";

 public LoadingWebView(Context context) {
  super(context, null);
 }

 public LoadingWebView(Context context, AttributeSet attrs) {
  super(context, attrs, 0);
 }

 public LoadingWebView(Context context, AttributeSet attrs, int defStyle) {
  super(context, attrs, defStyle);
  initContext(context);
 }

 private void initContext(Context context) {
  requestFocus();
  setInitialScale(39);
  getSettings().setJavaScriptCanOpenWindowsAutomatically(true);//支持通過Javascript打開新窗口
  getSettings().setJavaScriptEnabled(true);//設置WebView屬性,能夠執行Javascript腳本
  getSettings().setUseWideViewPort(true);//將圖片調整到適合webview的大小
  getSettings().setLoadWithOverviewMode(true);// 縮放至屏幕的大小
  getSettings().setDomStorageEnabled(true);//設置是否啟用了DOM Storage API
  getSettings().setDatabaseEnabled(true);//開啟database storage API功能
  getSettings().setDatabasePath(cacheDirPath); //設置數據庫緩存路徑
  getSettings().setAppCachePath(cacheDirPath);//設置Application Caches緩存目錄
  getSettings().setAppCacheEnabled(true);//開啟Application Caches功能
 }

 /**
  * 加載網頁url
  *
  * @param url
  */
 public void loadMessageUrl(String url) {
  super.loadUrl(url);
  setWebViewClient(new WebViewClient() {
   public boolean shouldOverrideUrlLoading(WebView view, String url) { // 重寫此方法表明點擊網頁裡面的鏈接不調用系統浏覽器,而是在本WebView中顯示
    loadUrl(url);//加載需要顯示的網頁
    return true;
   }
  });
 }

 /**
  * 添加進度條
  */
 public void addProgressBar() {
  mProgressBar = new ProgressBar(getContext(), null,
    android.R.attr.progressBarStyleHorizontal);
  mProgressBar.setLayoutParams(new LayoutParams(
    LayoutParams.MATCH_PARENT, 5, 0, 0));
  mProgressBar.setProgressDrawable(getContext().getResources()
    .getDrawable(R.drawable.bg_pb_web_loading));
  addView(mProgressBar);//添加進度條至LoadingWebView中

  setWebChromeClient(new WebChromeClient());//設置setWebChromeClient對象
 }

 public class WebChromeClient extends android.webkit.WebChromeClient {
  @Override
  public void onProgressChanged(WebView view, int newProgress) {
   if (newProgress == 100) {
    mProgressBar.setVisibility(GONE);
   } else {
    if (mProgressBar.getVisibility() == GONE)
     mProgressBar.setVisibility(VISIBLE);
    mProgressBar.setProgress(newProgress);
   }
   super.onProgressChanged(view, newProgress);
  }
 }

 /**
  * 回收webview
  */
 public void destroyWebView() {
  clearCache(true);
  clearHistory();
 }
}
我們重寫了3個構造方法,默認的布局文件調用的是兩個參數的構造方法,所以記得讓所有的構造調用我們的三個參數的構造,我們在三個參數的構造中獲得自定義View的屬性。
然後在布局中聲明我們的自定義View
<?xml version="1.0" encoding="utf-8"?>
<LinearLayout xmlns:android="http://schemas.android.com/apk/res/android"
 android:layout_width="match_parent"
 android:layout_height="match_parent"
 android:orientation="vertical">

 <include layout="@layout/common_top_banner" />

 <com.per.loadingwebviewdome.LoadingWebView
  android:id="@+id/wv_loading"
  android:layout_width="match_parent"
  android:layout_height="match_parent" />

</LinearLayout>
2.下面就是通用的帶進度條的WebView啦
package com.per.loadingwebviewdome;

import android.app.Activity;
import android.os.Bundle;
import android.view.View;
import android.widget.ImageView;
import android.widget.TextView;

/**
 * @author: xiaolijuan
 * @description: 通用的帶進度條的WebView
 * @date: 2016-06-03
 * @time: 23:32
 */
public class MainWebViewActivity extends Activity implements View.OnClickListener {

 private ImageView mIvBack;
 private TextView mTvTitle;
 private LoadingWebView mLoadingWebView;

 private String mTitle = "";
 private String mUrl = "";

 @Override
 protected void onCreate(Bundle savedInstanceState) {
  super.onCreate(savedInstanceState);
  setContentView(R.layout.activity_webview);
  initView();
  initData();
 }

 private void initView() {
  mIvBack = (ImageView) findViewById(R.id.iv_back);
  mLoadingWebView = (LoadingWebView) findViewById(R.id.wv_loading);
  mTvTitle = (TextView) findViewById(R.id.tv_title);

  mLoadingWebView.addProgressBar();
  mIvBack.setOnClickListener(this);
 }

 private void initData() {
  mTitle = getIntent().getStringExtra("title");
  mUrl = getIntent().getStringExtra("url");

  mLoadingWebView.loadMessageUrl(mUrl);
  mTvTitle.setText(mTitle);
 }

 @Override
 public void onDestroy() {
  super.onDestroy();
  mLoadingWebView.destroyWebView();
 }

 @Override
 public void onClick(View v) {
  switch (v.getId()) {
   case R.id.iv_back:
    if (mLoadingWebView.canGoBack())
     mLoadingWebView.goBack();
    else {
     finish();
    }
    break;
  }
 }

 /**
  * 按返回鍵時, 不退出程序而是返回WebView的上一頁面
  */
 @Override
 public void onBackPressed() {
  if (mLoadingWebView.canGoBack())
   mLoadingWebView.goBack();
  else {
   super.onBackPressed();
  }
 }
}
以上就是本文的全部內容,希望對大家的學習有所幫助,也希望大家多多支持本站。
 如何翻查微信消息列表 微信消息列表在哪
小編經常遇到評論了別人的微信,查看別人的回復信息後,過一會想到如何回復朋友,但那條微信評論已經不知別刷到哪裡去了!後來發現,直接去微信消息列表中回復就可以了
 框架模式 MVC 在Android中的使用
算來學習Android開發已有2年的歷史了,在這2年的學習當中,基本掌握了Android的基礎知識。越到後面的學習越感覺困難,一來是自認為android沒啥可學的了(自認
 Android如何保證一個線程最多只能有一個Looper?
1. 如何創建Looper?Looper的構造方法為private,所以不能直接使用其構造方法創建。private Looper(boolean quitAllowed)
 在Android Studio中進行單元測試和UI測試
聽說不會單元測試的Android程序員不是一個合格的程序員,,好吧,雖然學習Android好久,最近在使用AndroidStudio,但不知道AndroidStudio自