編輯:關於Android編程
本文實例分析了Android實現Gesture手勢識別用法。分享給大家供大家參考。具體如下:
很高興能在Android1.6的sdk看到手勢識別這一功能,之前一直在想,如何在android中實現nds游戲那樣用手勢(准確點應該是筆勢)來控制游戲角色?現在總算看到一點曙光了,不過手勢要做到筆勢那樣隨心所欲地控制游戲人物,還有很多細節問題需要處理。
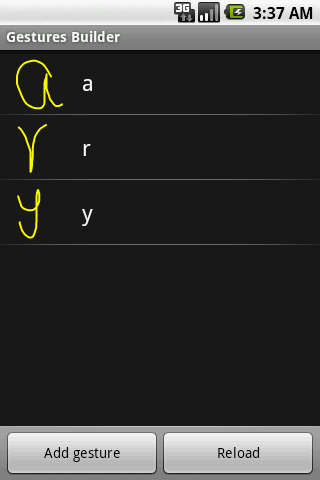
在Android1.6的模擬器裡面預裝了一個叫Gestures Builder的程序,這個程序就是讓你創建自己的手勢的(Gestures Builder的源代碼在sdk問samples裡面有,有興趣可以看看)。創建的手勢將被保存到/sdcard/gestures裡面,把這個文件復制到你的工程/res/raw下,你就可以在你的工程裡面使用這些手勢了。復制到/res/raw下的手勢是只讀的,也就是說你不能修改或增加手勢了,如果想實現增改的話,可以直接加載sd卡裡面的gestures文件。
在例子中,我創建了這樣的手勢:
第二步:在layout裡面創建GestureOverlayView,這個透明的view就是讓你在上面畫手勢用的,可以疊在其他View上面:
<?xml version="1.0" encoding="utf-8"?>
<LinearLayout xmlns:android="http://schemas.android.com/apk/res/android"
  android:orientation="vertical"
  android:layout_width="fill_parent"
  android:layout_height="fill_parent"
  >
<TextView
  android:layout_width="fill_parent"
  android:layout_height="wrap_content"
  android:text="@string/hello"
  />
<android.gesture.GestureOverlayView
  android:id="@+id/gestures"
  android:layout_width="fill_parent"
  android:layout_height="0dip"
  android:layout_weight="1.0"
  />
</LinearLayout>
第三步:載入Gesture:
mLibrary = GestureLibraries.fromRawResource(this, R.raw.gestures);
if (!mLibrary.load()) {
  finish();
}
第四步:增加響應函數OnGesturePerformedListener:
GestureOverlayView gestures = (GestureOverlayView) findViewById(R.id.gestures);
gestures.addOnGesturePerformedListener(this);
以上四步就可以實現簡單的Gesture識別原型了:
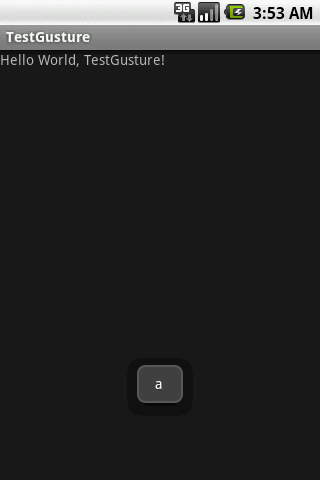
程序運行結果如下,書寫一個a字,程序識別出,然後toast一個a出來:
完整代碼如下:
package com.ray.test;
import java.util.ArrayList;
import android.app.Activity;
import android.gesture.Gesture;
import android.gesture.GestureLibraries;
import android.gesture.GestureLibrary;
import android.gesture.GestureOverlayView;
import android.gesture.Prediction;
import android.gesture.GestureOverlayView.OnGesturePerformedListener;
import android.os.Bundle;
import android.widget.Toast;
public class TestGesture extends Activity implements OnGesturePerformedListener{
  GestureLibrary mLibrary;
  @Override
  public void onCreate(Bundle savedInstanceState) {
    super.onCreate(savedInstanceState);
    setContentView(R.layout.main);
    GestureOverlayView gestures = (GestureOverlayView) findViewById(R.id.gestures);
    gestures.addOnGesturePerformedListener(this);
    mLibrary = GestureLibraries.fromRawResource(this, R.raw.gestures);
    if (!mLibrary.load()) {
      finish();
    }
  }
  @Override
  public void onGesturePerformed(GestureOverlayView overlay, Gesture gesture) {
    ArrayList predictions = mLibrary.recognize(gesture);
    // We want at least one prediction
    if (predictions.size() > 0) {
      Prediction prediction = (Prediction) predictions.get(0);
      // We want at least some confidence in the result
      if (prediction.score > 1.0) {
        // Show the spell
        Toast.makeText(this, prediction.name, Toast.LENGTH_SHORT).show();
      }
    }
  }
}
更多關於Android相關內容感興趣的讀者可查看本站專題:《Android編程之activity操作技巧總結》、《Android視圖View技巧總結》、《Android操作SQLite數據庫技巧總結》、《Android操作json格式數據技巧總結》、《Android數據庫操作技巧總結》、《Android文件操作技巧匯總》、《Android編程開發之SD卡操作方法匯總》、《Android開發入門與進階教程》、《Android資源操作技巧匯總》及《Android控件用法總結》
希望本文所述對大家Android程序設計有所幫助。
 Android筆記之:App調試的幾個命令的實踐與分析
在Android的應用開發中,我們會用到各種代碼調試;其實在Android的開發之後,我們可能會碰到一些隨機的問題,如cpu過高,內存洩露等,我們無法簡單的進行代碼調試,
 升級安卓開發環境到Android Studio和Genymotion
2014新年第一天,全面升級安卓開發環境。主要做兩件事:1. 把IDE從eclipse轉到Android Studio(又去掉了一個與IBM Rational的聯系,多少
 Android實現2048小游戲
本文實例介紹了Android實現2048小游戲的相關代碼,分享給大家供大家參考,具體內容如下根據界面,主要實現4*4的格子方塊比較麻煩,其他的都挺簡單的.總體為實現4*4
 安卓Andriod使用入門(十一)【下拉刷新】
MainActivity.java代碼:package siso.refreshablev;import android.app.Activity;import and