編輯:關於Android編程
Android如何獲取手機通話記錄,本文為大家揭曉。
獲取手機通話記錄流程:
1、 獲取ContentResolver;
ContentResolver resolver = getContentResolver();
2、resolver.query(*);
需要傳入通話記錄的URI:CallLog.Calls.CONTENT_URI
3、對查詢得到的Cursor進行數據獲取.
主要代碼如下:
MainActivity.java
package com.noonecode.contentresolvercalllogdemo;

import java.text.SimpleDateFormat;
import java.util.ArrayList;
import java.util.Date;
import java.util.HashMap;
import java.util.List;
import java.util.Map;

import android.app.Activity;
import android.content.ContentResolver;
import android.database.Cursor;
import android.os.Bundle;
import android.provider.CallLog;
import android.widget.ListView;
import android.widget.SimpleAdapter;

public class MainActivity extends Activity {
  private ListView mLvShow;
  private List<Map<String, String>> dataList;
  private SimpleAdapter adapter;

  @Override
  protected void onCreate(Bundle savedInstanceState) {
    super.onCreate(savedInstanceState);
    setContentView(R.layout.activity_main);
    mLvShow = (ListView) findViewById(R.id.lv_show);
    dataList = getDataList();
    adapter = new SimpleAdapter(this, dataList, R.layout.simple_calllog_item//
        , new String[] { "name", "number", "date", "duration", "type" }//
        , new int[] { R.id.tv_name, R.id.tv_number, R.id.tv_date, R.id.tv_duration, R.id.tv_type });
    mLvShow.setAdapter(adapter);
  }

  /**
   * 讀取數據
   *
   * @return 讀取到的數據
   */
  private List<Map<String, String>> getDataList() {
    // 1.獲得ContentResolver
    ContentResolver resolver = getContentResolver();
    // 2.利用ContentResolver的query方法查詢通話記錄數據庫
    /**
     * @param uri 需要查詢的URI,(這個URI是ContentProvider提供的)
     * @param projection 需要查詢的字段
     * @param selection sql語句where之後的語句
     * @param selectionArgs ?占位符代表的數據
     * @param sortOrder 排序方式
     *
     */
    Cursor cursor = resolver.query(CallLog.Calls.CONTENT_URI, // 查詢通話記錄的URI
        new String[] { CallLog.Calls.CACHED_NAME// 通話記錄的聯系人
            , CallLog.Calls.NUMBER// 通話記錄的電話號碼
            , CallLog.Calls.DATE// 通話記錄的日期
            , CallLog.Calls.DURATION// 通話時長
            , CallLog.Calls.TYPE }// 通話類型
        , null, null, CallLog.Calls.DEFAULT_SORT_ORDER// 按照時間逆序排列,最近打的最先顯示
    );
    // 3.通過Cursor獲得數據
    List<Map<String, String>> list = new ArrayList<Map<String, String>>();
    while (cursor.moveToNext()) {
      String name = cursor.getString(cursor.getColumnIndex(CallLog.Calls.CACHED_NAME));
      String number = cursor.getString(cursor.getColumnIndex(CallLog.Calls.NUMBER));
      long dateLong = cursor.getLong(cursor.getColumnIndex(CallLog.Calls.DATE));
      String date = new SimpleDateFormat("yyyy-MM-dd HH-mm-ss").format(new Date(dateLong));
      int duration = cursor.getInt(cursor.getColumnIndex(CallLog.Calls.DURATION));
      int type = cursor.getInt(cursor.getColumnIndex(CallLog.Calls.TYPE));
      String typeString = "";
      switch (type) {
      case CallLog.Calls.INCOMING_TYPE:
        typeString = "打入";
        break;
      case CallLog.Calls.OUTGOING_TYPE:
        typeString = "打出";
        break;
      case CallLog.Calls.MISSED_TYPE:
        typeString = "未接";
        break;
      default:
        break;
      }
      Map<String, String> map = new HashMap<String, String>();
      map.put("name", (name == null) ? "未備注聯系人" : name);
      map.put("number", number);
      map.put("date", date);
      map.put("duration", (duration / 60) + "分鐘");
      map.put("type", typeString);
      list.add(map);
    }
    return list;
  }
}
主布局activity_main.xml
<RelativeLayout xmlns:android="http://schemas.android.com/apk/res/android"
  xmlns:tools="http://schemas.android.com/tools"
  android:layout_width="match_parent"
  android:layout_height="match_parent"
  tools:context="com.noonecode.contentresolvercalllogdemo.MainActivity" >

  <ListView
    android:id="@+id/lv_show"
    android:layout_width="match_parent"
    android:layout_height="match_parent" />

</RelativeLayout>
simple_calllog_item.xml
<?xml version="1.0" encoding="utf-8"?>
<LinearLayout xmlns:android="http://schemas.android.com/apk/res/android"
  android:layout_width="match_parent"
  android:layout_height="match_parent"
  android:orientation="vertical"
  android:padding="10dp" >

  <TextView
    android:id="@+id/tv_name"
    android:layout_width="wrap_content"
    android:layout_height="wrap_content"
    android:text="name"
    android:textSize="20sp" />

  <LinearLayout
    android:layout_width="match_parent"
    android:layout_height="wrap_content"
    android:orientation="horizontal" >

    <TextView
      android:id="@+id/tv_number"
      android:layout_width="wrap_content"
      android:layout_height="wrap_content"
      android:layout_margin="4dp"
      android:text="number"
      />

    <TextView
      android:id="@+id/tv_date"
      android:layout_width="wrap_content"
      android:layout_height="wrap_content"
      android:layout_margin="4dp"
      android:text="date"
      />

    <TextView
      android:id="@+id/tv_duration"
      android:layout_width="wrap_content"
      android:layout_height="wrap_content"
      android:layout_margin="4dp"
      android:text="duration"
      />

    <TextView
      android:id="@+id/tv_type"
      android:layout_width="wrap_content"
      android:layout_height="wrap_content"
      android:layout_margin="4dp"
      android:text="type"
      />
  </LinearLayout>

</LinearLayout>
讀取通話記錄的權限:
<uses-permission android:name="android.permission.READ_CALL_LOG" />
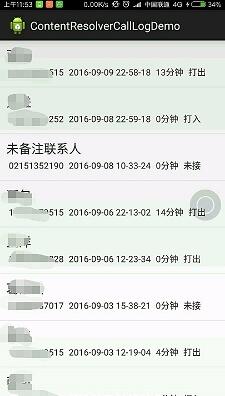
最終效果圖:
注意:
夜神模擬器貌似無打電話的功能,不要使用夜神測試本例
版主使用的是小米4真機測試,usb調試過程中會直接崩潰,需要手動在安全中心給應用賦予讀取通話記錄的權限。(視個人機器情況,部分機器可能不需要手動設置)
源碼下載:http://xiazai.jb51.net/201610/yuanma/androidContentDemo(jb51.net).rar
以上就是本文的全部內容,希望對大家的學習有所幫助,也希望大家多多支持本站。
 Android通訊錄開發之實現全選、反選功能
Android通訊錄開發之實現全選、反選功能 2014年1月15日 實現全選、反選不是什麼難的事情,就只是用另外一個數據結構來存儲被選中的狀態,通過刷新列表
 Android編程之ProgressBar圓形進度條顏色設置方法
本文實例講述了Android ProgressBar圓形進度條顏色設置方法。分享給大家供大家參考,具體如下:你是不是還在為設置進度條的顏色而煩惱呢……別著急,且看如下如何
 Android優化——UI優化(二)
使用include標簽復用布局- 1.include標簽的作用 假如說我下圖的這個布局在很多界面都用到了,我該怎麼辦?每個頁面都寫一遍的話,代碼太冗余,並且維護難度加大。
 Android Design支持庫TabLayout打造仿網易新聞Tab標簽效果(三十七)
(一).前言:仿36Kr客戶端開發過程中,因為他們網站上面的新聞文章分類比較多,所以我這邊還是打算模仿網易新聞APP的主界面新聞標簽Tab以及頁面滑動效果來進