編輯:關於Android編程
本文實例講述了Android編程動態按鈕實現方法。分享給大家供大家參考,具體如下:
第一種: 該方法通過onTouch來實現,
btn3 = (ImageButton) findViewById(R.id.ImageButton03);
btn3.setOnTouchListener(touchListener3);
View.OnTouchListener touchListener = new OnTouchListener() {
@Override
public boolean onTouch(View v, MotionEvent event) {
ImageButton imageBtn = (ImageButton) v;
if(event.getAction() == MotionEvent.ACTION_DOWN){
//更改為按下時的背景圖片
imageBtn .setImageResource(R.drawable.pressed);
}else if(event.getAction() == MotionEvent.ACTION_UP){
//改為抬起時的圖片
imageBtn .setImageResource(R.drawable.released);
}
return false;
}
};
第二種: 通過XML來實現
用XML文件實現:
<?xml version="1.0" encoding="UTF-8"?>
<selector xmlns:android="http://schemas.android.com/apk/res/android">
<item
android:state_pressed="false"
android:drawable="@drawable/button_add" />
<item
android:state_pressed="true"
android:drawable="@drawable/button_add_pressed" />
<item
android:state_focused="true"
android:drawable="@drawable/button_add_pressed" />
<item
android:drawable="@drawable/button_add" />
</selector>
這個文件放在drawable目錄下面。命名為button_add_x.xml
使用的時候:
<ImageButton
android:id="@+id/ImageButton"
android:layout_width="wrap_content"
android:layout_height="wrap_content"
android:background="#00000000"
android:src="@drawable/button_add_x"
>
</ImageButton>
更多關於Android相關內容感興趣的讀者可查看本站專題:《Android布局layout技巧總結》、《Android視圖View技巧總結》、《Android開發入門與進階教程》、《Android調試技巧與常見問題解決方法匯總》、《Android多媒體操作技巧匯總(音頻,視頻,錄音等)》、《Android基本組件用法總結》及《Android控件用法總結》
希望本文所述對大家Android程序設計有所幫助。
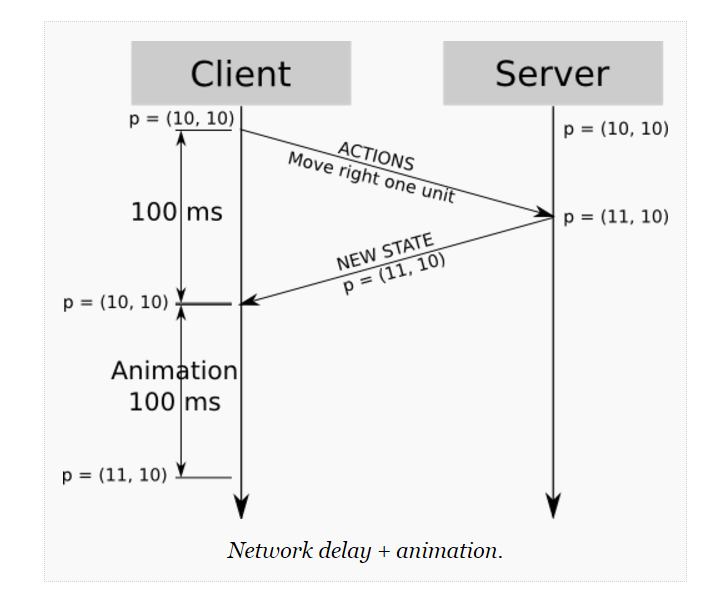 多人實時對戰網絡同步方式研究
寫在開頭:已經研究生畢業快一年半了,一直在一家游戲公司做客戶端研發。至於這篇文章講的卻是服務端的東西,主要是因為以前一直沒想寫博客,學到的東西也一直記在本子上就得了。本人
 Android實現ImageView圖片縮放和拖動
今天我們來編寫一個縮放效果的ImageView ,網上有很多人都講了這些。但有許多人都直接使用了庫文件,那麼我們今天做的是直接上代碼編寫一個拖動和縮放的ImageView
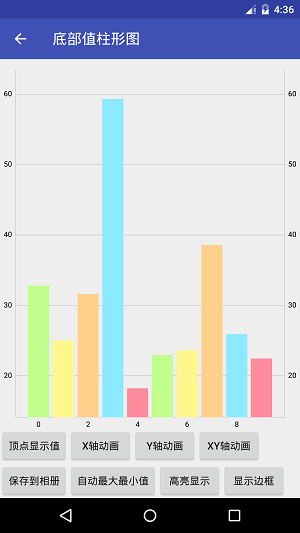 Android圖表庫MPAndroidChart(十三)——簡約的底部柱狀圖
Android圖表庫MPAndroidChart(十三)——簡約的底部柱狀圖。我們繼續上一講,今天還是說下柱狀圖,這個圖的話應該是用的比較多的,所
 Android實現自定義標題欄的方法
本文要講自己定義一個標題欄,能加事件。然後可以移值到不同的手機上,基本上不用改什麼,調用也很簡單在layout文件夾下,新建一個XML。名字叫做layout_title_