編輯:關於Android編程
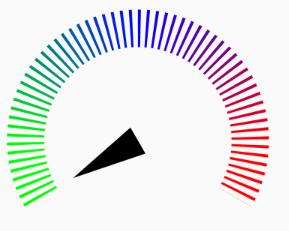
首先來看看效果圖:
1,SweepGradient(梯度渲染)
public SweepGradient (float cx, float cy, int[] colors, float[] positions)
掃描渲染,就是以某個點位中心旋轉一周所形成的效果!參數依次是:
cx:掃描的中心x坐標
cy:掃描的中心y坐標
colors:梯度漸變的顏色數組
positions:指定顏色數組的相對位置
public static final int[] SWEEP_GRADIENT_COLORS = new int[]{Color.GREEN, Color.GREEN, Color.BLUE, Color.RED, Color.RED};
mColorShader = new SweepGradient(radius, radius,SWEEP_GRADIENT_COLORS,null);
效果圖:
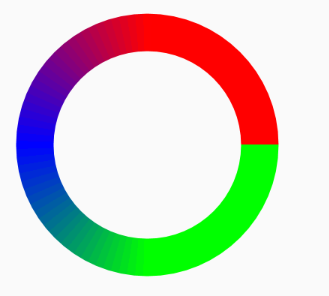
SweepGradient
2,DashPathEffect(Path的線段虛線化)
DashPathEffect(float[] intervals, float phase)
intervals:為虛線的ON和OFF的數組,數組中元素數目需要 >= 2
phase:為繪制時的偏移量
//計算路徑的長度
PathMeasure pathMeasure = new PathMeasure(mPath, false);
float length = pathMeasure.getLength();
float step = length / 60;
dashPathEffect = new DashPathEffect(new float[]{step / 3, step * 2 / 3}, 0);
效果圖:
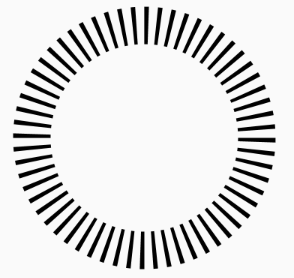
DashPathEffect
3,下面是全部的代碼:
package com.example.yyw.xfermodedemo;

import android.animation.ValueAnimator;
import android.content.Context;
import android.graphics.Canvas;
import android.graphics.Color;
import android.graphics.DashPathEffect;
import android.graphics.Paint;
import android.graphics.Path;
import android.graphics.PathMeasure;
import android.graphics.RectF;
import android.graphics.SweepGradient;
import android.util.AttributeSet;
import android.view.View;

/**
 * Created by yyw on 2016/10/11.
 */

public class OilTableLine extends View {
 public static final int[] SWEEP_GRADIENT_COLORS = new int[]{Color.GREEN, Color.GREEN, Color.BLUE, Color.RED, Color.RED};
 private int tableWidth = 50;
 private Paint mPaint;
 private Path mPath;
 private RectF mTableRectF;
 //把路徑分成虛線段的
 private DashPathEffect dashPathEffect;
 //給路徑上色
 private SweepGradient mColorShader;
 //指針的路徑
 private Path mPointerPath;
 private float mCurrentDegree = 60;

 public OilTableLine(Context context, AttributeSet attrs) {
  super(context, attrs);
  mPaint = new Paint();
  mPaint.setAntiAlias(true);
  mPaint.setDither(true);
  mPaint.setColor(Color.BLACK);
  mPath = new Path();
  mPointerPath = new Path();
  startAnimator();

 }

 @Override
 protected void onSizeChanged(int w, int h, int oldw, int oldh) {
  super.onSizeChanged(w, h, oldw, oldh);
  float size = Math.min(w, h) - tableWidth * 2;
  //油表的位置方框
  mTableRectF = new RectF(0, 0, size, size);
  mPath.reset();
  //在油表路徑中增加一個從起始弧度
  mPath.addArc(mTableRectF, 60, 240);
  //計算路徑的長度
  PathMeasure pathMeasure = new PathMeasure(mPath, false);
  float length = pathMeasure.getLength();
  float step = length / 60;
  dashPathEffect = new DashPathEffect(new float[]{step / 3, step * 2 / 3}, 0);

  float radius = size / 2;
  mColorShader = new SweepGradient(radius, radius,SWEEP_GRADIENT_COLORS,null);
  //設置指針的路徑位置
  mPointerPath.reset();
  mPointerPath.moveTo(radius, radius - 20);
  mPointerPath.lineTo(radius, radius + 20);
  mPointerPath.lineTo(radius * 2 - tableWidth, radius);
  mPointerPath.close();
 }

 @Override
 protected void onDraw(Canvas canvas) {
  super.onDraw(canvas);
  float dx = (getWidth() - mTableRectF.width()) / 2;
  float dy = (getHeight() - mTableRectF.height()) / 2;
  //把油表的方框平移到正中間
  canvas.translate(dx, dy);
  canvas.save();
  //旋轉畫布
  canvas.rotate(90, mTableRectF.width() / 2, mTableRectF.height() / 2);
  mPaint.setStyle(Paint.Style.STROKE);
  mPaint.setStrokeWidth(tableWidth);
  mPaint.setPathEffect(dashPathEffect);
  mPaint.setShader(mColorShader);
  canvas.drawPath(mPath, mPaint);
  canvas.restore();
  //還原畫筆
  mPaint.setPathEffect(null);
  mPaint.setShader(null);
  mPaint.setStyle(Paint.Style.FILL);
  mPaint.setStrokeWidth(tableWidth / 10);
  canvas.save();
  canvas.rotate(150 + mCurrentDegree, mTableRectF.width() / 2, mTableRectF.height() / 2);
  canvas.drawPath(mPointerPath, mPaint);
  canvas.restore();
 }

 public void startAnimator() {
  ValueAnimator animator = ValueAnimator.ofFloat(0, 240);
  animator.setDuration(40000);
  animator.setRepeatCount(ValueAnimator.INFINITE);
  animator.setRepeatMode(ValueAnimator.RESTART);
  animator.addUpdateListener(new ValueAnimator.AnimatorUpdateListener() {
   @Override
   public void onAnimationUpdate(ValueAnimator animation) {
    mCurrentDegree = (int) (0 + (Float) animation.getAnimatedValue());
    invalidate();
   }
  });
  animator.start();
 }
}
總結
以上就是這篇文章的全部內容了,希望本文的內容對大家的學習或者工作能帶來一定的幫助,如果有疑問大家可以留言交流。
 Android布局技巧之創建高效布局
Android UI工具包提供了一些布局管理器,它們使用起來相當容易,而且,大多數的時候,你只需要使用它們最基本的特征來實現UI。執著於基本特征的使用對於創建UI來說,往
 Android仿微信滑動彈出編輯、刪除菜單效果、增加下拉刷新功能
如何為不同的list item呈現不同的菜單,本文實例就為大家介紹了Android仿微信或QQ滑動彈出編輯、刪除菜單效果、增加下拉刷新等功能的實現,分享給大家供大家參考,
 Android 使用ListView實現網易評論蓋樓效果
效果如下:(點擊下載demo) 實現原理:頂部利用了ListView的HeadView來實現,然後其他每個item都用背景實現! 首先設置一些常量:package c
 SDWebImage源代碼解析(一)SDImageCache
前言本文的中文注釋代碼demo更新在我的github上。SDWebImage是一個十分有名的Objective-C第三方開源框架,作用是: Asynchronous im