編輯:關於Android編程
前言
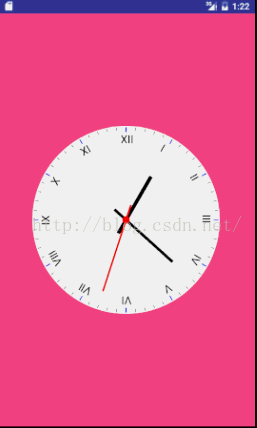
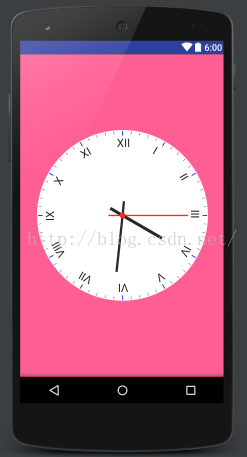
最近我跟自定義View槓上了,甚至說有點上瘾到走火入魔了。身為菜鳥的我自然要查閱大量的資料,學習大神們的代碼,這不,前兩天正好在郭神在微信公眾號裡推送一片自定義控件的文章——一步步實現精美的鐘表界面。正適合我這種菜鳥來學習,閒著沒事,我就差不多依葫蘆畫瓢也寫了一個自定義表盤View,現在純粹最為筆記記錄下來。先展示下效果圖:
下面進入正題
自定義表盤屬性
老規矩,先在attrs文件裡添加表盤自定義屬性
<declare-styleable name="WatchView">
<attr name="watchRadius" format="dimension"/> //表盤半徑
<attr name="watchPadding" format="dimension"/> //表盤相對控件邊框距離
<attr name="watchScalePadding" format="dimension"/> //刻度相對表盤距離
<attr name="watchScaleColor" format="color|reference"/> //常規刻度顏色
<attr name="watchScaleLength" format="dimension|reference"/> //常規刻度長度
<attr name="watchHourScaleColor" format="dimension|reference"/> //整點刻度顏色
<attr name="watchHourScaleLength" format="dimension|reference"/> //整點刻度長度
<attr name="hourPointColor" format="color|reference"/> //時針顏色
<attr name="hourPointLength" format="dimension|reference"/> //時針長度
<attr name="minutePointColor" format="color|reference"/> //分針顏色
<attr name="minutePointLength" format="dimension|reference"/> //分針長度
<attr name="secondPointColor" format="color|reference"/> //秒針顏色
<attr name="secondPointLength" format="dimension|reference"/> //秒針長度
<attr name="timeTextSize" format="dimension|reference"/> //表盤字體大小
<attr name="timeTextColor" format="color|reference"/> //表盤字體顏色
</declare-styleable>
在自定義View的構造方法種獲取自定義屬性
先將屬性變量聲明如下:
<span > /**表盤邊距*/
private float mWatchPadding = 5;
/**表盤與刻度邊距*/
private float mWatchScalePadding = 5;
/**表盤半徑*/
private float mWatchRadius = 250;
/**表盤刻度長度*/
private float mWatchScaleLength;
/**表盤刻度顏色*/
private int mWatchScaleColor = Color.BLACK;
/**表盤整點刻度長度*/
private float mHourScaleLength = 8;
/**表盤整點刻度顏色*/
private int mHourScaleColor = Color.BLUE;
/**表盤時針顏色*/
private int mHourPointColor = Color.BLACK;
/**表盤時針長度*/
private float mHourPointLength = 100;
/**表盤分針顏色*/
private int mMinutePointColor = Color.BLACK;
/**表盤分針長度*/
private float mMinutePointLength = 130;
/**表盤秒針顏色*/
private int mSecondPointColor = Color.RED;
/**表盤秒針長度*/
private float mSecondPointLength = 160;
/**表盤尾部指針長度*/
private float mEndPointLength;
/**表盤數字顏色*/
private int mTimeTextColor = Color.BLACK;
/**表盤數字大小*/
private int mTimeTextSize = 15;</span>
在構造方法種獲取自定義屬性
<span > public WatchView(Context context, AttributeSet attrs) {
super(context, attrs);
TypedArray array = context.obtainStyledAttributes(attrs,R.styleable.WatchView);
int n = array.getIndexCount();
for (int i = 0;i<n;i++){
int attr = array.getIndex(i);
switch (attr){
case R.styleable.WatchView_watchRadius:
mWatchRadius = array.getDimensionPixelSize(attr,MyUtil.dip2px(context,60));
break;
case R.styleable.WatchView_watchPadding:
mWatchPadding = array.getDimensionPixelSize(attr,MyUtil.dip2px(context,5));
break;
case R.styleable.WatchView_watchScalePadding:
mWatchScalePadding = array.getDimensionPixelSize(attr,MyUtil.dip2px(context,3));
break;
case R.styleable.WatchView_watchScaleLength:
mWatchScaleLength = array.getDimensionPixelSize(attr,MyUtil.dip2px(context,5));
break;
case R.styleable.WatchView_watchScaleColor:
mWatchScaleColor = array.getColor(attr, Color.parseColor("#50000000"));
break;
case R.styleable.WatchView_watchHourScaleLength:
mHourScaleLength = array.getDimensionPixelSize(attr,MyUtil.dip2px(context,10));
break;
case R.styleable.WatchView_watchHourScaleColor:
mHourScaleColor = array.getColor(attr,Color.BLACK);
break;
case R.styleable.WatchView_hourPointLength:
mHourPointLength = array.getDimensionPixelSize(attr,MyUtil.dip2px(context,35));
break;
case R.styleable.WatchView_hourPointColor:
mHourPointColor = array.getColor(attr,Color.BLACK);
break;
case R.styleable.WatchView_minutePointLength:
mMinutePointLength = array.getDimensionPixelSize(attr,MyUtil.dip2px(context,40));
break;
case R.styleable.WatchView_minutePointColor:
mMinutePointColor = array.getColor(attr,Color.BLACK);
break;
case R.styleable.WatchView_secondPointLength:
mSecondPointLength = array.getDimensionPixelSize(attr,MyUtil.dip2px(context,50));
break;
case R.styleable.WatchView_secondPointColor:
mSecondPointColor = array.getColor(attr,Color.BLUE);
break;
case R.styleable.WatchView_timeTextSize:
mTimeTextSize = array.getDimensionPixelSize(attr,MyUtil.dip2px(context,15));
break;
case R.styleable.WatchView_timeTextColor:
mTimeTextColor = array.getColor(attr,Color.BLACK);
break;
}
}
array.recycle();
}</span>
設置控件大小
這裡當然就是重寫onMeasure方法啦,這裡我們處理的簡單點,如下面代碼所示,當我們將控件的寬高都設定為wrap_content(即MeasureSpec.UNSPECIFED)時,我們將寬高設定為默認值(wrapContentSize)和圓盤半徑+圓盤邊距(mWatchRadius+mWatchPadding)之間取最大值,其他情況下就取系統自取值。當然作為一個嚴謹的控件,僅僅這樣處理肯定是不行的。項目中,我們要根據我們的需求自行修改裡面的代碼以適配。
<span > @Override
protected void onMeasure(int widthMeasureSpec, int heightMeasureSpec) {
int wrapContentSize = 1000;
int widthSize = MeasureSpec.getSize(widthMeasureSpec);
int widthMode = MeasureSpec.getMode(widthMeasureSpec);
int heightSize = MeasureSpec.getSize(heightMeasureSpec);
int heightMode = MeasureSpec.getMode(heightMeasureSpec);
if (widthMode == MeasureSpec.UNSPECIFIED && heightMode == MeasureSpec.UNSPECIFIED){
wrapContentSize = (int) Math.max(wrapContentSize,mWatchRadius+mWatchPadding);
setMeasuredDimension(wrapContentSize,wrapContentSize);
}else {
setMeasuredDimension(widthSize,heightSize);
}
}</span>
重寫onDraw方法
來到最關鍵真正畫表盤時刻了。一步一步來,首先初始化我們的畫筆(我的習慣,寫一個initPaint方法)
<span > private void initPaint(){
mPaint = new Paint();
mPaint.setAntiAlias(true);
mPaint.setColor(Color.WHITE);
mPaint.setStyle(Paint.Style.FILL);
}</span>
為了不顯贅述,方便理解,我直接展示代碼,在代碼中解釋
開畫之前我們先將畫筆移動到控件中心點位置,如下:
<span >@Override
protected void onDraw(Canvas canvas) {
canvas.translate(getWidth()/2,getHeight()/2);
}</span>
第一步,畫表盤
<span > /**
* 畫表盤
* @param canvas
*/
private void paintWatchBoard(Canvas canvas){
initPaint();
canvas.save();
canvas.drawCircle(0,0,mWatchRadius,mPaint); //畫圓盤
canvas.restore();
}</span>
注:每次畫圖之前都要先調用canvas.save()方法,保存畫筆屬性,畫完之後要調用canvas.restore()方法,重置畫筆屬性
這裡就不一一展示每次畫完之後的效果圖了。
第二步,畫刻度+整點時間數字(刻度從12點方向開始畫)
<span > /**
* 畫刻度及整點數字
* @param canvas
*/
private void paintScale(Canvas canvas){
int lineLength; //刻度線長度
canvas.save();
for (int i = 0;i<60;i++){
if (i%5 == 0){//整點刻度下畫筆相關屬性
mPaint.setStrokeWidth(MyUtil.dip2px(getContext(),1.5f));
mPaint.setColor(mHourScaleColor);
lineLength = MyUtil.dip2px(getContext(),8);
canvas.drawLine(0,-mWatchRadius+mWatchScalePadding,0,-mWatchRadius+mWatchScalePadding+lineLength,mPaint);
mPaint.setColor(mTimeTextColor);
mPaint.setTextSize(mTimeTextSize);
canvas.drawText(mTimes[i/5],-mTimeTextSize/2,-mWatchRadius+mWatchScalePadding + lineLength+mTimeTextSize,mPaint);//整點的位置標上整點時間數字
}else {//非整點刻度下畫筆相關屬性
mPaint.setStrokeWidth(MyUtil.dip2px(getContext(),0.8f));
mPaint.setColor(mWatchScaleColor);
lineLength = MyUtil.dip2px(getContext(),5);
canvas.drawLine(0,-mWatchRadius+mWatchScalePadding,0,-mWatchRadius+mWatchScalePadding+lineLength,mPaint);
}
canvas.rotate(6);//每次畫完一個刻度線,畫筆順時針旋轉6度(360/60,相鄰兩刻度之間的角度差為6度)
}
canvas.restore();
}</span>
其中,整點數字我用了羅馬數字來表示
<span >private String[] mTimes = {"XII","Ⅰ","Ⅱ","Ⅲ","Ⅳ","Ⅴ","Ⅵ","Ⅶ","Ⅷ","Ⅸ","Ⅹ","XI"};</span>
第三步,畫時針、分針、秒針以及其它修飾圖
考慮到時針、分針和秒針大小長度各不一樣,我這裡特意定義了三支畫筆來分別畫時針、分針和秒針。
同樣的,先初始化指針畫筆:
<span >/**
* 初始化指針
*/
private void initPointPaint(){
mHourPaint = new Paint();
mHourPaint.setAntiAlias(true);
mHourPaint.setStyle(Paint.Style.FILL);
mHourPaint.setStrokeWidth(16);
mHourPaint.setColor(mHourPointColor);
mMinutePaint = new Paint();
mMinutePaint.set(mHourPaint);
mMinutePaint.setStrokeWidth(12);
mMinutePaint.setColor(mMinutePointColor);
mSecondPaint = new Paint();
mSecondPaint.set(mHourPaint);
mSecondPaint.setStrokeWidth(7);
mSecondPaint.setColor(mSecondPointColor);
mEndPointLength = mWatchRadius/6; //(修飾部分)指針尾部長度,定義為表盤半徑的六分之一
}</span>
畫指針
<span >/**
* 畫指針
* @param canvas
*/
private void paintPoint(Canvas canvas){
initPointPaint();
Calendar c = Calendar.getInstance(); //取當前時間
int hour = c.get(Calendar.HOUR_OF_DAY);
int minute = c.get(Calendar.MINUTE);
int second = c.get(Calendar.SECOND);
//繪制時針
canvas.save();
canvas.rotate(hour*30);
canvas.drawLine(0,0,0,-mHourPointLength,mHourPaint);
canvas.drawLine(0,0,0,mEndPointLength,mHourPaint);
canvas.restore();
//繪制分針
canvas.save();
canvas.rotate(minute*6);
canvas.drawLine(0,0,0,-mMinutePointLength,mMinutePaint);
canvas.drawLine(0,0,0,mEndPointLength,mMinutePaint);
canvas.restore();
//繪制秒針
canvas.save();
canvas.rotate(second*6);
canvas.drawLine(0,0,0,-mSecondPointLength,mSecondPaint);
canvas.drawLine(0,0,0,mEndPointLength,mSecondPaint);
canvas.restore();
}</span>
OK,該有的差不多都有了,直接在onDraw中調用吧
<span >@Override
protected void onDraw(Canvas canvas) {
canvas.translate(getWidth()/2,getHeight()/2);
paintWatchBoard(canvas); //畫表盤
paintScale(canvas); //畫刻度
paintPoint(canvas); //畫指針
canvas.drawCircle(0,0,15,mSecondPaint); //為了美觀,也讓表盤更接近我們顯示生活中的樣子,我在圓盤中心畫了一個大紅圓點裝飾秒針
postInvalidateDelayed(1000); //每隔一秒鐘畫一次
}</span>
(⊙v⊙)嗯,自定義View大功告成,我們在布局文件裡調用看下效果吧
<span ><?xml version="1.0" encoding="utf-8"?>
<RelativeLayout xmlns:android="http://schemas.android.com/apk/res/android"
xmlns:zhusp="http://schemas.android.com/apk/res-auto"
android:layout_width="match_parent"
android:layout_height="match_parent"
android:background="@color/colorAccent">
<com.wondertek.propertyanimatordemo.WatchView
android:layout_width="wrap_content"
android:layout_height="wrap_content"
zhusp:timeTextSize="20dp"
zhusp:watchRadius="150dp"
zhusp:hourPointLength="80dp"
zhusp:minutePointLength="100dp"
zhusp:secondPointLength="115dp"/>
</RelativeLayout></span>
最後我這裡的靜態效果是這樣的:
 Android 命令:實現啟動一個apk
1、產生背景: 為了調試方便,常常希望通過知道apk的路徑,直接去啟動它,所以就寫了這個命令 2、使用方法: adb push launch /data/ adb pus
 Android高手之路之Android中Intent傳遞對象的兩種方法Serializable,Parcelable
Android中的傳遞有兩個方法,一個是Serializable,另一個是Parcelable。 Serializable是J2SE本身就支持的。而Parc
 從零開始學android小示例程序
布局文件復制代碼 代碼如下:<RelativeLayout xmlns:android=http://schemas.android.com/apk/res/and
 AndroidStudio--添加依賴
添加依賴需要在dependencies 中添加依賴語句。相當於界面操作project_structure–dependencies 中添加各種依賴庫。界面操作