編輯:關於Android編程
一、概述
現在大多數的電商APP的詳情頁長得幾乎都差不多,幾乎都是上面一個商品的圖片,當你滑動的時候,會有Tab懸浮在上面,這樣做用戶體驗確實不錯,如果Tab滑上去,用戶可能還需要滑下來,在來點擊Tab,這樣確實很麻煩。沉浸式狀態欄那,郭霖說過谷歌並沒有給出沉浸式狀態欄這個明白,谷歌只說了沉浸式模式(Immersive Mode)。不過沉浸式狀態欄這個名字其實聽不粗,隨大眾吧,但是Android的環境並沒有iOS環境一樣特別統一,比如華為rom的跟小米rom的虛擬按鍵完全不一樣,所有Android開發者不容易。。。。。
二、淘寶的效果

三、我們的效果

只能傳2M,把我的美女都給壓失真了。。。。。。
四、實現類
自定義ScrollView (StickyScrollView)
StatusBarUtil //非常不錯的狀態欄工具
五、布局
<?xml version="1.0" encoding="utf-8"?>
<RelativeLayout xmlns:android="http://schemas.android.com/apk/res/android"
xmlns:tools="http://schemas.android.com/tools"
android:layout_width="match_parent"
android:layout_height="match_parent">
<FrameLayout
android:layout_width="match_parent"
android:layout_height="match_parent">
<com.xiaoyuan.StickyScrollView
android:id="@+id/scrollView"
android:layout_width="match_parent"
android:layout_height="match_parent"
android:focusable="true"
android:focusableInTouchMode="true">
<LinearLayout
android:id="@+id/ll_content"
android:layout_width="match_parent"
android:layout_height="match_parent"
android:orientation="vertical">
<ImageView
android:layout_width="match_parent"
android:layout_height="500dip"
android:background="@mipmap/meinv"/>
<TextView
android:id="@+id/title"
android:layout_width="match_parent"
android:layout_height="50dp"
android:gravity="center"
android:text="美" />
<TextView
android:layout_width="match_parent"
android:layout_height="50dip"
android:gravity="center"
android:text="女"/>
<TextView
android:layout_width="match_parent"
android:layout_height="50dip"
android:gravity="center"
android:text="美"/>
<TextView
android:layout_width="match_parent"
android:layout_height="50dip"
android:gravity="center"
android:text="不"/>
<TextView
android:layout_width="match_parent"
android:layout_height="50dip"
android:gravity="center"
android:text="美"/>
<LinearLayout
android:layout_width="match_parent"
android:layout_height="wrap_content"
android:orientation="vertical"
android:tag="sticky">
<LinearLayout
android:layout_width="match_parent"
android:layout_height="45dp"
android:background="#ffffff"
android:orientation="horizontal">
<TextView
android:id="@+id/infoText"
android:layout_width="0dp"
android:layout_height="match_parent"
android:layout_weight="1"
android:gravity="center"
android:text="美女信息"
android:textColor="#000000"
android:textSize="16dp" />
<TextView
android:id="@+id/secondText"
android:layout_width="0dp"
android:layout_height="match_parent"
android:layout_weight="1"
android:gravity="center"
android:text="美女介紹"
android:textColor="#000000"
android:textSize="16dp" />
</LinearLayout>
</LinearLayout>
<FrameLayout
android:id="@+id/tabMainContainer"
android:layout_width="match_parent"
android:layout_height="wrap_content"
android:background="#ffffff"
android:minHeight="400dp">
</FrameLayout>
</LinearLayout>
</com.xiaoyuan.StickyScrollView>
<RelativeLayout
android:id="@+id/ll_good_detail"
android:layout_width="match_parent"
android:layout_height="49dp"
android:background="#00000000"
android:paddingTop="@dimen/spacing_normal">
<TextView
android:layout_width="wrap_content"
android:layout_height="wrap_content"
android:textColor="#ffffff"
android:layout_alignParentLeft="true"
android:layout_marginLeft="10dip"
android:layout_centerHorizontal="true"
android:text="返回"/>
<TextView
android:layout_width="wrap_content"
android:layout_height="wrap_content"
android:textColor="#ffffff"
android:layout_centerInParent="true"
android:layout_centerHorizontal="true"
android:layout_marginLeft="10dip"
android:text="美女"/>
<TextView
android:layout_width="wrap_content"
android:layout_height="wrap_content"
android:textColor="#ffffff"
android:layout_alignParentRight="true"
android:layout_marginRight="10dip"
android:layout_centerHorizontal="true"
android:text="分享"/>
</RelativeLayout>
</FrameLayout>
</RelativeLayout>
注意:我們把要懸浮的Tab設置了android:tag=”sticky”這樣的屬性
六、實現代碼
public class MainActivity extends AppCompatActivity implements View.OnClickListener, StickyScrollView.OnScrollChangedListener {
TextView oneTextView, twoTextView;
private StickyScrollView stickyScrollView;
private int height;
private LinearLayout llContent;
private RelativeLayout llTitle;
private FrameLayout frameLayout;
private TextView title;
@Override
protected void onCreate(Bundle savedInstanceState) {
super.onCreate(savedInstanceState);
setContentView(R.layout.activity_main);
initView();
initListeners();
}
/**
* 初始化View
*/
private void initView() {
stickyScrollView = (StickyScrollView) findViewById(R.id.scrollView);
frameLayout = (FrameLayout) findViewById(R.id.tabMainContainer);
title = (TextView) findViewById(R.id.title);
oneTextView = (TextView) findViewById(R.id.infoText);
llContent = (LinearLayout) findViewById(R.id.ll_content);
llTitle = (RelativeLayout) findViewById(R.id.ll_good_detail);
oneTextView.setOnClickListener(this);
twoTextView = (TextView) findViewById(R.id.secondText);
twoTextView.setOnClickListener(this);
stickyScrollView.setOnScrollListener(this);
StatusBarUtil.setTranslucentForImageView(MainActivity.this, 0, title);
FrameLayout.LayoutParams params = (FrameLayout.LayoutParams) llTitle.getLayoutParams();
params.setMargins(0, getStatusHeight(), 0, 0);
llTitle.setLayoutParams(params);
//默認設置一個Frg
getSupportFragmentManager().beginTransaction().replace(R.id.tabMainContainer, Fragment.newInstance()).commit();
}
/**
* 獲取狀態欄高度
* @return
*/
private int getStatusHeight() {
int resourceId = MainActivity.this.getResources().getIdentifier("status_bar_height", "dimen", "android");
return getResources().getDimensionPixelSize(resourceId);
}
@Override
public void onClick(View v) {
if (v.getId() == R.id.infoText) {
getSupportFragmentManager().beginTransaction().replace(R.id.tabMainContainer, Fragment.newInstance()).commit();
} else if (v.getId() == R.id.secondText) {
getSupportFragmentManager().beginTransaction().replace(R.id.tabMainContainer, Fragment1.newInstance()).commit();
}
}
private void initListeners() {
//獲取內容總高度
final ViewTreeObserver vto = llContent.getViewTreeObserver();
vto.addOnGlobalLayoutListener(new ViewTreeObserver.OnGlobalLayoutListener() {
@Override
public void onGlobalLayout() {
height = llContent.getHeight();
//注意要移除
llContent.getViewTreeObserver()
.removeGlobalOnLayoutListener(this);
}
});
//獲取Fragment高度
ViewTreeObserver viewTreeObserver = frameLayout.getViewTreeObserver();
viewTreeObserver.addOnGlobalLayoutListener(new ViewTreeObserver.OnGlobalLayoutListener() {
@Override
public void onGlobalLayout() {
height = height - frameLayout.getHeight();
//注意要移除
frameLayout.getViewTreeObserver()
.removeGlobalOnLayoutListener(this);
}
});
//獲取title高度
ViewTreeObserver viewTreeObserver1 = llTitle.getViewTreeObserver();
viewTreeObserver1.addOnGlobalLayoutListener(new ViewTreeObserver.OnGlobalLayoutListener() {
@Override
public void onGlobalLayout() {
height = height - llTitle.getHeight() - getStatusHeight();//計算滑動的總距離
stickyScrollView.setStickTop(llTitle.getHeight() + getStatusHeight());//設置距離多少懸浮
//注意要移除
llTitle.getViewTreeObserver()
.removeGlobalOnLayoutListener(this);
}
});
}
@Override
public void onScrollChanged(int l, int t, int oldl, int oldt) {
if (t <= 0) {
llTitle.setBackgroundColor(Color.argb((int) 0, 255, 255, 255));
StatusBarUtil.setTranslucentForImageView(MainActivity.this, 0, title);
} else if (t > 0 && t <= height) {
float scale = (float) t / height;
int alpha = (int) (255 * scale);
llTitle.setBackgroundColor(Color.argb((int) alpha, 227, 29, 26));//設置標題欄的透明度及顏色
StatusBarUtil.setTranslucentForImageView(MainActivity.this, alpha, title);//設置狀態欄的透明度
} else {
llTitle.setBackgroundColor(Color.argb((int) 255, 227, 29, 26));
StatusBarUtil.setTranslucentForImageView(MainActivity.this, 255, title);
}
}
}
注意:stickyScrollView.setStickTop(int height)我們通過這個方法可以設置Tab距離多高開始懸浮
我們通過監聽ScrollView滑動距離來不斷改變我們標題欄跟狀態欄的透明度來達到效果,在這裡我們計算了幾個高度(滑動距離)。最後來算出滑動總距離,根據滑動的距離跟滑動的總距離來算出透明度的數值。
StatusBarUtil.setTranslucentForImageView(MainActivity.this, 0, title);我們通過工具來實現圖片深入狀態欄。裡面的傳的View是圖片下面的View。
以上所述是小編給大家介紹的Android 沉浸式狀態欄及懸浮效果,希望對大家有所幫助,如果大家有任何疑問請給我留言,小編會及時回復大家的。在此也非常感謝大家對本站網站的支持!
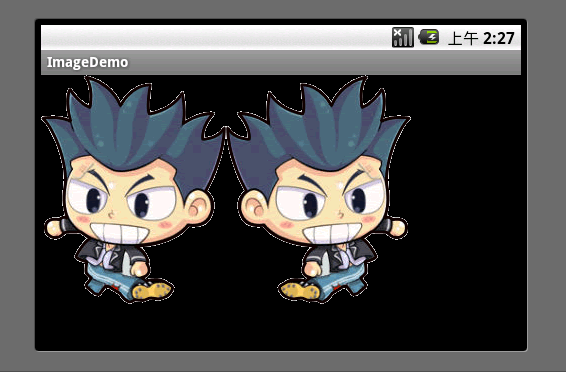 android實現圖片反轉效果
可能有些同學不明白,為啥要圖片反轉(不是旋轉哦),我們在游戲開發中,為了節省圖片資源(空間) 有可能會使用到圖片反轉,例如,一個人物圖片,面向左,或右,如果不能實現圖片反
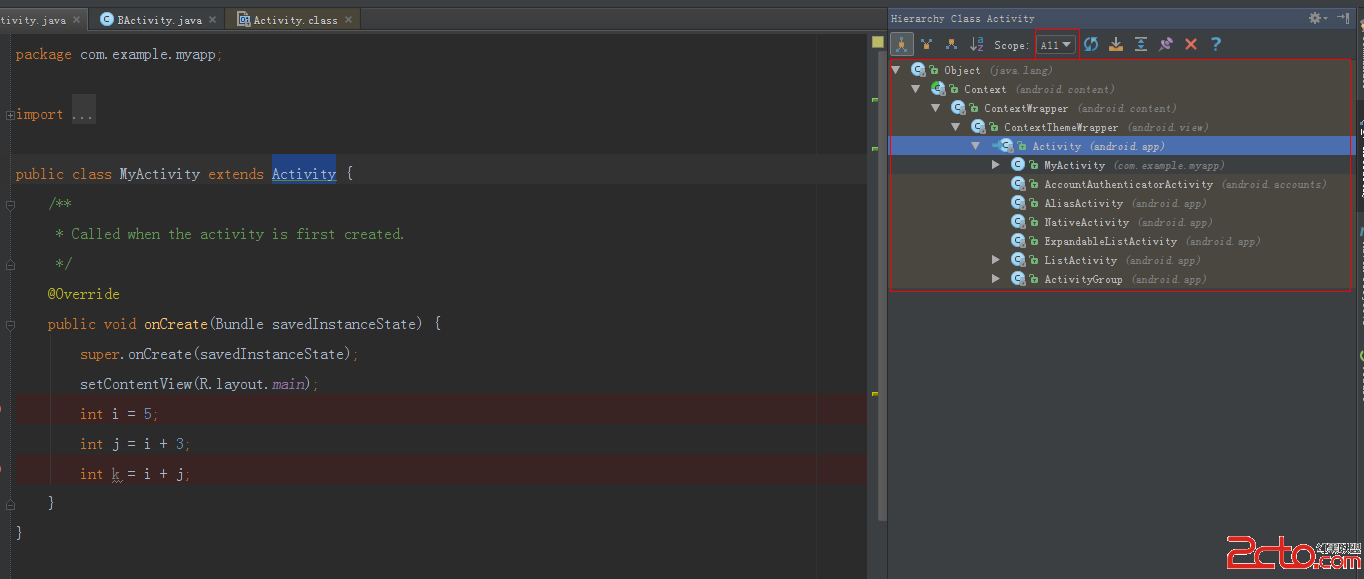 Android Studio中查看類的繼承關系
查看類的繼承關系的快捷鍵F4,在Android Studio常用快捷鍵這篇文章中,有寫了。今天主要是講一些關於這個快捷鍵出來的界面的一些配置,這塊功能相對偏冷一些,可能
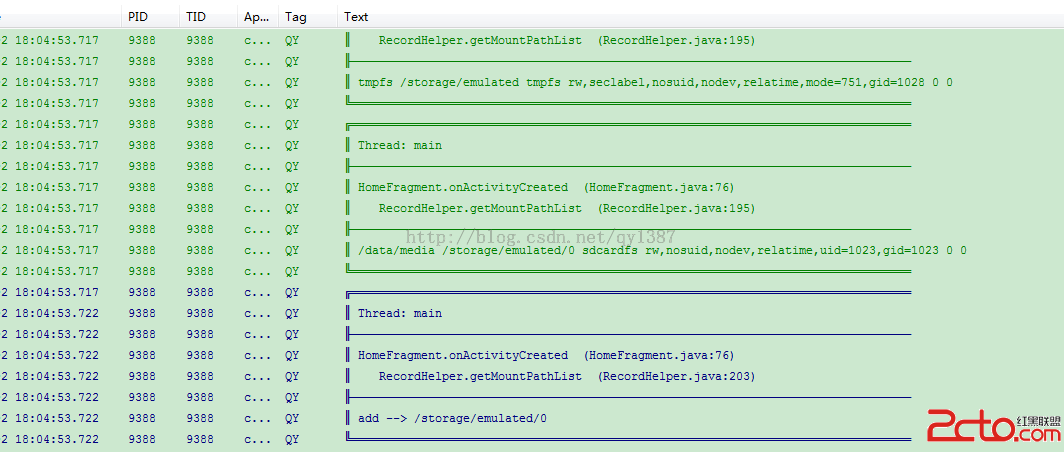 Android獲取所有存儲卡掛載路徑
最近因項目需求,需要在存儲卡查找文件,經測試發現部分手機掛載路徑查找不到,這裡分享一個有效的方法。 /** * 獲取所有存儲卡掛載路徑 * @return
 安卓實戰開發之CardView的selector及GrideView的item按下狀態保留selector(state_activated)的實現
android的selector對於android開發者而言再熟悉不過了,只要定義一個drawable目錄下定義一個selector的xml文件,在布局文件中backgr