編輯:關於Android編程
Android Service服務詳解
一.Service簡介
Service是android 系統中的四大組件之一(Activity、Service、BroadcastReceiver、 ContentProvider),它跟Activity的級別差不多,但不能頁面顯示只能後台運行,並且可以和其他組件進行交互。service可以在很多場合的應用中使用,比如播放多媒體的時候用戶啟動了其他Activity這個時候程序要在後台繼續播放,比如檢測SD卡上文件的變化,再或者在後台記錄你地理信息位置的改變等等,總之服務總是藏在後台的,例如,一個service可能處理網絡 事物,播放音樂,執行文件I/O,或與一個內容提供者交互,所有這些都在後台進行。
我們一定要知道的是這裡Service的後台運行並不是子線程。Service的運行是在主線程中進行的,只是它沒有界面顯示而已,它的耗時操作同樣需要開啟子線程,否者會跟Activity一樣出現ANR(application not response–程序沒有響應)。
我們要知道的是主線程的內容包括UI和後台。只要程序中的UI或後台其中一個在跑,程序都算是在運行狀態。
(一)Service的創建和注冊1.Service服務的創建
必須要實現重寫其中的onBind方法,可以在裡面做各種操作,也可以接收傳遞過來的Intent的數據做處理。
public class MyService extends Service {
  @Nullable
  @Override
  public IBinder onBind(Intent intent) {
    System.out.println("MyService.onBind");
    return null;
  }
 }
2.Service服務的注冊,在AndroidManifest中注冊
<service android:name=".MyService" />
服務的注冊是四大組件中最簡單的一個,一般只要設置name屬性就可以了。但是如果有其他需求還是要設置其他的屬性值的。
對Service服務做好創建和注冊後,就可以操作服務了。
(二)Service兩種啟動模式
Service的啟動有兩種方式:Context.startService() 和 Context.bindService()。這裡的Context是上下文的意思。
1.startService()方式啟動時的生命周期回調方法
(1)啟動服務startService : –>onCreate()–> onStart()
(2)停止服務stopService : –>onDestroy()
如果調用者直接退出而沒有停止Service,則Service 會一直在後台運行。這裡的退走只是關閉了UI界面。
startService()方法啟動服務,在服務未被創建時,系統會先調用服務的onCreate()方 法,接著調用onStart()方法。如果調用startService()方法前服務已經被創建,多次調用 startService()方法並不會導致多次創建服務,但會導致多次調用onStart()方法。采用 startService()方法啟動的服務,只能調用stopService()方法結束服務,服務結束時 會調用生命周期的onDestroy()方法。
2.bindService()方式啟動時的生命周期回調方法
(1)綁定bindService : –> onCreate() –> onBind()
(2)解綁unbindService: –>onUnbind()
(3)正常停止程序服務的方法是先解綁unbindService,再停止服務stopService。
(4)如果綁定後調用stopService 方法,這時是不能停止服務的,如果這時再調用解綁unbindService,程序後先解綁,後停止服務。
用bindService()方法啟動服務,在服務未被創建時,系統會先調用服務的onCreate() 方法,接著調用onBind()方法。這個時候調用者和服務綁定在一起,調用者退出了,系統就會
先調用服務的onUnbind()方法,接著調用onDestroy()方法。如果調用 bindService()方法前服務已經被綁定,多次調用bindService()方法並不會導致多次創建服務及綁定(也就是說 onCreate()和onBind()方法並不會被多次調用)。如果調用者希望與正在綁定的服務解除綁 定,可以調用unbindService()方法,調用該方法也會導致系統調用服務的onUnbind()->onDestroy()方法。
綁定Service方法:bindService(intent, conn, Service.BIND_AUTO_CREATE);
三個參數的說明:
第一個:Intent對象
第二個:ServiceConnection對象,創建該對象要實現它的onServiceConnected()和 on ServiceDisconnected()來判斷連接成功或者是斷開連接
第三個:創建Service的模式,一般指定綁定的時候自動創建
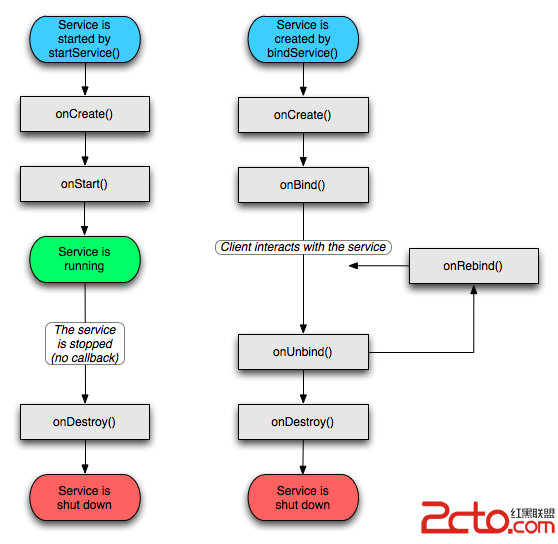
(三)Service的五個生命周期的回調方法
1.周期命名(1)onCreate()
(2)onStart()
(3)onBind()
(4)onUnBind()
(5)onDestroy()
2.生命周期圖解
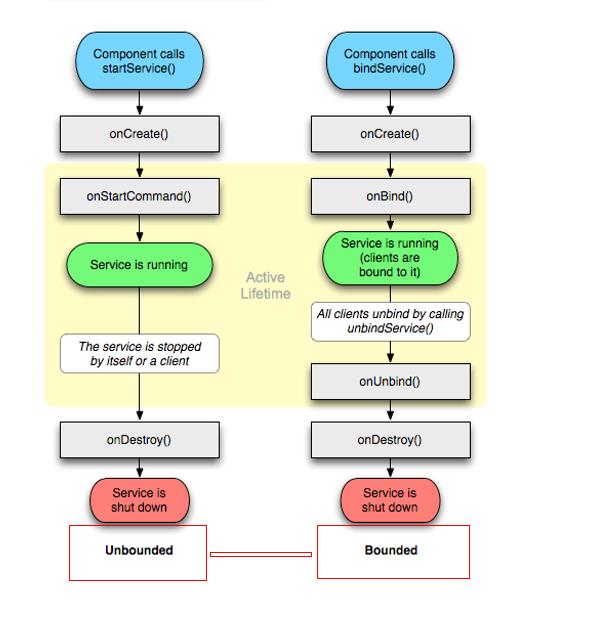
上面展示的是沒有綁定服務和有綁定服務的生命周期的不同情況的過程。
3.關於幾個方法的說明
(1)onCreate()說明服務第一次被創建
(2)onStartComand()說明服務開始工作
(3)onBind()說明服務已經綁定
(4)onUnBind()說明服務已經解綁
(5)onDestroy()說明服務已經停止
正如上面說的啟動服務有兩種方式,一個是使用startService,另一個方法是使用bindService方法;使用bindService方法沒有回調到startCommand方法;
也可以先啟動服務用startService,再綁定服務用bindService,這時的Service的回調方法的順序是:
–>onCreate()–>onStartCommand()–>onBind()
二.IntentService
普通的Service要創建一個線程去完成耗時操作,因為其運行在主線程,並且要手動停止IntentService是繼承於Service並處理異步請求的一個類,在IntentService內有一個工作線程 來處理耗時操作,啟動IntentService的方式和啟動傳統Service一樣,同時,當任務執行完 後,IntentService會自動停止,而不需要我們去手動控制。
另外,可以啟動IntentService多次,而每一個耗時操作會以工作隊列的方式在IntentService的onHandleIntent回調方法中執行,並且,每次只會執行一個工作線程,執行完第一個再執行第二個,以此類推。 而且,所有請求都在一個單線程中,不會阻塞應用程序的主線程(UI Thread),同一時間只處理一個請求。
那麼,用IntentService有什麼好處呢?
首先,我們省去了在Service中手動開線程的麻煩,
第二,當操作完成時,我們不用手動停止Service IntentService,一個方便我們處理業務流程的類,它是一個Service,但是比Service更智能
三.查看Service的生命周期回調方法的簡單示例
本示例只是用來看看Service在服務開啟時,停止時,綁定時,解綁時,生命周期方法的回調情況加深對Service生命周期的印象。
(一)創建MyService類(繼承Service)
package com.lwz.service;

import android.app.Service;
import android.content.Intent;
import android.os.IBinder;
import android.support.annotation.Nullable;

  /**
   * 服務的創建,
   * 測試生命周期的過程和先後
   * 五個生命周期:
   * onCreate
   * onStartCommand
   * onDestroy
   * onBind
   * onUnBind
   */

public class MyService extends Service {
  @Nullable
  @Override
  public IBinder onBind(Intent intent) {
    System.out.println("MyService.onBind");
    return null;
  }

  @Override
  public void onCreate() {
    System.out.println("MyService.onCreate");
    super.onCreate();
  }

  @Override
  public int onStartCommand(Intent intent, int flags, int startId) {
    System.out.println("MyService.onStartCommand");

    return super.onStartCommand(intent, flags, startId);
  }

  @Override
  public void onDestroy() {
    System.out.println("MyService.onDestroy");
    super.onDestroy();
  }

  @Override
  public boolean onUnbind(Intent intent) {
    System.out.println("MyService.onUnbind");
    return super.onUnbind(intent);
  }
}
(二)在AndroidManifest中注冊服務
<service android:name=".MyService" />
(三)設計控制服務開啟、停止、綁定、解綁狀態的代碼
package com.lwz.service;

import android.app.Service;
import android.content.ComponentName;
import android.content.Intent;
import android.content.ServiceConnection;
import android.os.Bundle;
import android.os.IBinder;
import android.support.v7.app.AppCompatActivity;
import android.view.View;

/**
 * 服務的創建和使用
 * 注意這裡的服務不依賴於Activity頁面,即使頁面關閉了,服務沒有主動去停止,是不會關閉的
 * Service也是在主線程中執行任務的,但是為什麼不會造成主線程阻塞??
 * 因為做的不是耗時操作,如果做耗時操作一樣會造成ANR。。。
 * 這裡點擊綁定服務後,點擊停止服務按鈕是無效的,要先解綁後,才能停止服務。
 * 正常情況下,從綁定狀態到解綁狀態是不會停止服務的。只是一種狀態改變而已。
 * 這裡點擊綁定服務後,點擊停止服務按鈕是無效的,但是解綁後,會馬上停止服務。
 */

public class MainActivity extends AppCompatActivity {

  @Override
  protected void onCreate(Bundle savedInstanceState) {
    super.onCreate(savedInstanceState);
    setContentView(R.layout.activity_main);
  }

  //開啟服務
  public void startService(View view) {
    //開啟服務需要Intent對象,和Activity跳轉類似
    startService(new Intent(this, MyService.class));

  }

  //停止服務
  public void stopService(View view) {
    //停止服務的方法
    stopService(new Intent(this, MyService.class));
  }

  //綁定服務
  public void bindService(View view) {
    //綁定服務
    bindService(new Intent(this, MyService.class), conn, flags);
  }

  //解綁服務
  public void unBindService(View view) {
    //防止在沒有綁定的情況下,去解除綁定,拋出異常
    try {
      //解除綁定
      unbindService(conn);
    } catch (Exception e) {
      System.out.println("MainActivity.unBindService" + e);
    }


  }

  //服務綁定的連接對象
  private ServiceConnection conn = new ServiceConnection() {
    @Override
    public void onServiceConnected(ComponentName name, IBinder service) {
    }

    @Override
    public void onServiceDisconnected(ComponentName name) {
    }
  };

  //服務綁定的標識
  //BIND_AUTO_CREATE 綁定的同時,啟動Service
  private int flags = Service.BIND_AUTO_CREATE;


}
上面是使用四個按鈕來實現服務的幾種狀態的改變。
(四)布局文件的設計
<?xml version="1.0" encoding="utf-8"?>
<LinearLayout xmlns:android="http://schemas.android.com/apk/res/android"
  android:id="@+id/activity_main"
  android:layout_width="match_parent"
  android:layout_height="match_parent"
  android:orientation="vertical">

  <TextView
    android:layout_width="wrap_content"
    android:layout_height="wrap_content"
    android:layout_gravity="center_horizontal"
    android:text="Service" />

  <Button
    android:layout_width="wrap_content"
    android:layout_height="wrap_content"
    android:onClick="startService"
    android:text="啟動服務" />

  <Button
    android:layout_width="wrap_content"
    android:layout_height="wrap_content"
    android:onClick="stopService"
    android:text="停止服務" />

  <Button
    android:layout_width="wrap_content"
    android:layout_height="wrap_content"
    android:onClick="bindService"
    android:text="綁定服務" />

  <Button
    android:layout_width="wrap_content"
    android:layout_height="wrap_content"
    android:onClick="unBindService"
    android:text="解綁服務" />


</LinearLayout>
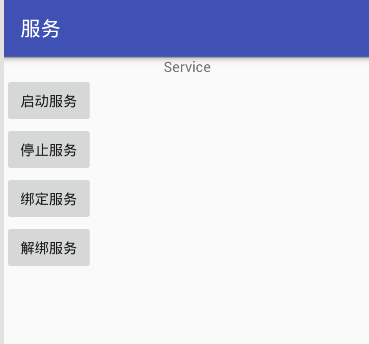
上面布局文件代碼比較簡單的,只是用四個按鈕搞定!
程序運行後顯示的界面:
點擊“啟動服務”按鈕後的Log信息:

這時有兩個回調方法執行。onCreate和onStartCommand.
點擊“停止服務”按鈕後的Log信息:

執行了一個回調方法:onDestroy;這時服務已經停止,相當於程序剛運行的狀態!
點擊“綁定服務”按鈕後的Log信息:
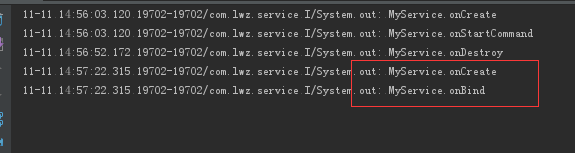
這裡執行了兩個回調方法,先啟動服務,再綁定服務!
在綁定服務的情況下是不能停止服務的,要解綁服務才能停止服務。
在程序的服務啟動/綁定了的情況下,再點擊啟動服務,只會回調onStartCommand方法,也就是說一個服務在一個生命周期內只會回調一次onCreate方法。
點擊“解綁服務”按鈕後顯示的Log信息:
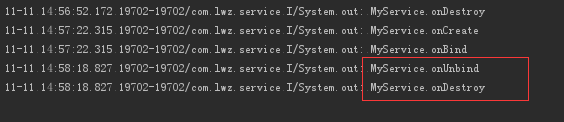
執行了兩個回調方法:onUnBind和onDestroy
如果是用服務做簡單 的事情,使用第一種方法來啟動服務就可以了,但是如果需要涉及到比較復雜的數據處理和操作就用綁定服務的方法來啟動服務。
四.IntentService的使用示例
程序設計:查找手機SD卡中的所有圖片顯示在UI界面上。
//(一)布局文件activity_main.xml文件實際
<?xml version="1.0" encoding="utf-8"?>
<RelativeLayout xmlns:android="http://schemas.android.com/apk/res/android"
  android:id="@+id/activity_main"
  android:layout_width="match_parent"
  android:layout_height="match_parent">


  <ListView
    android:id="@+id/main_lv"
    android:layout_width="match_parent"
    android:layout_height="match_parent"></ListView>
</RelativeLayout>
非常簡單的布局設計,使用List View來顯示所有的圖片
(二)遍歷文件的工具類的設計
package com.lwz.intentservice;

import android.os.Environment;
import android.os.StatFs;

import java.io.File;
import java.util.ArrayList;
import java.util.List;

/**
 * SD卡的路徑:Environment.getExternalStorageDirectory()
 */

public class FileUtils {

  /**
   * 獲得指定目錄下的所有的圖片
   */
  public static final ArrayList<File> getAllPicture(File dir) {
    ArrayList<File> files = getAllFile(dir);
    ArrayList<File> imgList = new ArrayList<>();
    for (File file : files) {
      if (file.getName().endsWith(".png") || file.getName().endsWith(".jpg"))
        imgList.add(file);
    }
    return imgList;
  }

  /**
   * 遞歸遍歷文件夾的方法
   */
  public static final void getFileFromDir(File dir, List<File> fileList) {
    File[] files = dir.listFiles();
    if (files == null)
      return;
    for (File file : files) {
      if (file.isDirectory())
        getFileFromDir(file, fileList);
      fileList.add(file);
    }
  }

  /**
   * 獲得根目錄下的所有圖片
   */
  public static final ArrayList<File> getAllPicture() {
    return getAllPicture(Environment.getExternalStorageDirectory());
  }

}
(三)簡化BaseAdapter的一個工具類
package com.lwz.intentservice;

import android.content.Context;
import android.widget.BaseAdapter;

import java.util.ArrayList;
import java.util.List;

/**
 * 這是一個簡化BaseAdapter適配器的工具類
 * 這是使用的是定義一個泛型T,使用時傳入什麼數據,T就是什麼數據
 * 實際設計中除了getVIew方法外,其他的方法基本是差不多的
 * 所以繼承這個工具類後只要重寫getView方法,就可以使用BaseAdapter了
 */

public abstract class ListItemAdapter<T> extends BaseAdapter {
  List<T> list = new ArrayList<>();
  Context context;

  ListItemAdapter(Context context, List<T> list) {
    this.context = context;
    this.list = list;
  }

  ListItemAdapter(Context context, T[] list) {
    this.context = context;
    for (T t : list) {
      this.list.add(t);
    }
  }

  @Override
  public int getCount() {
    return list == null ? 0 : list.size();
  }

  @Override
  public T getItem(int position) {

    return list == null ? null : list.get(position);
  }

  @Override
  public long getItemId(int position) {
    return position;
  }

}
(四)MyIntentService的創建
package com.lwz.intentservice;

import android.app.IntentService;
import android.content.Intent;
import android.os.Message;
import android.util.Log;

import java.io.File;
import java.util.ArrayList;

/**
 * IntentService的使用
 * IntentService是Service的子類,也需要在xml中注冊
 * 它有自定義的子線程的方法
 * 這裡主要需要解決的問題是資源文件得到後怎麼把數據傳遞給UI線程的Activity
 */

public class MyIntentService extends IntentService {
  /**
   * 通過構造方法,傳入子線程的名字
   * 但是這裡必須要創建一個無參的構造方法
   */
  public MyIntentService() {
    super("myService");
  }

  /**
   * 這是在子線程中的執行操作
   */
  @Override
  protected void onHandleIntent(Intent intent) {
    Log.e("TAG", "子線程開始工作");
    //遍歷文件夾獲取圖片
    ArrayList<File> list = FileUtils.getAllPicture();
    //使用handler發送信息
    Message msg = Message.obtain();
    //這裡給handler對象傳遞一個對象
    msg.obj = list;
    //發送廣播來傳遞數據
    Intent intent1 = new Intent("filefinish");
    intent1.putExtra("file", list);
    sendBroadcast(intent1);
  }

  @Override
  public void onCreate() {
    super.onCreate();
    Log.e("TAG", "onCreate");
  }

  @Override
  public void onDestroy() {
    super.onDestroy();
    Log.e("TAG", "onDestroy");
  }
}
這裡的Intent Service的注冊和Intent的注冊是一樣的。
(五)MainActivity中的代碼設計
package com.lwz.intentservice;

import android.content.BroadcastReceiver;
import android.content.Context;
import android.content.Intent;
import android.content.IntentFilter;
import android.net.Uri;
import android.os.Bundle;
import android.support.v7.app.AppCompatActivity;
import android.view.View;
import android.view.ViewGroup;
import android.widget.ImageView;
import android.widget.ListView;

import java.io.File;
import java.util.ArrayList;
import java.util.List;

/**
 * 這裡使用服務來IntentService來遍歷文件夾
 * 在程序創建的使用就要啟動服務
 * 在頁面銷毀的時候就停止服務
 但是Service執行完任務後還有傳遞數據給MainActivity
 在MainActivity中才能進行UI界面的更新
 這就涉及到Service和Activity的數據傳遞問題了
 這裡使用的是用廣播來傳遞數據
 */
public class MainActivity extends AppCompatActivity {
  //定義布局內的控件
  ListView listView;
  //定義適配器的數據的集合

  //一定要static???
  static ArrayList<File> fileList;
  static MyBaseAdapter adapter;
  MyBroadcastReceiver mbcr;

  @Override
  protected void onCreate(Bundle savedInstanceState) {
    super.onCreate(savedInstanceState);
    setContentView(R.layout.activity_main);
    mbcr = new MyBroadcastReceiver();
    //動態注冊一個廣播
    IntentFilter filter = new IntentFilter();
    filter.addAction("filefinish");
    registerReceiver(mbcr, filter);// 注冊
    //創建適配器的對象
    adapter = new MyBaseAdapter(this, fileList);
    //實例化布局內的控件
    listView = (ListView) findViewById(R.id.main_lv);

    //給listView設置適配器
    listView.setAdapter(adapter);
    //啟動服務
    startService(new Intent(this, MyIntentService.class));
  }


  //創建適配器的類
  class MyBaseAdapter extends ListItemAdapter<File> {

    MyBaseAdapter(Context context, List<File> list) {
      super(context, list);
    }

    @Override
    public View getView(int position, View convertView, ViewGroup parent) {
      ImageView image = null;
      if (convertView == null) {
        image = new ImageView(getBaseContext());
        convertView = image;
      } else {
        image = (ImageView) convertView;
      }
      //設置圖片資源和屬性
      image.setImageURI(Uri.fromFile(fileList.get(position)));
      image.setScaleType(ImageView.ScaleType.FIT_XY);
      image.setAdjustViewBounds(true);
      return image;
    }
  }

  //停止服務
  public void stop() {
    stopService(new Intent(MainActivity.this, MyIntentService.class));
  }

  @Override
  protected void onDestroy() {
    super.onDestroy();
    //即使之前停止了服務,再次停止服務也是不會報錯的
    stop();
    //解除廣播
    unregisterReceiver(mbcr);
  }

  //動態創建廣播接收者
  class MyBroadcastReceiver extends BroadcastReceiver {
    @Override
    public void onReceive(Context context, Intent intent) {
      //對接收到的廣播進行處理,intent裡面包含數據
      fileList = (ArrayList<File>) intent.getSerializableExtra("file");
      //刷新適配器
      adapter.notifyDataSetChanged();
      //停止服務,它的子線程也會停止
      stop();
    }
  }


}
程序運行前還記得加上SD卡的訪問權限;
上面程序功能還是有點問題!遍歷完文件後。頁面沒有馬上更新?退出程序再進來,頁面上馬上顯示SD卡的圖片。
一般的說遍歷文件夾也不算是耗時操作,這裡只是簡單示范。
一般的耗時操作是從網絡下載數據,或本地移動大文件等等。
五.同一個程序中Service和Activity通信的一些方式,這裡展示主要代碼。
這裡組件不要忘記在AndroidManifest中注冊
(一)使用Intent來傳遞數據1.MainActivity中的代碼,發送數據
Intent intent = new Intent(this, MyService.class);
intent.putExtra("msg", "activity向service傳遞一個hello service");
startService(intent);
2.MyService中的代碼,接收數據
這裡要使用onStartCommand的方法來接收Intent的數據,如果上面使用的是bind的方法來啟動服務,這裡可以在onBind方法中接收數據。
@Override
  public int onStartCommand(Intent intent, int flags, int startId) {
    Log.e("onStartCommand", intent.getStringExtra(msg));
    return super.onStartCommand(intent, flags, startId);
  }
(二)使用單例模式來傳遞數據
這個方法算是有點麻煩的吧!這裡要在MyService類中先做好單例,然後在Activity中調用MyService對象的方法
1.MyService中的代碼
//定義一個靜態的類變量,單例的使用准備
  private static MyService instance;

  //靜態方法,返回的是一個本類對象
  //為了能讓另一邊的類調用Myservice的方法
  public static MyService getInstance() {
    return instance;
  }


  @Override
  public void onCreate() {
    super.onCreate();

    //單例模式變量賦值
    instance = this;
  }
public void print(String msg) {
    Log.e("service", msg);
  }
其中print方法是在Activity中調用的,可以達到傳送數據給MyService,但是這裡要先啟動過服務後才能使用單例,因為這裡是在MyService的onCreate方法中把對象賦值給instance,之後才能實現單例。
2.MainActivity中的代碼:
/**
   * 單例模式傳參
   *MyService這裡通過一個靜態方法,來獲得MyService的對象
這裡通過MyService.getInstance()方法來獲得MyService對象
   */
      //必須保證Myservice對象不能為null
    //靜態的變量,最後釋放(不用的時候,手動將static變量=null)
    if (MyService.getInstance() != null) {
      MyService.getInstance().print("使用單例從activity中調用service的方法");
    }
(三)廣播傳參傳數據
弄兩個廣播接收者相互傳數據。
這裡要在MyService和MyService中分別動態的創建廣播接收者和動態注冊廣播接收者,然後在MainActivity中發送廣播,在MyService中接收到廣播傳來遞數據後,在發送廣播,讓MainActivity接收廣播數據!
1.MyService中的代碼:
@Override
  public void onCreate() {
    super.onCreate();
    //動態注冊廣播接收者,要定義好接收的action屬性值
    IntentFilter filter = new IntentFilter("service");
    registerReceiver(serviceReceiver, filter);

  }

 //定義一個廣播接收者BroadcastReceiver
  BroadcastReceiver serviceReceiver = new BroadcastReceiver() {
    @Override
    public void onReceive(Context context, Intent intent) {
      Log.e("service", "接收到了activity發送的廣播:" + intent.getStringExtra("msg"));
//發送廣播給MainActivity
      sendBroadcast(new Intent("activity").putExtra("msg", "發送給activity的消息"));
    }
  };
2.MainActivity中的代碼:
@Override
  protected void onCreate(Bundle savedInstanceState) {
    super.onCreate(savedInstanceState);
    setContentView(R.layout.activity_main);
    //注冊本類內的廣播,定義好action的屬性值
    IntentFilter filter = new IntentFilter("activity");
    registerReceiver(activityReceiver, filter);

  }

 /**
   * 通過廣播來傳遞數據
   */
  public void sendBroadcast(View view) {
    //指明action屬性值
    Intent intent = new Intent("service");
    intent.putExtra("msg", "activity向廣播傳遞一個hello broadcast");
    sendBroadcast(intent);
  }

 //定義一個內部類的廣播接收者,用於接收MyService傳遞過來的數據
  BroadcastReceiver activityReceiver = new BroadcastReceiver() {
    @Override
    public void onReceive(Context context, Intent intent) {
      Log.e("activity", intent.getStringExtra("msg"));
    }
  };
(四)MyService實例調用方法
這個方法是最最麻煩的方法了!涉及到一個Binder類的使用!這裡要被調用的方法其實不是MyService中的方法,而是裡面的內部接口的抽象方法,需要在MainActivity中去實現這個方法!但是,實際這個方法實在MyService中執行的。
1.MyService中的代碼:
//定義一個接口
  interface Callback {
    //定義兩個要實現的方法
    void call();

    void start();
  }

  //定義一個接口對象
  Callback callback;

  /**
   * 創建Binder類,很多很多的Service就是通過Binder機制來和客戶端通訊交互的。
   */
  class Mybinder extends Binder {
    public MyService getService() {
      return MyService.this;
    }

    //設置回調方法
    public void setCallback(Callback callback) {
      MyService.this.callback = callback;
    }
  }

  //定義一個模擬開始音樂播放的方法
  //需要重寫start裡面的方法來開始播放音樂
  public void startMusic() {
    //播放
    Toast.makeText(this, "音樂開始播放", Toast.LENGTH_SHORT).show();
    callback.start();
  }

 @Nullable
  @Override
  public IBinder onBind(Intent intent) {
    //要傳遞一個MyBinder對象給MainActivity
    return new MyBinder();
  }

//定義一個模擬開始音樂播放的方法
  //需要重寫start裡面的方法來開始播放音樂
  public void startMusic() {
    //播放
    Toast.makeText(this, "音樂開始播放", Toast.LENGTH_SHORT).show();
//在MainActivity中實例化callback對象
    callback.start();
  }
上面的代碼中要開始播放音樂要調用startMusic方法,並且要實例化裡面的callback對象,而要實例化callback對象必須要調用內部類Mybinder的set Callback方法,而實現這個方法又必須實現這個接口的方法!
2.MainActivity中的代碼:
/**
   * 綁定服務Service
調用MyService的方法來調用內部類的接口方法
   */
//定義一個MyService對象
MyService myService;
  public void bindService(View view) {
    bindService(new Intent(this, MyService.class), conn, BIND_AUTO_CREATE);
 myService.startMusic();
  }

//創建ServiceConnection對象
 ServiceConnection conn = new ServiceConnection() {
    @Override
    public void onServiceConnected(ComponentName name, IBinder service) {
      //連接服務後,操作。。。
      //獲取IBinder的bind對象,從MyService的onBinder中傳遞過來的
      MyService.Mybinder bind = (MyService.Mybinder) service;
      //通過bind對象獲取Service對象
      myService = bind.getService();
      //設置監聽事件的回調方法,並實現裡面的兩個方法
//這裡的回調方法不是MyService中的,而是內部類Mybinder中的
      bind.setCallback(new MyService.Callback() {
        @Override
        public void call() {
          Log.e("activity", "Service回調Activity");
        }

        @Override
        public void start() {
          //比如在後台播放音樂;開始播放音樂
          Log.e("action", "正在播放音樂");
          //關閉頁面
          finish();
        }
      });
上面的關系確實是有點亂,我發現我有些注解還是有點問題的!!
上面就是Service中的個方面的總結。
Service還可以用來做進程間的數據傳遞,這裡就涉及到AIDL(Android Interface Definition Language,安卓接口定義語言)進程通信。這個相對來說比較復雜,另作總結!
感謝閱讀,希望能幫助到大家,謝謝大家對本站的支持!
 Android Contact provider基礎
Contact providerContact provider是一個強大而又靈活的 Android 組件,用於管理設備上有關聯系人數據的中央存儲庫。 Contact p
 Android M 動態權限獲取
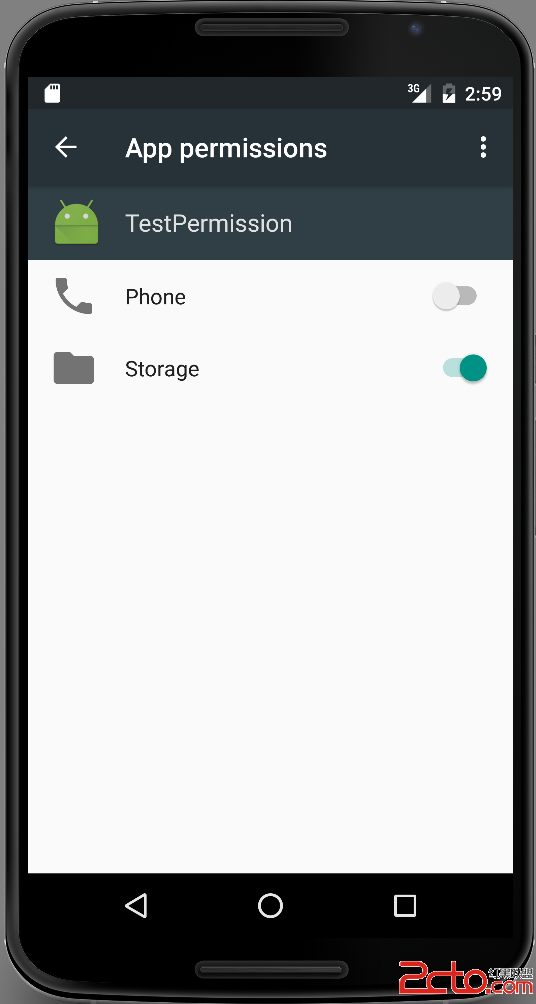
新的權限獲取方式除了要求像之前版本一樣在AndroidManifest文件中靜態申請之外,應用還需根據需要請求權限,方式采用向用戶顯示一個請求權限的對話框。這些被動態申
 Android中關於FragmentA嵌套FragmentB的問題
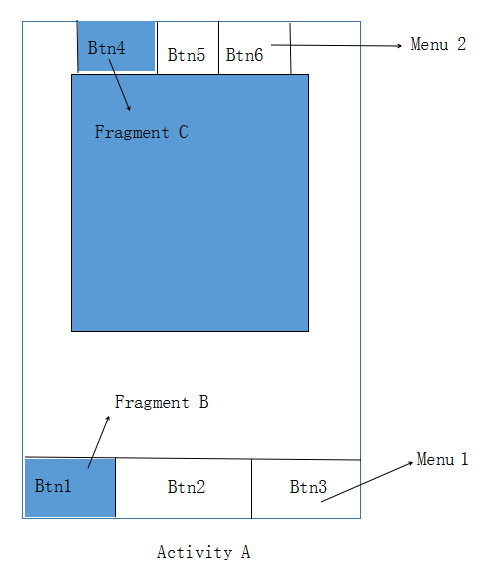
問題描述:在項目中Activity A中嵌套Fragment B,Fragment B中再嵌套Fragment C,如圖:問題1:在點擊Activity A中主菜單1進行
 AndroidStudio如何快速制作.so
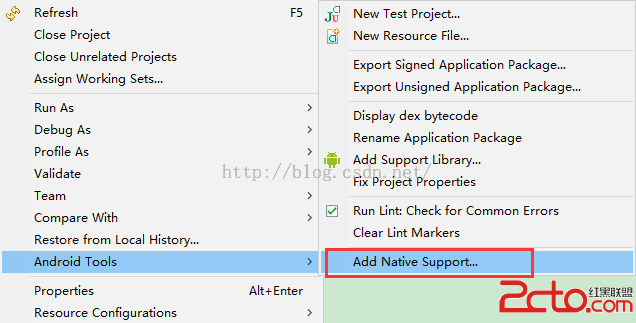
之前寫過一篇Eclipse制作.so的文章,使用的是GNUstep模擬Linux環境,過程現在看來是想相當麻煩,後來發現一個簡單的方法就是通過項目右鍵添加Native S