編輯:關於Android編程
今天碰到了在XML中應用以內部類形式定義的自定義view,結果遇到了一些坑。雖然通過看了一些前輩寫的文章解決了這個問題,但是我看到的幾篇都沒有完整說清楚why,於是決定做這個總結。
使用自定義內部類view的規則
本文主要是總結why,所以先把XML布局文件中引用內部類的自定義view的做法擺出來,有四點:
1.自定義的類必須是靜態類;
2.使用view作為XML文件中的tag,注意,v是小寫字母,小寫字母v,小寫字母v;
3.添加class屬性,注意,沒有帶android:命名空間的,表明該自定義view的完整路徑,且外部類與內部類之間用美元“$”連接,而不是“.”,注意,要美元“$”,不要“.”;
4.自定義的view至少應該含有帶有Context, AttributeSet這兩個參數的構造函數
布局加載流程主要代碼
首先,XML布局文件的加載都是使用LayoutInflater來實現的,通過這篇文章的分析,我們知道實際使用的LayoutInflater類是其子類PhoneLayoutInflater,然後通過這篇文章的分析,我們知道view的真正實例化的關鍵入口函數是createViewFromTag這個函數,然後通過createView來真正實例化view,下面便是該流程用到的關鍵函數的主要代碼:
final Object[] mConstructorArgs = new Object[2];

  static final Class<?>[] mConstructorSignature = new Class[] {
      Context.class, AttributeSet.class};

  //...

  /**
   * Creates a view from a tag name using the supplied attribute set.
   * <p>
   * <strong>Note:</strong> Default visibility so the BridgeInflater can
   * override it.
   *
   * @param parent the parent view, used to inflate layout params
   * @param name the name of the XML tag used to define the view
   * @param context the inflation context for the view, typically the
   *        {@code parent} or base layout inflater context
   * @param attrs the attribute set for the XML tag used to define the view
   * @param ignoreThemeAttr {@code true} to ignore the {@code android:theme}
   *            attribute (if set) for the view being inflated,
   *            {@code false} otherwise
   */
  View createViewFromTag(View parent, String name, Context context, AttributeSet attrs,
      boolean ignoreThemeAttr) {
    //**關鍵1**//
    if (name.equals("view")) {
      name = attrs.getAttributeValue(null, "class");
    }

    // Apply a theme wrapper, if allowed and one is specified.
    if (!ignoreThemeAttr) {
      final TypedArray ta = context.obtainStyledAttributes(attrs, ATTRS_THEME);
      final int themeResId = ta.getResourceId(0, 0);
      if (themeResId != 0) {
        context = new ContextThemeWrapper(context, themeResId);
      }
      ta.recycle();
    }

    if (name.equals(TAG_1995)) {
      // Let's party like it's 1995!
      return new BlinkLayout(context, attrs);
    }

    try {
      View view;
      if (mFactory2 != null) {
        view = mFactory2.onCreateView(parent, name, context, attrs);
      } else if (mFactory != null) {
        view = mFactory.onCreateView(name, context, attrs);
      } else {
        view = null;
      }

      if (view == null && mPrivateFactory != null) {
        view = mPrivateFactory.onCreateView(parent, name, context, attrs);
      }

      if (view == null) {
        final Object lastContext = mConstructorArgs[0];
        mConstructorArgs[0] = context;
        try {
          if (-1 == name.indexOf('.')) {
            //**關鍵2**//
            view = onCreateView(parent, name, attrs);
          } else {
            //**關鍵3**//
            view = createView(name, null, attrs);
          }
        } finally {
          mConstructorArgs[0] = lastContext;
        }
      }

      return view;
    }
    //後面都是catch,省略
  }

  protected View onCreateView(View parent, String name, AttributeSet attrs)
      throws ClassNotFoundException {
    return onCreateView(name, attrs);
  }

  protected View onCreateView(String name, AttributeSet attrs)
      throws ClassNotFoundException {
    return createView(name, "android.view.", attrs);
  }

  /**
   * Low-level function for instantiating a view by name. This attempts to
   * instantiate a view class of the given <var>name</var> found in this
   * LayoutInflater's ClassLoader.
   *
   * @param name The full name of the class to be instantiated.
   * @param attrs The XML attributes supplied for this instance.
   *
   * @return View The newly instantiated view, or null.
   */
  public final View createView(String name, String prefix, AttributeSet attrs)
      throws ClassNotFoundException, InflateException {
    Constructor<? extends View> constructor = sConstructorMap.get(name);
    Class<? extends View> clazz = null;

    try {
      Trace.traceBegin(Trace.TRACE_TAG_VIEW, name);

      if (constructor == null) {
        //**關鍵4**//
        // Class not found in the cache, see if it's real, and try to add it
        clazz = mContext.getClassLoader().loadClass(
            prefix != null ? (prefix + name) : name).asSubclass(View.class);

        if (mFilter != null && clazz != null) {
          boolean allowed = mFilter.onLoadClass(clazz);
          if (!allowed) {
            failNotAllowed(name, prefix, attrs);
          }
        }
        constructor = clazz.getConstructor(mConstructorSignature);
        constructor.setAccessible(true);
        sConstructorMap.put(name, constructor);
      } else {
        // If we have a filter, apply it to cached constructor
        if (mFilter != null) {
          // Have we seen this name before?
          Boolean allowedState = mFilterMap.get(name);
          if (allowedState == null) {
            // New class -- remember whether it is allowed
            clazz = mContext.getClassLoader().loadClass(
                prefix != null ? (prefix + name) : name).asSubclass(View.class);

            boolean allowed = clazz != null && mFilter.onLoadClass(clazz);
            mFilterMap.put(name, allowed);
            if (!allowed) {
              failNotAllowed(name, prefix, attrs);
            }
          } else if (allowedState.equals(Boolean.FALSE)) {
            failNotAllowed(name, prefix, attrs);
          }
        }
      }

      Object[] args = mConstructorArgs;
      args[1] = attrs;
      //**關鍵5**//
      final View view = constructor.newInstance(args);
      if (view instanceof ViewStub) {
        // Use the same context when inflating ViewStub later.
        final ViewStub viewStub = (ViewStub) view;
        viewStub.setLayoutInflater(cloneInContext((Context) args[0]));
      }
      return view;

    }
    //後面都是catch以及finally處理,省略
  }
PhoneLayoutInflater中用到的主要代碼:
public class PhoneLayoutInflater extends LayoutInflater {
  private static final String[] sClassPrefixList = {
    "android.widget.",
    "android.webkit.",
    "android.app."
  };
  //......

  /** Override onCreateView to instantiate names that correspond to the
    widgets known to the Widget factory. If we don't find a match,
    call through to our super class.
  */
  @Override protected View onCreateView(String name, AttributeSet attrs) throws ClassNotFoundException {
    //**關鍵6**//
    for (String prefix : sClassPrefixList) {
      try {
        View view = createView(name, prefix, attrs);
        if (view != null) {
          return view;
        }
      } catch (ClassNotFoundException e) {
        // In this case we want to let the base class take a crack
        // at it.
      }
    }

    return super.onCreateView(name, attrs);
  }

  //.........
}
WHY
對於任何一個XML中的元素,首先都是從“1”處開始(“1”即表示代碼中標注“關鍵1”的位置,後同),下面便跟著代碼的流程來一遍:
1.“1”處進行名字是否為“view”的判斷,那麼這裡會有兩種情況,我們先假設使用“view”
2.由於在“1”滿足條件,所以name被賦值為class屬性的值,比如“com.willhua.view.MyView”或者“com.willhua.view.MyClass$MyView”。其實這裡也是要使用“view”來定義,而不是其他名字來定義的原因。
3.根據name的值,name中含有‘.'符號,於是代碼走到“3”處,調用createView,且prefix參數為空
4.來到“4”處,prefix為空,於是loadClass函數的參數即為name,即在a.2中說的class屬性的值。我們知道,傳給loadClass的參數是想要加載的類的類名,而在Java中,內部類的類名表示都是在外部類類名的後面用符號“$”連接內部類類名而來,於是文章開頭提到的第3點的答案也就是在這裡了。補充一下,為什麼是來到“4”,而不是對應的else塊中呢?類第一次被加載的時候,構造器肯定是還不存在的,也就是if條件肯定是成立的。然後等到後面再次實例化的時候,就來到了else塊中,而在else快中只是根據mFilter做一些是否可以加載該view的判斷而已,並沒有從本質上影響view的加載流程。
5.在“4”處還有一個很重要的地方,那就是constructor = class.getConstructor(mConstructorSignature)這句。首先,在代碼開頭已經給出了mConstructorSignature的定義:
static final Class<?>[] mConstructorSignature = new Class[] {Context.class, AttributeSet.class};
在Oracle的文檔上找到getConstructor函數的說明:
Returns a Constructor object that reflects the specified public constructor of the class represented by this Class object. The parameterTypes parameter is an array of Class objects that identify the constructor's formal parameter types, in declared order. If this Class object represents an inner class declared in a non-static context, the formal parameter types include the explicit enclosing instance as the first parameter.
The constructor to reflect is the public constructor of the class represented by this Class object whose formal parameter types match those specified by parameterTypes.
於是,這裡其實解答了我們兩個問題:(1)getConstructor返回的構造函數是其參數與傳getConstructor的參數完全匹配的那一個,如果沒有就拋出NoSuchMethodException異常。於是我們就知道,必須要有一個與mConstructorSignature完全匹配,就需要Context和AttributeSet兩個參數的構造函數;(2)要是該類表示的是非靜態的內部類,那麼應該把一個外部類實例作為第一個參數傳入。而我們的代碼中傳入的mConstructorSignature是不含有外部類實例的,因此我們必須把我們自定義的內部類view聲明為靜態的才不會報錯。有些同學的解釋只是說到了非靜態內部類需要由一個外部類實例來引用,但我想那萬一系統在加載的時候它會自動構造一個外部類實例呢?於是這裡給了否定的答案。
6. 拿到了類信息clazz之後,代碼來到了“5”,在這裡注意下mConstructorArgs,在貼出的代碼最前面有給出它的定義,為Object[2],並且,通過源碼中發現,mConstructorArgs[0]被賦值為創建LayoutInflater時傳入的context。於是我們就知道 在“5”這裡,傳給newInstance的參數為Context和AttributeSet。然後在Oracl的文檔上關於newInstance的說明中也有一句:If the constructor's declaring class is an inner class in a non-static context, the first argument to the constructor needs to be the enclosing instance; 我們這裡也沒有傳入外部類實例,也就是說對於靜態內部類也會報錯。這裡同樣驗證了自定義了的內部類view必須聲明為靜態類這個問題。
至此,我們已經在假設使用“view”,再次強調是小寫‘v',作為元素名稱的情況,推出了要在XML中應用自定義的內部類view必須滿足的三點條件,即在class屬性中使用“$”連接外部類和內部類,必須有一個接受Context和AttributeSet參數的構造函數,必須聲明為靜態的這三個要求。
而如果不使用“view”標簽的形式來使用自定義內部類view,那麼在寫XML的時候我們發現,只能使用比如<com.willhua.MyClass.MyView />的形式,而不能使用<com.willhua.MyClass$MyView />的形式,這樣AndroidStudio會報“Tag start is not close”的錯。顯然,如果我們使用<com.willhua.MyClass.MyView />的形式,那麼在“關鍵4”處將會調用loadClass("com.willhua.MyClass.MyView"),這樣在前面也已經分析過,是不符合Java中關於內部類的完整命名規則的,將會報錯。有些人估計會粗心寫成大寫的V的形式,即<View class="com.willhua.MyClass$MyView" ... />的形式,這樣將會在運行時報“wrong type”錯,因為這樣本質上定義的是一個android.view.View,而你在代碼中卻以為是定義的com.willhua.MyClass$MyView。
在標識的“2”處,該出的調用流程為onCreateView(parent, name, attrs)——>onCreateView(name, attrs)——>createView(name, "android.view.", attrs),在前面提到過,我們真正使用的的LayoutInflater是PhoneLayoutInflater,而在PhoneLayoutInflater對這個onCreateView(name, attrs)函數是進行了重寫的,在PhoneLayoutInflater的onCreateView函數中,即“6”處,該函數通過在name前面嘗試分別使用三個前綴:"android.widget.","android.webkit.","android.app."來調用createView,若都沒有找到則調用父類的onCreateView來嘗試添加"android.view."前綴來加載該view。所以,這也是為什麼我們可以比如直接使用<Button />, <View />的原因,因為這些常用都是包含在這四個包名裡的。
總結
至此,開篇提到的四個要求我們都已經找到其原因了。其實,整個流程走下來,我們發現,要使定義的元素被正確的加載到相關的類,有三種途徑:
1.只使用簡單類名,即<ViewName />的形式。對於“android.widget”, "android.webkit", "android.app"以及"android.view"這四個包內的類,可以直接使用這樣的形式,因為在代碼中會自動給加上相應的包名來構成完整的路徑,而對於的其他的類,則不行,因為ViewName加上這四個包名構成的完整類名都無法找到該類。
2.使用<"完整類名" />的形式,比如<com.willhua.MyView />或者<android.widget.Button />的形式來使用,對於任何的非內部類view,這樣都是可以的。但是對於內部類不行,因為這樣的類名不符合Java中關於內部類完整類名的定義規則。如果<com.willhua.MyClass$MyView />的形式能夠通過編譯話,肯定是能正確Inflate該MyView的,可惜在編寫的時候就會提示錯。
3.使用<view class="完整類名" />的形式。這個是最通用的,所有的類都可以這麼干,但是前提是“完整類名”寫對,比如前面提到的內部類使用"$"符號連接。
為了搞清楚加載內部類view的問題,結果對整個加載流程都有了一定了解,感覺能說多若干個why了,還是收獲挺大的。
以上就是本文的全部內容,希望對大家的學習有所幫助,也希望大家多多支持本站。
 知乎的微信朋友圈值乎怎麼玩 微信朋友圈值乎具體玩法介紹
微信朋友圈值乎怎麼玩?大家是否還記得微信紅包看照片的活動?現在知乎也推出了一個新的活動,那就是如果你想看完我的整篇文章,請付錢。 哈哈~是不是很有意思呢?
 RecyclerView 下拉刷新和上拉加載
RecyclerView已經出來很久了,許許多多的項目都開始從ListView轉戰RecyclerView,那麼,上拉加載和下拉刷新是一件很有必要的事情。在ListVie
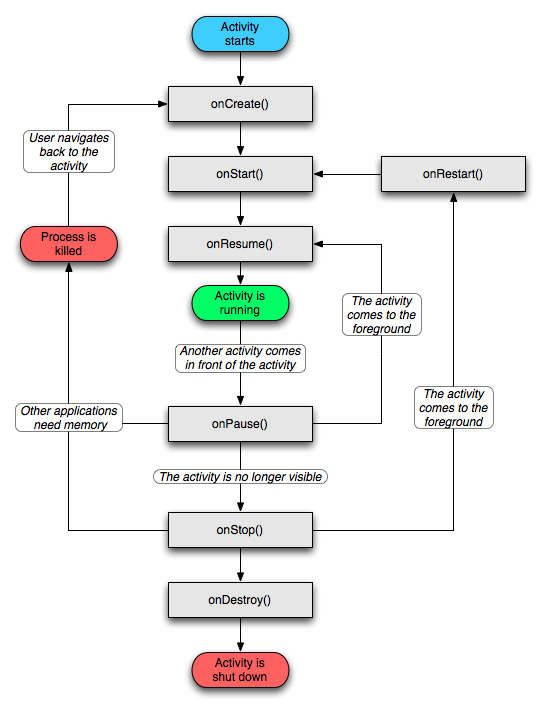 Activity的生命周期
Activity的生命周期1. 從打開應用到按後退鍵打開應用onCreate() 方法執行! 不可見onStart() 方法執行! 可見onResume() 方法執行!
 Android中級:實現ViewPager的無線自動循環
無限自動循環 = 無限循環 + 自動循環無限循環 = 無限向左循環 + 無限向右循環接下來我們通過demo一步步的實現無限向右循環–>無限向左循環&nd