編輯:關於Android編程
本篇文章介紹:
如何使用Toolbar;
自定義Toolbar;
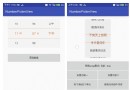
先來看一看效果,了解一下toolbar;

布局文件:
<android.support.v7.widget.Toolbar
    android:id="@+id/toolbar"
    android:layout_width="match_parent"
    android:layout_height="wrap_content"
    android:background="@color/colorPrimary"/>
Actvity中設置屬性:
Toolbar toolBar= (Toolbar) findViewById(R.id.toolbar);
toolBar.setLogo(R.mipmap.ic_launcher);//設置圖標
toolBar.setTitle("Title");//設置主標題
toolBar.setSubtitle("smalltitle");//設置子標題
這樣就可以實現上面的效果。
接下來是自定義的Toolbar:

布局文件:
<com.example.cjj.test.bean.MyToolBar
    android:id="@+id/toolbar"
    android:layout_width="match_parent"
    android:layout_height="wrap_content"
    android:background="?attr/colorPrimary"
    android:minHeight="?attr/actionBarSize"
    android:layout_centerInParent="true"
    android:layout_gravity="center"
  >
  </com.example.cjj.test.bean.MyToolBar>
toolbar.xml:
<?xml version="1.0" encoding="utf-8"?>
<RelativeLayout xmlns:android="http://schemas.android.com/apk/res/android"

  android:layout_width="match_parent"
  android:layout_height="match_parent">

  <ImageButton
    android:id="@+id/mLeftButton"
    android:layout_width="wrap_content"
    android:layout_height="wrap_content"
    android:layout_alignParentLeft="true"
    android:layout_centerVertical="true"
    android:background="?attr/colorPrimary"
    />
  <TextView
    android:id="@+id/toolbar_title"
    android:text="title"
    android:layout_width="match_parent"
    android:layout_height="wrap_content"
    android:layout_centerInParent="true"
    android:layout_gravity="center"
    android:gravity="center"
    android:textColor="@color/white"
    android:textSize="20sp"
    />
  <ImageButton
    android:id="@+id/mRightButton"
    android:layout_width="wrap_content"
    android:layout_height="wrap_content"
    android:layout_alignParentRight="true"
    android:layout_centerVertical="true"
    android:background="?attr/colorPrimary"/>
</RelativeLayout>
新建一個MyToolbar:
public class MyToolBar extends Toolbar {
  //布局
  private LayoutInflater mInflater;
  //右邊按鈕
  private ImageButton mRightButton;
  //左邊按鈕
  private ImageButton mLeftButton;
  //標題
  private TextView mTextTitle;

  private View view;

  public MyToolBar(Context context) {
    this(context,null);
  }

  public MyToolBar(Context context, AttributeSet attrs) {
    this(context, attrs, 0);
  }
  public MyToolBar(Context context, AttributeSet attrs, int defStyleAttr) {
    super(context, attrs, defStyleAttr);

    //初始化函數
    initView();
    setContentInsetsRelative(10, 10);
    if (attrs != null) {
       setLeftButtonIcon(R.mipmap.back_icon);//設置左圖標
        //設置點擊事件
        setLeftButtonOnClickLinster(new OnClickListener() {
          @Override
          public void onClick(View v) {
            Toast.makeText(getContext(),"left",Toast.LENGTH_SHORT).show();
          }
        });
        setRightButtonIcon(R.mipmap.nav_more);//設置右圖標
         //設置點擊事件
        setRightButtonOnClickLinster(new OnClickListener() {
          @Override
          public void onClick(View v) {
            Toast.makeText(getContext(), "right", Toast.LENGTH_SHORT).show();
          }
        });
    }
  }
 private void initView() {
    if(view==null){
      //初始化
      mInflater= LayoutInflater.from(getContext());
      //添加布局文件
      view=mInflater.inflate(R.layout.toolbar,null);
      //綁定控件
      mEditSearchView= (EditText) view.findViewById(R.id.toolbar_searchview);
      mTextTitle= (TextView) view.findViewById(R.id.toolbar_title);
      mLeftButton= (ImageButton) view.findViewById(R.id.mLeftButton);
      mRightButton= (ImageButton) view.findViewById(R.id.mRightButton);

      LayoutParams layoutParams = new LayoutParams(ViewGroup.LayoutParams.MATCH_PARENT, ViewGroup.LayoutParams.WRAP_CONTENT, Gravity.CENTER_HORIZONTAL);
      addView(view, layoutParams);
    }
  }
   public void setRightButtonIcon(int icon){

    if(mRightButton !=null){

      mRightButton.setImageResource(icon);
      // mRightButton.setVisibility(VISIBLE);
    }

  }
  public void setLeftButtonIcon(int icon){

    if(mLeftButton !=null){

      mLeftButton.setImageResource(icon);
      //mLeftButton.setVisibility(VISIBLE);
    }

  }

  //設置右側按鈕監聽事件
  public void setRightButtonOnClickLinster(OnClickListener linster) {
    mRightButton.setOnClickListener(linster);
  }

  //設置左側按鈕監聽事件
  public void setLeftButtonOnClickLinster(OnClickListener linster) {
    mLeftButton.setOnClickListener(linster);
  }
以上就是本文的全部內容,希望對大家的學習有所幫助,也希望大家多多支持本站。
 Android左右滑出菜單實例分析
現在的Android應用,只要有一個什麼新的創意,過不了多久,幾乎所有的應用都帶這個創意。這不,咱們公司最近的一個持續性的項目,想在首頁加個從左滑動出來的菜單,我查閱網上
 Android平台一款UI體驗好於NumberPicker的自定義控件NumberPickerView
NumberPickerViewanother NumberPicker with more flexible attributes on Android platfor
 VIVO X5Pro官方線刷包下載地址 VIVO X5Pro刷機教程
不少網友對VIVO X5Pro的評價是:外觀漂亮、手感舒適而且音色音質好。不知你對VIVO X5Pro又有什麼特別的看法呢?VIVO X5Pro是不是一款性
 Android進階中級教程——1.1 Git的本地使用詳解
Android進階中級教程——1.1 Git的本地使用詳解標簽(空格分隔): Android進階1.引言在之前的Android基礎入門系列我們就講
 Android Touch系統簡介(二):實例詳解onInterceptTouchEvent與onTouchEvent的調用過程
上一篇文章主要講述了Android的TouchEvent的分發過程,其中