編輯:關於Android編程
Android Handler 原理分析
Handler一個讓無數android開發者頭疼的東西,希望我今天這邊文章能為您徹底根治這個問題
今天就為大家詳細剖析下Handler的原理
Handler使用的原因
1.多線程更新Ui會導致UI界面錯亂
2.如果加鎖會導致性能下降
3.只在主線程去更新UI,輪詢處理
Handler使用簡介
其實關鍵方法就2個一個sendMessage,用來接收消息
另一個是handleMessage,用來處理接收到的消息
下面是我參考瘋狂android講義,寫的一個子線程和主線程之間相互通信的demo
對原demo做了一定修改
public class MainActivity extends AppCompatActivity {
  public final static String UPPER_NUM="upper_num";
  private EditText editText;
  public jisuanThread jisuan;
  public Handler mainhandler;
  private TextView textView;
  class jisuanThread extends Thread{
    public Handler mhandler;
    @Override
    public void run() {
      Looper.prepare();
      final ArrayList<Integer> al=new ArrayList<>();
      mhandler=new Handler(){
        @Override
        public void handleMessage(Message msg) {

          if(msg.what==0x123){
            Bundle bundle=msg.getData();
            int up=bundle.getInt(UPPER_NUM);
            outer:
            for(int i=3;i<=up;i++){
              for(int j=2;j<=Math.sqrt(i);j++){
                if(i%j==0){
                  continue outer;
                }
              }
              al.add(i);
            }
            Message message=new Message();
            message.what=0x124;
            Bundle bundle1=new Bundle();
            bundle1.putIntegerArrayList("Result",al);
            message.setData(bundle1);
            mainhandler.sendMessage(message);
          }
        }
      };
      Looper.loop();
    }
  }
  @Override
  protected void onCreate(Bundle savedInstanceState) {
    super.onCreate(savedInstanceState);
    setContentView(R.layout.activity_main);
    editText= (EditText) findViewById(R.id.et_num);
    textView= (TextView) findViewById(R.id.tv_show);
    jisuan=new jisuanThread();
    jisuan.start();
    mainhandler=new Handler(){
      @Override
      public void handleMessage(Message msg) {
        if(msg.what==0x124){
          Bundle bundle=new Bundle();
          bundle=msg.getData();
          ArrayList<Integer> al=bundle.getIntegerArrayList("Result");
          textView.setText(al.toString());
        }
      }
    };
    findViewById(R.id.bt_jisuan).setOnClickListener(new View.OnClickListener() {
      @Override
      public void onClick(View v) {
        Message message=new Message();
        message.what=0x123;
        Bundle bundle=new Bundle();
        bundle.putInt(UPPER_NUM, Integer.parseInt(editText.getText().toString()));
        message.setData(bundle);
        jisuan.mhandler.sendMessage(message);
      }
    });
  }
}
Hanler和Looper,MessageQueue原理分析
1.Handler發送消息處理消息(一般都是將消息發送給自己),因為hanler在不同線程是可使用的
2.Looper管理MessageQueue
Looper.loop死循環,不斷從MessageQueue取消息,如果有消息就處理消息,沒有消息就阻塞
public static void loop() {
    final Looper me = myLooper();
    if (me == null) {
      throw new RuntimeException("No Looper; Looper.prepare() wasn't called on this thread.");
    }
    final MessageQueue queue = me.mQueue;
    // Make sure the identity of this thread is that of the local process,
    // and keep track of what that identity token actually is.
    Binder.clearCallingIdentity();
    final long ident = Binder.clearCallingIdentity();

    for (;;) {
      Message msg = queue.next(); // might block
      if (msg == null) {
        // No message indicates that the message queue is quitting.
        return;
      }
      // This must be in a local variable, in case a UI event sets the logger
      Printer logging = me.mLogging;
      if (logging != null) {
        logging.println(">>>>> Dispatching to " + msg.target + " " +
            msg.callback + ": " + msg.what);
      }
      msg.target.dispatchMessage(msg);

      if (logging != null) {
        logging.println("<<<<< Finished to " + msg.target + " " + msg.callback);
      }
      // Make sure that during the course of dispatching the
      // identity of the thread wasn't corrupted.
      final long newIdent = Binder.clearCallingIdentity();
      if (ident != newIdent) {
        Log.wtf(TAG, "Thread identity changed from 0x"
            + Long.toHexString(ident) + " to 0x"
            + Long.toHexString(newIdent) + " while dispatching to "
            + msg.target.getClass().getName() + " "
            + msg.callback + " what=" + msg.what);
      }

      msg.recycleUnchecked();
    }
  }
這個是Looper.loop的源碼,實質就是一個死循環,不斷讀取自己的MessQueue的消息
3.MessQueue一個消息隊列,Handler發送的消息會添加到與自己內聯的Looper的MessQueue中,受Looper管理
private Looper(boolean quitAllowed) {
    mQueue = new MessageQueue(quitAllowed);
    mThread = Thread.currentThread();
  }
這個是Looper構造器,其中做了2個工作,
1.生成與自己關聯的Message
2.綁定到當前線程
主線程在初始化的時候已經生成Looper,
其他線程如果想使用handler需要通過Looper.prepare()生成一個自己線程綁定的looper
這就是Looper.prepare()源碼,其實質也是使用構造器生成一個looper
private static void prepare(boolean quitAllowed) {
    if (sThreadLocal.get() != null) {
      throw new RuntimeException("Only one Looper may be created per thread");
    }
    sThreadLocal.set(new Looper(quitAllowed));
  }
4.handler發送消息會將消息保存在自己相關聯的Looper的MessageQueue中,那它是如何找到這個MessageQueue的呢
public Handler(Callback callback, boolean async) {
    if (FIND_POTENTIAL_LEAKS) {
      final Class<? extends Handler> klass = getClass();
      if ((klass.isAnonymousClass() || klass.isMemberClass() || klass.isLocalClass()) &&
          (klass.getModifiers() & Modifier.STATIC) == 0) {
        Log.w(TAG, "The following Handler class should be static or leaks might occur: " +
          klass.getCanonicalName());
      }
    }

    mLooper = Looper.myLooper();
    if (mLooper == null) {
      throw new RuntimeException(
        "Can't create handler inside thread that has not called Looper.prepare()");
    }
    mQueue = mLooper.mQueue;
    mCallback = callback;
    mAsynchronous = async;
  }
這個是Handler的構造方法,它會找到一個自己關聯的一個Looper
public static Looper myLooper() {
    return sThreadLocal.get();
  }
沒錯,他們之間也是通過線程關聯的,得到Looper之後自然就可以獲得它的MessageQueue了
5.我們再看下handler如發送消息,又是如何在發送完消息後,回調HandlerMessage的
private boolean enqueueMessage(MessageQueue queue, Message msg, long uptimeMillis) {
    msg.target = this;
    if (mAsynchronous) {
      msg.setAsynchronous(true);
    }
    return queue.enqueueMessage(msg, uptimeMillis);
  }
這個就是Handler發送消息的最終源碼,可見就是將一個message添加到MessageQueue中,那為什麼發送完消息又能及時回調handleMessage方法呢
大家請看上邊那個loop方法,其中的for循環裡面有一句話msg.target.dispatchMessage(msg);
public void dispatchMessage(Message msg) {
    if (msg.callback != null) {
      handleCallback(msg);
    } else {
      if (mCallback != null) {
        if (mCallback.handleMessage(msg)) {
          return;
        }
      }
      handleMessage(msg);
    }
  }
這就是這句話,看到了吧裡面會調用hanlerMessage,一切都聯系起來了吧
感謝閱讀,希望能幫助到大家,謝謝大家對本站的支持!
 魅藍Note 3無法切換優酷超清解決方法
很多入手了魅藍Note 3的機友們發現,在魅藍Note3上優酷居然沒有超清視頻的選項,這對於喜歡看超清視頻的機友們而言無疑是一種折磨。這種事情小編也是郁悶了
 Android編程基礎之獲取手機屏幕大小(DisplayMetrics應用)示例
本文實例講述了Android獲取手機屏幕大小的方法。分享給大家供大家參考,具體如下:這裡主要用了三個對象TextView ,Button ,以及DisplayMetric
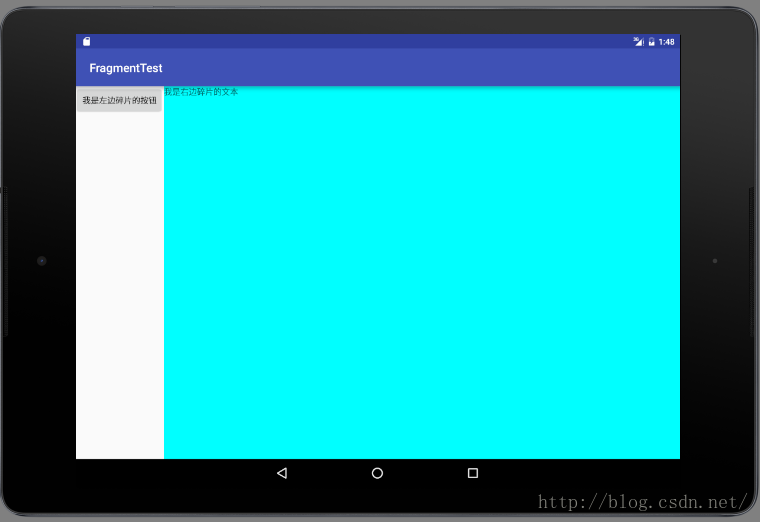
 Android學習項目之簡易版微信為例(一)
這是“Android學習之路”系列文章的開篇,可能會讓大家有些失望——這篇文章中我們不介紹簡易版微信的實現(不過不是標題黨哦,我會在後續文章中一步步實現這個應用程序的)。
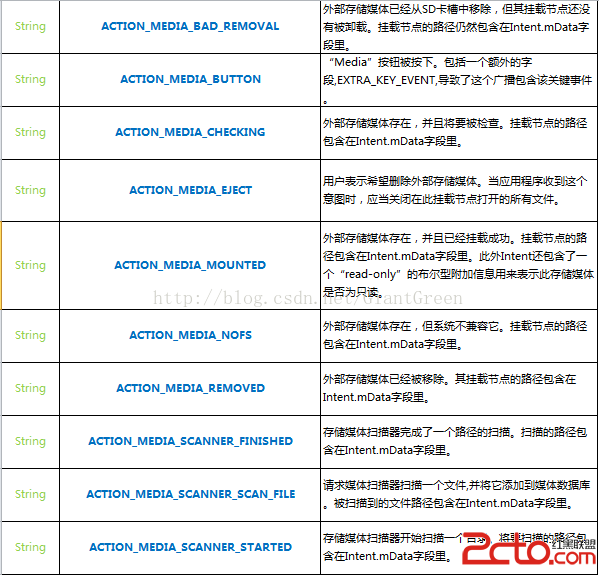 Android監聽外部存儲設備的狀態(SD卡、U盤等等)
最近在項目中需要對外部存儲設備的狀態進行監聽,所以整理了此筆記,以便日後查看。 外部存儲設備的狀態變化時發出的廣播