編輯:Android開發實例
GridView跟ListView都是比較常用的多控件布局,而GridView更是實現九宮圖的首選!本文就是介紹如何使用GridView實現九宮圖。GridView的用法很多,網上介紹最多的方法就是自己實現一個ImageAdapter繼承BaseAdapter,再供GridView使用,類似這種的方法本文不再重復,本文介紹的GridView用法跟前文ListView的極其類似。。。。也算是我偷懶一下,嘻嘻嘻嘻。。。。
先來貼出本文代碼運行的結果:
本文需要添加/修改3個文件:main.xml、night_item.xml、JAVA源代碼。
main.xml源代碼如下,本身是個GirdView,用於裝載Item:
- <?xml version="1.0" encoding="utf-8"?>
- <GridView xmlns:android="http://schemas.android.com/apk/res/android"
- android:id="@+id/gridview"
- android:layout_width="fill_parent"
- android:layout_height="fill_parent"
- android:numColumns="auto_fit"
- android:verticalSpacing="10dp"
- android:horizontalSpacing="10dp"
- android:columnWidth="90dp"
- android:stretchMode="columnWidth"
- android:gravity="center"
- />
介紹一下裡面的某些屬性:
android:numColumns="auto_fit" ,GridView的列數設置為自動
android:columnWidth="90dp",每列的寬度,也就是Item的寬度
android:stretchMode="columnWidth",縮放與列寬大小同步
android:verticalSpacing="10dp",兩行之間的邊距,如:行一(NO.0~NO.2)與行二(NO.3~NO.5)間距為10dp
android:horizontalSpacing="10dp",兩列之間的邊距。
接下來介紹 night_item.xml,這個XML跟前面ListView的ImageItem.xml很類似:
- <?xml version="1.0" encoding="utf-8"?>
- <RelativeLayout
- xmlns:android="http://schemas.android.com/apk/res/android"
- android:layout_height="wrap_content"
- android:paddingBottom="4dip" android:layout_width="fill_parent">
- <ImageView
- android:layout_height="wrap_content"
- android:id="@+id/ItemImage"
- android:layout_width="wrap_content"
- android:layout_centerHorizontal="true">
- </ImageView>
- <TextView
- android:layout_width="wrap_content"
- android:layout_below="@+id/ItemImage"
- android:layout_height="wrap_content"
- android:text="TextView01"
- android:layout_centerHorizontal="true"
- android:id="@+id/ItemText">
- </TextView>
- </RelativeLayout>
最後就是JAVA的源代碼了,也跟前面的ListView的JAVA源代碼很類似,不過多了“選中”的事件處理:
- public void onCreate(Bundle savedInstanceState) {
- super.onCreate(savedInstanceState);
- setContentView(R.layout.main);
- GridView gridview = (GridView) findViewById(R.id.gridview);
- //生成動態數組,並且轉入數據
- ArrayList<HashMap<String, Object>> lstImageItem = new ArrayList<HashMap<String, Object>>();
- for(int i=0;i<10;i++)
- {
- HashMap<String, Object> map = new HashMap<String, Object>();
- map.put("ItemImage", R.drawable.icon);//添加圖像資源的ID
- map.put("ItemText", "NO."+String.valueOf(i));//按序號做ItemText
- lstImageItem.add(map);
- }
- //生成適配器的ImageItem <====> 動態數組的元素,兩者一一對應
- SimpleAdapter saImageItems = new SimpleAdapter(this, //沒什麼解釋
- lstImageItem,//數據來源
- R.layout.night_item,//night_item的XML實現
- //動態數組與ImageItem對應的子項
- new String[] {"ItemImage","ItemText"},
- //ImageItem的XML文件裡面的一個ImageView,兩個TextView ID
- new int[] {R.id.ItemImage,R.id.ItemText});
- //添加並且顯示
- gridview.setAdapter(saImageItems);
- //添加消息處理
- gridview.setOnItemClickListener(new ItemClickListener());
- }
- //當AdapterView被單擊(觸摸屏或者鍵盤),則返回的Item單擊事件
- class ItemClickListener implements OnItemClickListener
- {
- public void onItemClick(AdapterView<?> arg0,//The AdapterView where the click happened
- View arg1,//The view within the AdapterView that was clicked
- int arg2,//The position of the view in the adapter
- long arg3//The row id of the item that was clicked
- ) {
- //在本例中arg2=arg3
- HashMap<String, Object> item=(HashMap<String, Object>) arg0.getItemAtPosition(arg2);
- //顯示所選Item的ItemText
- setTitle((String)item.get("ItemText"));
- }
- }
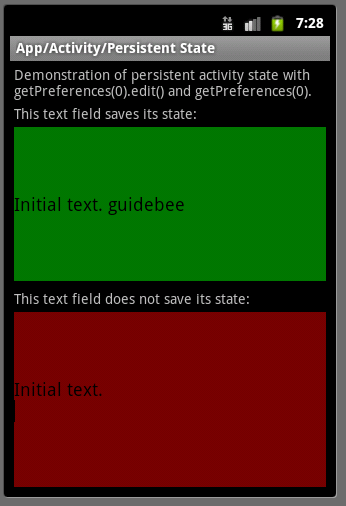 Android ApiDemo示例解讀系列之九:App
Android 提供了多種存儲數據的方法,其中最簡單的是使用Shared Preferences。
 使用ViewPager實現高仿launcher左右拖動效果
前面一篇高仿launcher和墨跡左右拖動效果獲得了很多朋友的好評,上一篇文章主要是通過自定義ViewGroup實現的,有點麻煩。今天用ViewPager這個類實
 Android實用圖文教程之代碼混淆、第三方平台加固加密、渠道分發
第一步:代碼混淆(注意引入的第三方jar) 在新版本的ADT創建項目時,混碼的文件不再是proguard.cfg,而是project.properties和pro
 Android編程實現圓角邊框的方法
本文實例講述了Android編程實現圓角邊框的方法。分享給大家供大家參考,具體如下: 設置邊框圓角可以在drawable-mdpi目錄裡定義一個xml: &l