編輯:Android開發實例
大家好,今天說說Location , Location 在Android 開發中還是經常用到的,比如 通過經緯度獲取天氣,根據Location 獲取所在地區詳細Address (比如Google Map 開發).等。而在Android 中通過LocationManager 來獲取Location .通常獲取Location 有GPS 獲取,WIFI 獲取。
我今天做一個簡單的小Demo ,來教大家如何獲取Location ,從而獲取經緯度。下一節將教大家通過Location 來獲取Address .
首先第一步:
創建一個Android 工程命名為LocationDemo .
第二步:修改main.xml 代碼如下:
- <?xml version="1.0" encoding="utf-8"?>
- <LinearLayout xmlns:android="http://schemas.android.com/apk/res/android"
- android:orientation="vertical"
- android:layout_width="fill_parent"
- android:layout_height="fill_parent"
- >
- <TextView
- android:id="@+id/longitude"
- android:layout_width="fill_parent"
- android:layout_height="wrap_content"
- android:text="longitude:"
- />
- <TextView
- android:id="@+id/latitude"
- android:layout_width="fill_parent"
- android:layout_height="wrap_content"
- android:text="latitude:"
- />
- </LinearLayout>
第三步:修改LocationDemo.java ,代碼如下:
- package com.android.tutor;
- import android.app.Activity;
- import android.content.Context;
- import android.location.Location;
- import android.location.LocationManager;
- import android.os.Bundle;
- import android.widget.TextView;
- public class LocationDemo extends Activity {
- private TextView longitude;
- private TextView latitude;
- @Override
- public void onCreate(Bundle savedInstanceState) {
- super.onCreate(savedInstanceState);
- setContentView(R.layout.main);
- longitude = (TextView)findViewById(R.id.longitude);
- latitude = (TextView)findViewById(R.id.latitude);
- Location mLocation = getLocation(this);
- longitude.setText("Longitude: " + mLocation.getLongitude());
- latitude.setText("Latitude: " + mLocation.getLatitude());
- }
- //Get the Location by GPS or WIFI
- public Location getLocation(Context context) {
- LocationManager locMan = (LocationManager) context
- .getSystemService(Context.LOCATION_SERVICE);
- Location location = locMan
- .getLastKnownLocation(LocationManager.GPS_PROVIDER);
- if (location == null) {
- location = locMan
- .getLastKnownLocation(LocationManager.NETWORK_PROVIDER);
- }
- return location;
- }
- }
第四步:增加權限,修改AndroidManifest.xml 代碼如下(第16行為所增行):
- <?xml version="1.0" encoding="utf-8"?>
- <manifest xmlns:android="http://schemas.android.com/apk/res/android"
- package="com.android.tutor"
- android:versionCode="1"
- android:versionName="1.0">
- <application android:icon="@drawable/icon" android:label="@string/app_name">
- <activity android:name=".LocationDemo"
- android:label="@string/app_name">
- <intent-filter>
- <action android:name="android.intent.action.MAIN" />
- <category android:name="android.intent.category.LAUNCHER" />
- </intent-filter>
- </activity>
- </application>
- <uses-sdk android:minSdkVersion="7" />
- <uses-permission android:name="android.permission.ACCESS_FINE_LOCATION"/>
- </manifest>
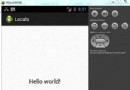
第五步:運行LocationDemo 工程,所得效果如下(真機深圳測試):
 帶你實現開發者頭條(四) 首頁的優化(加入design包)
一 、前言 上次模仿開發者頭條首頁實現了一個版本,給345大神,我的產品經理一看,又被鄙視了一把,說還在用老的技術,於是乎這三天把整個design
 android計時器,時間計算器的實現方法
需求:默認為00:00:00,點擊開始按鈕時清零後開始計時,出現如10:28:34。點擊停止的時候停止計時。問題:使用Calendar DateFormat的方法
 Android本地化
Android應用程序可以在許多不同地區的許多設備上運行。為了使應用程序更具交互性,應用程序應該處理以適合應用程序將要使用的語言環境方面的文字,數字,文件等。在本章中,我
 Android基礎之Fragment與Activity交互詳解
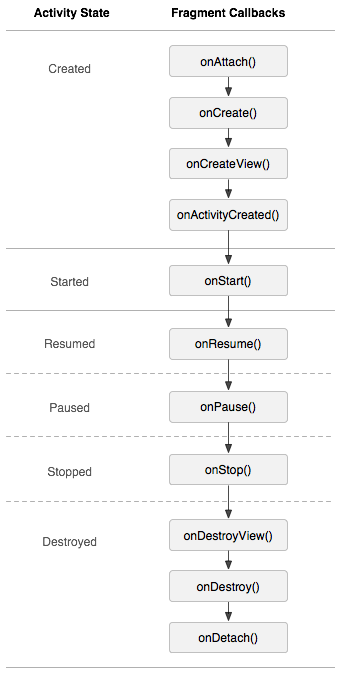
今天繼續講解Fragment組件的特性,主要是跟Activity的交互和生命周期的關系,我們前面已經說過Fragment是依賴於Activity的,而且生命周期也