編輯:Android開發實例
大家好,上一節我講解了Android Activity的生命周期,這一節我將講解一下Service,首先我們要知道Service具體是干什麼的,什麼時候用到?以及它的生命周期等。
Service概念及用途:
Android中的服務,它與Activity不同,它是不能與用戶交互的,不能自己啟動的,運行在後台的程序,如果我們退出應用時,Service進程並沒有結束,它仍然在後台運行,那我們什麼時候會用到Service呢?比如我們播放音樂的時候,有可能想邊聽音樂邊干些其他事情,當我們退出播放音樂的應用,如果不用Service,我們就聽不到歌了,所以這時候就得用到Service了,又比如當我們一個應用的數據是通過網絡獲取的,不同時間(一段時間)的數據是不同的這時候我們可以用Service在後台定時更新,而不用每打開應用的時候在去獲取。
Service生命周期 :
Android Service的生命周期並不像Activity那麼復雜,它只繼承了onCreate(),onStart(),onDestroy()三個方法,當我們第一次啟動Service時,先後調用了onCreate(),onStart()這兩個方法,當停止Service時,則執行onDestroy()方法,這裡需要注意的是,如果Service已經啟動了,當我們再次啟動Service時,不會在執行onCreate()方法,而是直接執行onStart()方法,具體的可以看下面的實例。
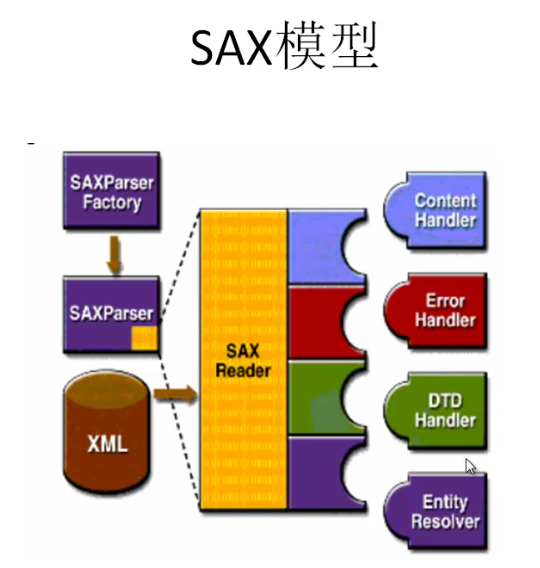
Service與Activity通信:
Service後端的數據最終還是要呈現在前端Activity之上的,因為啟動Service時,系統會重新開啟一個新的進程,這就涉及到不同進程間通信的問題了(AIDL)這一節我不作過多描述,當我們想獲取啟動的Service實例時,我們可以用到bindService和onBindService方法,它們分別執行了Service中IBinder()和onUnbind()方法。
為了讓大家 更容易理解,我寫了一個簡單的Demo,大家可以模仿著我,一步一步的來。
第一步:新建一個Android工程,我這裡命名為ServiceDemo.
第二步:修改main.xml代碼,我這裡增加了四個按鈕,代碼如下:
- <?xml version="1.0" encoding="utf-8"?>
- <LinearLayout xmlns:android="http://schemas.android.com/apk/res/android"
- android:orientation="vertical"
- android:layout_width="fill_parent"
- android:layout_height="fill_parent"
- >
- <TextView
- android:id="@+id/text"
- android:layout_width="fill_parent"
- android:layout_height="wrap_content"
- android:text="@string/hello"
- />
- <Button
- android:id="@+id/startservice"
- android:layout_width="fill_parent"
- android:layout_height="wrap_content"
- android:text="startService"
- />
- <Button
- android:id="@+id/stopservice"
- android:layout_width="fill_parent"
- android:layout_height="wrap_content"
- android:text="stopService"
- />
- <Button
- android:id="@+id/bindservice"
- android:layout_width="fill_parent"
- android:layout_height="wrap_content"
- android:text="bindService"
- />
- <Button
- android:id="@+id/unbindservice"
- android:layout_width="fill_parent"
- android:layout_height="wrap_content"
- android:text="unbindService"
- />
- </LinearLayout>
第三步:新建一個Service,命名為MyService.java代碼如下:
- package com.tutor.servicedemo;
- import android.app.Service;
- import android.content.Intent;
- import android.os.Binder;
- import android.os.IBinder;
- import android.text.format.Time;
- import android.util.Log;
- public class MyService extends Service {
- //定義個一個Tag標簽
- private static final String TAG = "MyService";
- //這裡定義吧一個Binder類,用在onBind()有方法裡,這樣Activity那邊可以獲取到
- private MyBinder mBinder = new MyBinder();
- @Override
- public IBinder onBind(Intent intent) {
- Log.e(TAG, "start IBinder~~~");
- return mBinder;
- }
- @Override
- public void onCreate() {
- Log.e(TAG, "start onCreate~~~");
- super.onCreate();
- }
- @Override
- public void onStart(Intent intent, int startId) {
- Log.e(TAG, "start onStart~~~");
- super.onStart(intent, startId);
- }
- @Override
- public void onDestroy() {
- Log.e(TAG, "start onDestroy~~~");
- super.onDestroy();
- }
- @Override
- public boolean onUnbind(Intent intent) {
- Log.e(TAG, "start onUnbind~~~");
- return super.onUnbind(intent);
- }
- //這裡我寫了一個獲取當前時間的函數,不過沒有格式化就先這麼著吧
- public String getSystemTime(){
- Time t = new Time();
- t.setToNow();
- return t.toString();
- }
- public class MyBinder extends Binder{
- MyService getService()
- {
- return MyService.this;
- }
- }
- }
第四步:修改ServiceDemo.java,代碼如下:
- package com.tutor.servicedemo;
- import android.app.Activity;
- import android.content.ComponentName;
- import android.content.Context;
- import android.content.Intent;
- import android.content.ServiceConnection;
- import android.os.Bundle;
- import android.os.IBinder;
- import android.view.View;
- import android.view.View.OnClickListener;
- import android.widget.Button;
- import android.widget.TextView;
- public class ServiceDemo extends Activity implements OnClickListener{
- private MyService mMyService;
- private TextView mTextView;
- private Button startServiceButton;
- private Button stopServiceButton;
- private Button bindServiceButton;
- private Button unbindServiceButton;
- private Context mContext;
- //這裡需要用到ServiceConnection在Context.bindService和context.unBindService()裡用到
- private ServiceConnection mServiceConnection = new ServiceConnection() {
- //當我bindService時,讓TextView顯示MyService裡getSystemTime()方法的返回值
- public void onServiceConnected(ComponentName name, IBinder service) {
- // TODO Auto-generated method stub
- mMyService = ((MyService.MyBinder)service).getService();
- mTextView.setText("I am frome Service :" + mMyService.getSystemTime());
- }
- public void onServiceDisconnected(ComponentName name) {
- // TODO Auto-generated method stub
- }
- };
- public void onCreate(Bundle savedInstanceState) {
- super.onCreate(savedInstanceState);
- setContentView(R.layout.main);
- setupViews();
- }
- public void setupViews(){
- mContext = ServiceDemo.this;
- mTextView = (TextView)findViewById(R.id.text);
- startServiceButton = (Button)findViewById(R.id.startservice);
- stopServiceButton = (Button)findViewById(R.id.stopservice);
- bindServiceButton = (Button)findViewById(R.id.bindservice);
- unbindServiceButton = (Button)findViewById(R.id.unbindservice);
- startServiceButton.setOnClickListener(this);
- stopServiceButton.setOnClickListener(this);
- bindServiceButton.setOnClickListener(this);
- unbindServiceButton.setOnClickListener(this);
- }
- public void onClick(View v) {
- // TODO Auto-generated method stub
- if(v == startServiceButton){
- Intent i = new Intent();
- i.setClass(ServiceDemo.this, MyService.class);
- mContext.startService(i);
- }else if(v == stopServiceButton){
- Intent i = new Intent();
- i.setClass(ServiceDemo.this, MyService.class);
- mContext.stopService(i);
- }else if(v == bindServiceButton){
- Intent i = new Intent();
- i.setClass(ServiceDemo.this, MyService.class);
- mContext.bindService(i, mServiceConnection, BIND_AUTO_CREATE);
- }else{
- mContext.unbindService(mServiceConnection);
- }
- }
- }
第五步:修改AndroidManifest.xml代碼(將我們新建的MyService注冊進去如下代碼第14行:)
- <?xml version="1.0" encoding="utf-8"?>
- <manifest xmlns:android="http://schemas.android.com/apk/res/android"
- package="com.tutor.servicedemo"
- android:versionCode="1"
- android:versionName="1.0">
- <application android:icon="@drawable/icon" android:label="@string/app_name">
- <activity android:name=".ServiceDemo"
- android:label="@string/app_name">
- <intent-filter>
- <action android:name="android.intent.action.MAIN" />
- <category android:name="android.intent.category.LAUNCHER" />
- </intent-filter>
- </activity>
- <service android:name=".MyService" android:exported="true"></service>
- </application>
- <uses-sdk android:minSdkVersion="7" />
- </manifest>
第六步:執行上述工程,效果圖如下:
點擊startServie按鈕時先後執行了Service中onCreate()->onStart()這兩個方法,打開Logcat視窗效果如下圖:
我們這時可以按HOME鍵進入Settings(設置)->Applications(應用)->Running Services(正在運行的服務)看一下我們新啟動了一個服務,效果如下:
點擊stopService按鈕時,Service則執行了onDestroy()方法,效果圖如下所示:
這時候我們再次點擊startService按鈕,然後點擊bindService按鈕(通常bindService都是bind已經啟動的Service),我們看一下Service執行了IBinder()方法,以及TextView的值也有所變化了,如下兩張圖所示:
最後點擊unbindService按鈕,則Service執行了onUnbind()方法,如下圖所示:
 Android MediaPlayer(多媒體播放)
Android提供了許多方法來控制播放的音頻/視頻文件和流。其中該方法是通過一類稱為MediaPlayer。Android是提供MediaPlayer類訪問內置的媒體播放
 android 網絡連接處理分析
在Android中,可以有多種方式來實現網絡編程: 創建URL,並使用URLConnection/HttpURLConnection 使用HttpClient使用
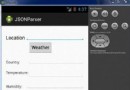 Android JSON解析器
JSON代表JavaScript對象符號。它是一個獨立的數據交換格式,是XML的最佳替代品。本章介紹了如何解析JSON文件,並從中提取所需的信息。Android提供了四個
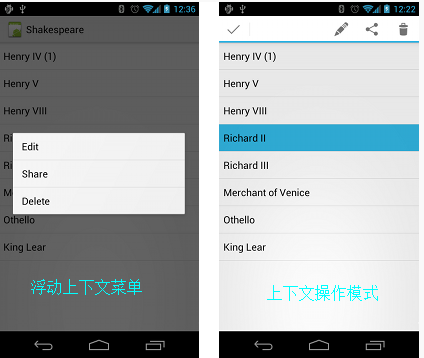 Android學習筆記——Menu介紹(二)
知識點: 這次將繼續上一篇文章沒有講完的Menu的學習,上下文菜單(Context menu)和彈出菜單(Popup menu)。 上下文菜單 上下文菜單提供對U