編輯:Android開發實例
效果圖
- <?xml version="1.0" encoding="utf-8"?>
- <FrameLayout
- xmlns:android="http://schemas.android.com/apk/res/android"
- android:layout_width="fill_parent"
- android:layout_height="fill_parent" >
- <ImageView
- android:id="@+id/image"
- android:layout_width="fill_parent"
- android:layout_height="fill_parent"
- android:scaleType="center"
- android:src="@drawable/candle"
- />
- <TextView
- android:id="@+id/text1"
- android:layout_width="wrap_content"
- android:layout_height="wrap_content"
- android:layout_gravity="center"
- android:textColor="#00ff00"
- android:text="@string/hello"
- />
- <Button
- android:id="@+id/start"
- android:layout_width="wrap_content"
- android:layout_height="wrap_content"
- android:layout_gravity="bottom"
- android:text="Start"
- />
- </FrameLayout>
<merge>也有一些使用限制: 只能用於xml layout文件的根元素;在代碼中使用LayoutInflater.Inflater()一個以merge為根元素的 布局文件時候,需要使用View inflate (int resource, ViewGroup root, boolean attachToRoot)指定一個ViewGroup 作為其容器,並且要設置attachToRoot 為true。 <include> 重用layout代碼 如果在某個布局裡面需要用到另一個相同的布局設計,可以通過<include> 標簽來重用layout代碼:
- <?xml version="1.0" encoding="utf-8"?>
- <merge xmlns:android="http://schemas.android.com/apk/res/android">
- <ImageView
- android:id="@+id/image"
- android:layout_width="fill_parent"
- android:layout_height="fill_parent"
- android:scaleType="center"
- android:src="@drawable/candle"
- />
- <TextView
- android:id="@+id/text1"
- android:layout_width="wrap_content"
- android:layout_height="wrap_content"
- android:layout_gravity="center"
- android:textColor="#00ff00"
- android:text="@string/hello"
- />
- <Button
- android:id="@+id/start"
- android:layout_width="wrap_content"
- android:layout_height="wrap_content"
- android:layout_gravity="bottom"
- android:text="Start"
- />
- </merge>
效果圖 這裡要注意的是,"@layout/relative"不是引用Layout的id,而是引用res/layout/relative.xml,其內容是前面文章介紹RelativeLayout的布局代碼。 另外,通過<include>,除了可以覆寫id屬性值,還可以修改其他屬性值,例如android:layout_width,android:height等。 <viewstub> 延遲加載 (轉自http://rainhomepage.appspot.com/2010/01/use-viewstub-to-optimize-the-layout-of) ViewStub 是一個不可見的,大小為0的View,最佳用途就是實現View的延遲加載,在需要的時候再加載View,可Java中常見的性能優化方法延遲加載一樣。 當調用ViewStub的setVisibility函數設置為可見或則調用 inflate初始化該View的時候,ViewStub引用的資源開始初始化,然後引用的資源替代ViewStub自己的位置填充在ViewStub的 位置。因此在沒有調用setVisibility(int) 或則 inflate()函數之前 ViewStub一種存在組件樹層級結構中,但是由於ViewStub非常輕量級,這對性能影響非常小。 可以通過ViewStub的inflatedId屬性來重新定義引用的layout id。 例如:
- <?xml version="1.0" encoding="utf-8"?>
- <LinearLayout xmlns:android="http://schemas.android.com/apk/res/android"
- android:orientation="vertical"
- android:layout_width="fill_parent"
- android:layout_height="fill_parent">
- <include android:id="@+id/layout1" layout="@layout/relative" />
- <include android:id="@+id/layout2" layout="@layout/relative" />
- <include android:id="@+id/layout3" layout="@layout/relative" />
- </LinearLayout>
上面定義的ViewStub ,可以通過id “stub”來找到,在初始化資源“mySubTree”後,stub從父組件中刪除,然後"mySubTree"替代stub的位置。初始資源"mySubTree"得到的組件可以通過inflatedId 指定的id "subTree"引用。 然後初始化後的資源被填充到一個120dip寬、40dip高的地方。 推薦使用下面的方式來初始化ViewStub:
- <ViewStub android:id="@+id/stub"
- android:inflatedId="@+id/subTree"
- android:layout="@layout/mySubTree"
- android:layout_width="120dip"
- android:layout_height="40dip" />
當調用inflate()函數的時候,ViewStub 被引用的資源替代,並且返回引用的view。 這樣程序可以直接得到引用的view而不用再次調用函數 findViewById()來查找了。 ViewStub目前有個缺陷就是還不支持 <merge /> 標簽。 layoutopt (Layout Optimization工具) 這工具可以分析所提供的Layout,並提供優化意見。在tools文件夾裡面可以找到layoutopt.bat。 用法: layoutopt <list of xml files or directories> 參數: 一個或多個的Layout xml文件,以空格間隔;或者多個Layout xml文件所在的文件夾路徑 例子: layoutopt G:\StudyAndroid\UIDemo\res\layout\main.xml layoutopt G:\StudyAndroid\UIDemo\res\layout\main.xml G:\StudyAndroid\UIDemo\res\layout\relative.xml layoutopt G:\StudyAndroid\UIDemo\res\layout
- ViewStub stub = (ViewStub) findViewById(R.id.stub);
- View inflated = stub.inflate();
本文出自 “學習Android” 博客,請務必保留此出處http://android.blog.51cto.com/268543/308090
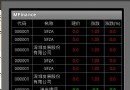 Android中使用ListView實現漂亮的表格效果
在這裡我們要使用Android ListView來實現顯示股票行情,效果圖如下,紅色表示股票價格上漲,綠色表示股票價格下跌。 第一步、定義color.xml如下
 Android登錄實例
登錄應用程序的屏幕,詢問憑據登錄到一些特定的應用。可能需要登錄到Facebook,微博等本章介紹了,如何創建一個登錄界面,以及如何管理安全問題和錯誤嘗試。首先,必須定義兩
 Android加載Spinner
可以顯示在的Android任務,通過加載進度條的進展。進度條有兩種形狀。加載欄和加載微調(spinner)。在本章中,我們將討論微調(spinner)。Spinner 用
 Android加載Spinner
可以顯示在的Android任務,通過加載進度條的進展。進度條有兩種形狀。加載欄和加載微調(spinner)。在本章中,我們將討論微調(spinner)。Spinner 用