編輯:Android開發實例
昨天聖誕節,沒有出去,而是一天時間全部糾結在如何在SurfaceView中添加組件,例如添加常用的Button,TextView等等、一開始也想著從網上找些資料看看有沒有可參考的,但是發現搜到的結果仍是些童鞋對此很疑惑並且也在找尋答案,那麼,這裡就把聖誕節一天的成果來和各位童鞋分享;
1.因為我們的SurfaceView是個View對於添加的組件其實也是View,如果我們只是一味的想在SurfaceView中添加View組件其實是錯誤的思想,當然我一開始也是想著直接在SurfaceView中定義或者去使用組件,但是結果肯定是不成功的,因為View不能添加View!
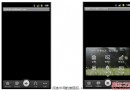
2.既然第一條肯定是錯誤的,那麼我們就應該想到把我們的SurfaceView和組件都放在一個Layout裡面,畢竟我們的的SurfaceView也是一個view和其他組件一同放在我們的layout裡,那麼這樣一來肯定就能完成在SurfaceView中添加組件的目的啦。下面先上截圖、
大家看到中間白色區域就是我們的SurfaceView啦,最上方是組件TextView ,最下方是Button 、對的,要的就是這個效果!而不是像前面文章中多個Activity切換,這樣都在一個界面中啦。哇哈哈啊。好、下面來看代碼吧:
先放上Xml 代碼:
- <?xml version="1.0" encoding="utf-8"?>
- <LinearLayout xmlns:android="http://schemas.android.com/apk/res/android"
- android:orientation="vertical"
- android:layout_width="fill_parent"
- android:layout_height="fill_parent"
- >
- <LinearLayout
- android:orientation="horizontal"
- android:layout_width="wrap_content"
- android:layout_height="wrap_content"
- android:layout_gravity="center">
- <TextView
- android:id="@+id/textview"
- android:layout_width="fill_parent"
- android:layout_height="fill_parent"
- android:text="This is Himi"
- android:textSize="32sp"
- android:textColor="#00FF00"
- android:gravity="center_horizontal"/>
- </LinearLayout>
- <FrameLayout
- android:layout_width="fill_parent"
- android:layout_height="wrap_content"
- android:layout_weight="1" >
- <com.himi.MySurfaceView android:id="@+id/view3d"
- android:layout_width="fill_parent"
- android:layout_height="fill_parent"/>
- </FrameLayout>
- <LinearLayout
- android:orientation="horizontal"
- android:layout_width="wrap_content"
- android:layout_height="wrap_content"
- android:layout_gravity="center">
- <Button
- android:layout_width="wrap_content"
- android:layout_height="wrap_content"
- android:text="Himi Button_1"
- android:id="@+id/button1"/>
- <Button android:layout_width="wrap_content"
- android:layout_height="wrap_content"
- android:text="Himi Button_2"
- android:id="@+id/button2"/>
- </LinearLayout>
- </LinearLayout>
以上代碼很簡單,都是一些布局方式和各個組件一些屬性及顯示方式的設定,當然主要看如何對我們的SurfaceView如何注冊在xml中的,那麼每個組件都有id這樣為了對後面其交互數據用到,因為我們要對每個組件操作,所以這裡都索引了id方面從R文件中取出其對象。
那麼,xml我們定義好了,看看代碼中如何實現的,這裡先說下Activity類中代碼:
- package com.himi;
- import android.app.Activity;
- import android.os.Bundle;
- import android.view.View;
- import android.view.Window;
- import android.view.WindowManager;
- import android.view.View.OnClickListener;
- import android.widget.Button;
- import android.widget.TextView;
- public class MainActivity extends Activity implements OnClickListener {
- /** Called when the activity is first created. */
- private Button button1, button2;
- private TextView tv ;
- @Override
- public void onCreate(Bundle savedInstanceState) {
- super.onCreate(savedInstanceState);
- this.requestWindowFeature(Window.FEATURE_NO_TITLE);//隱去標題(應用的名字)
- //此設定必須要寫在setContentView之前,否則會有異常)
- this.getWindow().setFlags(WindowManager.LayoutParams.FLAG_FULLSCREEN,
- WindowManager.LayoutParams.FLAG_FULLSCREEN);
- setContentView(R.layout.main); //要先顯示,然後再對其組件取出、處理操作
- tv=(TextView)findViewById(R.id.textview);
- button1 = (Button) findViewById(R.id.button1);
- button1.setOnClickListener(this);//這裡是監聽按鍵,因為本類使用了OnClickListener接口
- button2 = (Button) findViewById(R.id.button2);
- button2.setOnClickListener(this);
- /* 其實大家也可以不用本類使用接口,可以內部類來完成。
- * 以下是不使用OnClickListener接口的綁定監聽方式;
- button2.setOnClickListener(new OnClickListener() {
- @Override
- public void onClick(View v) {
- //這裡處理按鍵操作
- }
- });
- */
- }
- @Override
- public void onClick(View v) {
- if (v == button1) {
- MySurfaceView.button_str = "button 1被觸發";
- tv.setText("button 1被觸發");
- } else if (v == button2) {
- MySurfaceView.button_str = "button 2被觸發";
- tv.setText("button 2被觸發");
- }
- }
- }
該有的備注在代碼後面都備注了,MySurfaceView.button_str,這個是自己的SurfaceView中定義的一個static 的變量用來交互數據用到;在那麼下面就要看我們的SurfaceView,當在Xml注冊需要注意什麼了,我半天的時候都花在了這裡!!!一定要引起注意,這也是在SurfaceView中並顯示組件完成最重要的一步。
先分析:
1.SurfaceView類的創建和實現等等和之前都是一樣的,該怎麼去寫還怎麼去寫,但是!構造函數一定要注意!
- /*
- * public MySurfaceView(Context context) { super(context); }//備注1(這裡一定要引起注意,仔細看下文對備注1的解釋 )
- */
- public MySurfaceView(Context context, AttributeSet attrs) {//備注1}
這裡解釋下備注1: 這裡有兩個構造函數,當然我們用哪個都是可以的,但是在此時我們需要明確我們到底要使用哪個。
一個參數的構造函數:如果是new出來的此類實例肯定是沒有問題,但是我們為了能在顯示SurfaceView同時顯示別的組件,所以把自定義的SurfaceView也當作組件注冊在了main——xml中,所以這裡需要注意,當在xml中注冊的就必須在SurfaceView中使用這種含有兩個參數的構造函數的方法, xml初始化的時候會調用兩個參數的這個構造方法, (當時這個問題困擾了半天的研究時間,最後在一個群友的幫助下才發現是這裡出了問題) 那麼含有兩個構造參數的方法裡第二個參數指的自定義的組件的一些屬性,就像長寬一樣,你可以給組件屬性,就是通過這個來傳遞的!
那麼在SurfaceView 中並一同顯示組件也就到底完結了,回顧下,一共分為3步,1.將我們的SurfaceView 作為一個組件view 和其他組件一同放置到布局中,當然布局的方式和顯示的方式大家自己隨自己喜歡定義! 2.在我們的SurfaceView中一定要使用兩個構造函數的構造函數,一定!一定! 就這裡有區別,別的還是該怎麼處理就怎麼處理,就是構造函數換了 3.交互數據,對其按鍵的綁定在 activity中完成,別把view綁定在咱們的SurfaceView中啊,否則報錯- -、
這裡說下為什麼要在activity中去綁定按鍵處理 而不是在我們的surfaceview中去綁定:
其實根據xml中定義button時的id 我們可以通過R.id 索引取到button,不管在activity中還是我們的surfaceview中都可以取到,但是!綁定button這一步如果在 surfaceview中去寫就一定報錯,原因我解釋下;
我們在xml中定義我們的surfaceview 和 組件button、textview等等的時候 他們是同一級別的!!而不是把button包含在 surfaceview
裡,所以雖然在surfaceview中可以根據id索引到button但綁定的時候是無法找到button的,只有我們的activitysetContentView(R.layout.main); 顯示的button,所以只能在顯示它的activity中去綁定,這裡需要注意下;
下面分享出源碼:
源碼下載地址:
http://download.csdn.net/source/2939526
 Android提高之SQLite分頁表格實現方法
繼前一篇文章講到Android上的SQLite分頁讀取,其功能只是用文本框顯示數據而已。本文就講得更加深入些,實現並封裝一個SQL分頁表格控件,不僅支持分頁還是以
 Android編程根據系列圖片繪制動畫實例總結
本文實例講述了Android編程根據系列圖片繪制動畫的方法。分享給大家供大家參考,具體如下: 一、采用系統提供的Animation類,用自帶的方法 其中的ani
 Android本地化
Android應用程序可以在許多不同地區的許多設備上運行。為了使應用程序更具交互性,應用程序應該處理以適合應用程序將要使用的語言環境方面的文字,數字,文件等。在本章中,我
 Android ApiDemo示例解讀系列之四:App
在Android Demo實例App->Activity->Cus