編輯:Android開發實例
大家好,我們今天這一節要介紹的是RadioGroup 的組事件.RadioGroup 可將各自不同的RadioButton ,設限於同一個Radio 按鈕組,同一個RadioGroup 組裡的按鈕,只能做出單一選擇(單選題).
首先,我們先設計一個TextView Widget ,以及一個RadioGroup ,並將該RadioGroup 內放置兩個RadioButton ,默認為都不選擇,在程序運行階段,利用onCheckedChanged 作為啟動事件裝置,讓User選擇其中一個按鈕,顯示被選擇的內容,最的將RadioButton 的選項文字顯示於TextView 當中.
下面我們看一下效果圖:
下面是涉及的相關代碼:
string.xml:
<?xml version="1.0" encoding="utf-8"?>
<resources>
<string name="hello">Hello World, RadioGroupDemo</string>
<string name="app_name">RadioGroupDemo</string>
<string name="tr_radio_op1">帥哥</string>
<string name="tr_radio_op2">美女</string>
<string name="str_radio_question1">請問你是?</string>
</resources>
主布局main.xml:
<?xml version="1.0" encoding="utf-8"?>
<LinearLayout xmlns:android="http://schemas.android.com/apk/res/android"
android:orientation="vertical"
android:layout_width="fill_parent"
android:layout_height="fill_parent"
>
<!--第一個TextView -->
<TextView
android:id="@+id/myTextView"
android:layout_width="228px"
android:layout_height="49px"
android:text="@string/str_radio_question1"
android:textSize="30sp"
/>
<!--建立一個RadioGroup -->
<RadioGroup
android:id="@+id/myRadioGroup"
android:layout_width="137px"
android:layout_height="216px"
android:orientation="vertical"
>
<!--第一個RadioButton -->
<RadioButton
android:id="@+id/myRadioButton1"
android:layout_width="wrap_content"
android:layout_height="wrap_content"
android:text="@string/tr_radio_op1"
/>
<!--第二個RadioButton -->
<RadioButton
android:id="@+id/myRadioButton2"
android:layout_width="wrap_content"
android:layout_height="wrap_content"
android:text="@string/tr_radio_op2"
/>
</RadioGroup>
</LinearLayout>
最後是主控制程序RadioGroupDemo.java:
package com.android.test;
import android.app.Activity;
import android.os.Bundle;
import android.widget.RadioButton;
import android.widget.RadioGroup;
import android.widget.TextView;
public class RadioGroupDemo extends Activity
{
public TextView mTextView1;
public RadioGroup mRadioGroup1;
public RadioButton mRadio1,mRadio2;
public void onCreate(Bundle savedInstanceState)
{
super.onCreate(savedInstanceState);
setContentView(R.layout.main);
/*取得 TextView、RadioGroup、RadioButton對象*/
mTextView1 = (TextView) findViewById(R.id.myTextView);
mRadioGroup1 = (RadioGroup) findViewById(R.id.myRadioGroup);
mRadio1 = (RadioButton) findViewById(R.id.myRadioButton1);
mRadio2 = (RadioButton) findViewById(R.id.myRadioButton2);
/*RadioGroup用OnCheckedChangeListener來運行*/
mRadioGroup1.setOnCheckedChangeListener(mChangeRadio);
}
private RadioGroup.OnCheckedChangeListener mChangeRadio = new
RadioGroup.OnCheckedChangeListener()
{
@Override
public void onCheckedChanged(RadioGroup group, int checkedId)
{
// TODO Auto-generated method stub
if(checkedId==mRadio1.getId())
{
/*把mRadio1的內容傳到mTextView1*/
mTextView1.setText(mRadio1.getText());
}
else if(checkedId==mRadio2.getId())
{
/*把mRadio2的內容傳到mTextView1*/
mTextView1.setText(mRadio2.getText());
}
}
};
}
 使用User Agent分辨出Android設備類型的安全做法
隨著Android設備增多,不少網站都開始設備Android設備,而Android主流設備類型以手機和平板為主。網站在適配時通過User Agent(用戶代理,以
 Android加載Spinner
可以顯示在的Android任務,通過加載進度條的進展。進度條有兩種形狀。加載欄和加載微調(spinner)。在本章中,我們將討論微調(spinner)。Spinner 用
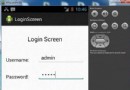 Android登錄實例
登錄應用程序的屏幕,詢問憑據登錄到一些特定的應用。可能需要登錄到Facebook,微博等本章介紹了,如何創建一個登錄界面,以及如何管理安全問題和錯誤嘗試。首先,必須定義兩
 Android JSON解析器
JSON代表JavaScript對象符號。它是一個獨立的數據交換格式,是XML的最佳替代品。本章介紹了如何解析JSON文件,並從中提取所需的信息。Android提供了四個