編輯:Android開發實例
今天在看視頻的時候看到一個ExpandableListView控件的使用,感覺挺有用的,所以在博客上做一下記載供我在以後的開發中使用,有興趣的朋友也可以參考下。
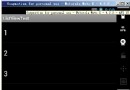
先把運行效果附在下面:
首先看下布局文件:在定義布局時,這裡要定義三個布局文件,全在res/layout目錄下,我先把布局文件附在下面,具體有什麼用,我在下面會詳細說明
main.xml
 1 <?xml version="1.0" encoding="utf-8"?>
 2 <LinearLayout xmlns:android="http://schemas.android.com/apk/res/android"
 3     android:orientation="vertical"
 4     android:layout_width="fill_parent"
 5     android:layout_height="fill_parent"
 6     >
 7  <ExpandableListView
 8      android:id="@id/android:list"
 9      android:layout_width="fill_parent"
10      android:layout_height="fill_parent"
11      android:drawSelectorOnTop="false"/>
12  <TextView
13     android:layout_width="fill_parent"
14     android:layout_height="fill_parent"
15     android:id="@id/android:empty"
16     android:text="No Data"/>
17 </LinearLayout>
groups.xml:
 1 <?xml version="1.0" encoding="utf-8"?>
 2 <LinearLayout xmlns:android="http://schemas.android.com/apk/res/android"
 3     android:orientation="vertical"
 4     android:layout_width="fill_parent"
 5     android:layout_height="fill_parent"
 6     >
 7  <TextView
 8     android:layout_width="fill_parent"
 9     android:layout_height="fill_parent"
10     android:id="@+id/group"
11     android:textSize="25sp"
12     android:paddingLeft="35px"
13     android:paddingTop="10px"
14     android:paddingRight="5px"
15     android:paddingBottom="10px"
16     android:text="No Data"/>
17 </LinearLayout>
childs.xml:
 1 <?xml version="1.0" encoding="utf-8"?>
 2 <LinearLayout xmlns:android="http://schemas.android.com/apk/res/android"
 3     android:orientation="vertical"
 4     android:layout_width="fill_parent"
 5     android:layout_height="fill_parent"
 6     >
 7  <TextView
 8     android:layout_width="fill_parent"
 9     android:layout_height="fill_parent"
10     android:id="@+id/child"
11     android:textSize="15sp"
12     android:paddingLeft="25px"
13     android:paddingTop="10px"
14     android:paddingRight="5px"
15     android:paddingBottom="10px"
16     android:text="No Data"/>
17 </LinearLayout>
首先,第一個布局文件main.xml是在主界面定義一個ExpandableListView ,在這裡我們就要和在做ListView是的方法做下對比了,其實這個listView的顯示類似。主要是用來顯示ExpandableListView 下的數據。第二個布局文件是定義ExpandableListView 下的一級條目目錄。在這裡我只為一級條目目錄添加一個textView控件。第三個布局文件是定義ExpandableListView 下的二級條目目錄,和一級條目目錄一樣,布局文件裡也只有一個TextView控件。
下面看java代碼怎麼寫,具體的做法我在代碼中已經做了注釋,在這裡我就不啰嗦了,就將代碼直接附在下面供大家參考。
ExpandableActivity:
 1 package cn.yj3g.ExpandableListActivity;
 2
 3 import java.util.ArrayList;
 4 import java.util.HashMap;
 5 import java.util.List;
 6 import java.util.Map;
 7 import android.app.ExpandableListActivity;
 8 import android.os.Bundle;
 9 import android.view.View;
10 import android.widget.ExpandableListView;
11 import android.widget.SimpleExpandableListAdapter;
12 /**
13  * 繼承ExpandableListActivity類
14  */
15 public class ExpandableActivity extends ExpandableListActivity {
16     @Override
17     public void onCreate(Bundle savedInstanceState) {
18         super.onCreate(savedInstanceState);
19         setContentView(R.layout.main);
20         // 創建一級條目
21         List<Map<String, String>> groups = new ArrayList<Map<String, String>>();
22         //創建兩個一級條目標題
23         Map<String, String> group1 = new HashMap<String, String>();
24         group1.put("group", "音樂");
25         Map<String, String> group2 = new HashMap<String, String>();
26         group2.put("group", "歌詞");
27         groups.add(group1);
28         groups.add(group2);
29         // 創建一級條目下的的二級條目
30         List<Map<String, String>> child1 = new ArrayList<Map<String, String>>();
31         //同樣是在一級條目目錄下創建兩個對應的二級條目目錄
32         Map<String, String> childdata1 = new HashMap<String, String>();
33         childdata1.put("child", "青花瓷");
34         Map<String, String> childdata2 = new HashMap<String, String>();
35         childdata2.put("child", "東風破");
36         child1.add(childdata1);
37         child1.add(childdata2);
38         //同上
39         List<Map<String, String>> child2 = new ArrayList<Map<String, String>>();
40         Map<String, String> childdata3 = new HashMap<String, String>();
41         childdata3.put("child", "青花瓷.lrc");
42         Map<String, String> childdata4 = new HashMap<String, String>();
43         childdata4.put("child", "東風破.lrc");
44         child2.add(childdata3);
45         child2.add(childdata4);
46         // 將二級條目放在一個集合裡,供顯示時使用
47         List<List<Map<String, String>>> childs = new ArrayList<List<Map<String, String>>>();
48         childs.add(child1);
49         childs.add(child2);
50         /**
51          * 使用SimpleExpandableListAdapter顯示ExpandableListView
52          * 參數1.上下文對象Context
53          * 參數2.一級條目目錄集合
54          * 參數3.一級條目對應的布局文件
55          * 參數4.fromto,就是map中的key,指定要顯示的對象
56          * 參數5.與參數4對應,指定要顯示在groups中的id
57          * 參數6.二級條目目錄集合
58          * 參數7.二級條目對應的布局文件
59          * 參數8.fromto,就是map中的key,指定要顯示的對象
60          * 參數9.與參數8對應,指定要顯示在childs中的id
61          */
62         SimpleExpandableListAdapter adapter = new SimpleExpandableListAdapter(
63                 this, groups, R.layout.groups, new String[] { "group" },
64                 new int[] { R.id.group }, childs, R.layout.child,
65                 new String[] { "child" }, new int[] { R.id.child });
66         setListAdapter(adapter);
67
68     }
69     /**
70      * 設置哪個二級目錄被默認選中
71      */
72     @Override
73     public boolean setSelectedChild(int groupPosition, int childPosition,
74             boolean shouldExpandGroup) {
75             //do something
76         return super.setSelectedChild(groupPosition, childPosition,
77                 shouldExpandGroup);
78     }
79     /**
80      * 設置哪個一級目錄被默認選中
81      */
82     @Override
83     public void setSelectedGroup(int groupPosition) {
84         //do something
85         super.setSelectedGroup(groupPosition);
86     }
87     /**
88      * 當二級條目被點擊時響應
89      */
90     @Override
91     public boolean onChildClick(ExpandableListView parent, View v,
92             int groupPosition, int childPosition, long id) {
93             //do something
94         return super.onChildClick(parent, v, groupPosition, childPosition, id);
95     }
96
97 }
上面在顯示ExpandableListView 是用的是SimpleExpandableListAdapter ,這裡要傳的參數比較多,大家在用時別一看到參數多就頭疼,沒事的,看注釋你就知道各個參數的意思了。下面的三個重寫方法是在顯示ExpandableListView 是調用的,具體的用法就要根據需求來確定了。
這個控件和ListView很相似,在學習的過程中,可以結合ListView的用法的來使用。
 Android MediaPlayer(多媒體播放)
Android提供了許多方法來控制播放的音頻/視頻文件和流。其中該方法是通過一類稱為MediaPlayer。Android是提供MediaPlayer類訪問內置的媒體播放
 Android本地化
Android應用程序可以在許多不同地區的許多設備上運行。為了使應用程序更具交互性,應用程序應該處理以適合應用程序將要使用的語言環境方面的文字,數字,文件等。在本章中,我
 Android MediaPlayer(多媒體播放)
Android提供了許多方法來控制播放的音頻/視頻文件和流。其中該方法是通過一類稱為MediaPlayer。Android是提供MediaPlayer類訪問內置的媒體播放
 Android Service(不和用戶交互應用組件)案例分析
Service是在一段不定的時間運行在後台,不和用戶交互應用組件。每個Service必須在manifest中 通過<service>來聲明。可以通過c