編輯:Android開發實例
裝過Android版的Facebook、lastfm的同學是否對於這些應用的功能感到驚喜,它們可以定期更新朋友的最新信息,將最新近況和心情短語集成入聯系人中。這些應用全部是以Android2.0後的賬戶和同步機制為基礎的。Google的例程中給出了名為SampleSyncAdpater的例子,通過分析該例子可以學會Android中的Account驗證、同步Adapter的使用。
詳細例子代碼可以看sdk samples中提供的源碼,現在拿2.2中的版本來簡要說明。
首先是 class Authenticator extends AbstractAccountAuthenticator ,該類是賬戶認證類,打開手機的Setting裡,有Account&Sync 一項,Authenticator就是實現其中的賬號功能的類。
- // in Authenticator.java
- public Bundle addAccount(AccountAuthenticatorResponse response,
- String accountType, String authTokenType, String[] requiredFeatures,
- Bundle options) {
- final Intent intent = new Intent(mContext, AuthenticatorActivity.class);
- intent.putExtra(AuthenticatorActivity.PARAM_AUTHTOKEN_TYPE,
- authTokenType);
- intent.putExtra(AccountManager.KEY_ACCOUNT_AUTHENTICATOR_RESPONSE,
- response);
- final Bundle bundle = new Bundle();
- bundle.putParcelable(AccountManager.KEY_INTENT, intent);
- return bundle;
- }
其中addAccount方法用來定義需要增加賬號時的操作,如調用AuthenticatorActivity來進行賬號的添加認證。
在AuthenticatorActivity.java中定義了handleLogin(),此方法由login_activity.xml中的android:onClick="handleLogin"定義與ui中的okbutton的關聯。
- // in layout/login_activity.xml
- <Button
- android:id="@+id/ok_button"
- android:layout_width="wrap_content"
- android:layout_height="wrap_content"
- android:layout_gravity="center_horizontal"
- android:minWidth="100dip"
- android:text="@string/login_activity_ok_button"
- android:onClick="handleLogin" />
handleLogin()將ui中的用戶名和密碼取得,並創建一個試圖認證的線程,通過網絡去服務端驗證。
NetworkUtilities.java中的 public static boolean authenticate(String username, String password, Handler handler, final Context context)方法展示了通過網絡驗證的具體流程。得到服務端驗證結果後,在sendResult()中通過handler.post調用來實現onAuthenticationResult()在AuthenticatorActivity中的運行。onAuthenticationResult()判斷驗證通過則結束AuthenticatorActivity,否則報出用戶名密碼錯,讓用戶在AuthenticatorActivity中再次嘗試驗證。
- // AuthenticatorActivity.java中的handleLogin()方法
- /**
- * Handles onClick event on the Submit button. Sends username/password to
- * the server for authentication.
- *
- * @param view The Submit button for which this method is invoked
- */
- public void handleLogin(View view) {
- if (mRequestNewAccount) {
- mUsername = mUsernameEdit.getText().toString();
- }
- mPassword = mPasswordEdit.getText().toString();
- if (TextUtils.isEmpty(mUsername) || TextUtils.isEmpty(mPassword)) {
- mMessage.setText(getMessage());
- } else {
- showProgress();
- // Start authenticating...
- mAuthThread =
- NetworkUtilities.attemptAuth(mUsername, mPassword, mHandler,
- AuthenticatorActivity.this);
- }
- }
- // NetworkUtilities中的authenticate()方法通過網絡訪問具體來實現服務端的驗證,sendResult()來使調用結果被AuthenticatorActivity的onAuthenticationResult()調用。
- /**
- * Connects to the Voiper server, authenticates the provided username and
- * password.
- *
- * @param username The user's username
- * @param password The user's password
- * @param handler The hander instance from the calling UI thread.
- * @param context The context of the calling Activity.
- * @return boolean The boolean result indicating whether the user was
- * successfully authenticated.
- */
- public static boolean authenticate(String username, String password,
- Handler handler, final Context context) {
- final HttpResponse resp;
- final ArrayList<NameValuePair> params = new ArrayList<NameValuePair>();
- params.add(new BasicNameValuePair(PARAM_USERNAME, username));
- params.add(new BasicNameValuePair(PARAM_PASSWORD, password));
- HttpEntity entity = null;
- try {
- entity = new UrlEncodedFormEntity(params);
- } catch (final UnsupportedEncodingException e) {
- // this should never happen.
- throw new AssertionError(e);
- }
- final HttpPost post = new HttpPost(AUTH_URI);
- post.addHeader(entity.getContentType());
- post.setEntity(entity);
- maybeCreateHttpClient();
- try {
- resp = mHttpClient.execute(post);
- if (resp.getStatusLine().getStatusCode() == HttpStatus.SC_OK) {
- if (Log.isLoggable(TAG, Log.VERBOSE)) {
- Log.v(TAG, "Successful authentication");
- }
- sendResult(true, handler, context);
- return true;
- } else {
- if (Log.isLoggable(TAG, Log.VERBOSE)) {
- Log.v(TAG, "Error authenticating" + resp.getStatusLine());
- }
- sendResult(false, handler, context);
- return false;
- }
- } catch (final IOException e) {
- if (Log.isLoggable(TAG, Log.VERBOSE)) {
- Log.v(TAG, "IOException when getting authtoken", e);
- }
- sendResult(false, handler, context);
- return false;
- } finally {
- if (Log.isLoggable(TAG, Log.VERBOSE)) {
- Log.v(TAG, "getAuthtoken completing");
- }
- }
- }
- /**
- * Sends the authentication response from server back to the caller main UI
- * thread through its handler.
- *
- * @param result The boolean holding authentication result
- * @param handler The main UI thread's handler instance.
- * @param context The caller Activity's context.
- */
- private static void sendResult(final Boolean result, final Handler handler,
- final Context context) {
- if (handler == null || context == null) {
- return;
- }
- handler.post(new Runnable() {
- public void run() {
- ((AuthenticatorActivity) context).onAuthenticationResult(result);
- }
- });
- }
- // AuthenticatorActivity.java中的onAuthenticationResult,來根據驗證結果來選擇結束認證或重新嘗試。
- /**
- * Called when the authentication process completes (see attemptLogin()).
- */
- public void onAuthenticationResult(boolean result) {
- Log.i(TAG, "onAuthenticationResult(" + result + ")");
- // Hide the progress dialog
- hideProgress();
- if (result) {
- if (!mConfirmCredentials) {
- finishLogin();
- } else {
- finishConfirmCredentials(true);
- }
- } else {
- Log.e(TAG, "onAuthenticationResult: failed to authenticate");
- if (mRequestNewAccount) {
- // "Please enter a valid username/password.
- mMessage
- .setText(getText(R.string.login_activity_loginfail_text_both));
- } else {
- // "Please enter a valid password." (Used when the
- // account is already in the database but the password
- // doesn't work.)
- mMessage
- .setText(getText(R.string.login_activity_loginfail_text_pwonly));
- }
- }
- }
Account的驗證完畢後,就生成了賬號,可以開始使用同步功能了。同步的主要邏輯在public class SyncAdapter extends AbstractThreadedSyncAdapter中實現。
- // SyncAdapter.java中的OnPerformSync方法,主要的同步邏輯
- @Override
- public void onPerformSync(Account account, Bundle extras, String authority,
- ContentProviderClient provider, SyncResult syncResult) {
- List<User> users;
- List<Status> statuses;
- String authtoken = null;
- try {
- // use the account manager to request the credentials
- authtoken =
- mAccountManager.blockingGetAuthToken(account,
- Constants.AUTHTOKEN_TYPE, true /* notifyAuthFailure */);
- // fetch updates from the sample service over the cloud
- users =
- NetworkUtilities.fetchFriendUpdates(account, authtoken,
- mLastUpdated);
- // update the last synced date.
- mLastUpdated = new Date();
- // update platform contacts.
- Log.d(TAG, "Calling contactManager's sync contacts");
- ContactManager.syncContacts(mContext, account.name, users);
- // fetch and update status messages for all the synced users.
- statuses = NetworkUtilities.fetchFriendStatuses(account, authtoken);
- ContactManager.insertStatuses(mContext, account.name, statuses);
- } catch (final AuthenticatorException e) {
- syncResult.stats.numParseExceptions++;
- Log.e(TAG, "AuthenticatorException", e);
- } catch (final OperationCanceledException e) {
- Log.e(TAG, "OperationCanceledExcetpion", e);
- } catch (final IOException e) {
- Log.e(TAG, "IOException", e);
- syncResult.stats.numIoExceptions++;
- } catch (final AuthenticationException e) {
- mAccountManager.invalidateAuthToken(Constants.ACCOUNT_TYPE,
- authtoken);
- syncResult.stats.numAuthExceptions++;
- Log.e(TAG, "AuthenticationException", e);
- } catch (final ParseException e) {
- syncResult.stats.numParseExceptions++;
- Log.e(TAG, "ParseException", e);
- } catch (final JSONException e) {
- syncResult.stats.numParseExceptions++;
- Log.e(TAG, "JSONException", e);
- }
- }
onPerformSync中的執行流程中,使用NetworkUtilities中的fetchFriendUpdates和fetchFriendStatuses來訪問服務端的聯系人更新,並使用了例程中自己封裝的ContactManager來讀取、更新聯系人信息。
那Account和SyncAdapter及其Service和xml定義之間是如何關聯的呢? AndroidManifest.xml中定義了AccountAuthenticator,SyncAdapter及對應的Service和xml定義的關聯。
- <application
- android:icon="@drawable/icon"
- android:label="@string/label">
- <!-- The authenticator service -->
- <service
- android:name=".authenticator.AuthenticationService"
- android:exported="true">
- <intent-filter>
- <action
- android:name="android.accounts.AccountAuthenticator" />
- </intent-filter>
- <meta-data
- android:name="android.accounts.AccountAuthenticator"
- android:resource="@xml/authenticator" />
- </service>
- <service
- android:name=".syncadapter.SyncService"
- android:exported="true">
- <intent-filter>
- <action
- android:name="android.content.SyncAdapter" />
- </intent-filter>
- <meta-data
- android:name="android.content.SyncAdapter"
- android:resource="@xml/syncadapter" />
- <meta-data
- android:name="android.provider.CONTACTS_STRUCTURE"
- android:resource="@xml/contacts" />
- </service>
- <activity
- android:name=".authenticator.AuthenticatorActivity"
- android:label="@string/ui_activity_title"
- android:theme="@android:style/Theme.Dialog"
- android:excludeFromRecents="true"
- >
- <!--
- No intent-filter here! This activity is only ever launched by
- someone who explicitly knows the class name
- -->
- </activity>
- </application>
更詳細的代碼細節和執行流程,可以去把SDK中的SampleSyncAdapter代碼運行起來體會一下,不過要實現整個流程,必須搭建聯系人的服務器端,例程中在目錄samplesyncadapter_server中也提供了簡單的server端python代碼,需要搭建在google app engine上。搭建過程遇到一些問題,由於對python不熟我弄了幾天才解決好搭建成功,其中遇到的一個model moudle找不到的問題需要你在model中新建一個__init__.py的空文件,來說明是一個python模塊,如果你也遇到此問題,希望對你有幫助。
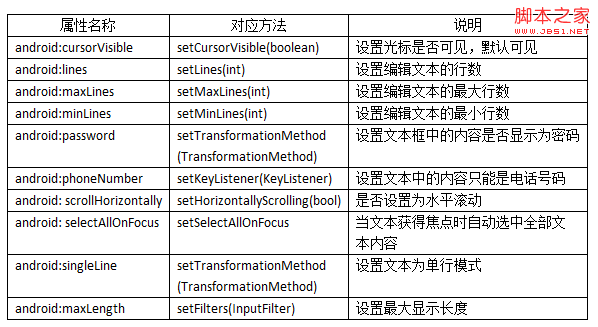 Android控件之EditView常用屬性及應用方法
EditView類繼承自TextView類,EditView與TextView最大的不同就是用戶可以對EditView控件進
 Android加載Spinner
可以顯示在的Android任務,通過加載進度條的進展。進度條有兩種形狀。加載欄和加載微調(spinner)。在本章中,我們將討論微調(spinner)。Spinner 用
 Android 使用Gallery實現3D相冊(附效果圖+Demo源碼)
今天因為要做一個設置開機畫面的功能,主要是讓用戶可以設置自己的開機畫面,應用層需要做讓用戶選擇開機畫面圖片的功能。所以需要做一個簡單的圖片浏覽選擇程序。最後選用G
 android:descendantFocusability方法介紹
此方法適用於所有母控件無法獲取焦點的情況 開發中很常見的一個問題,項目中的listview不僅僅是簡單的文字,常常需要自己定義listview,自己的Adapte