編輯:Android開發實例
概述
布局(Layout)的概念是針對Activity的,Activity就是布滿整個Android設備的窗口或者懸浮於其他窗口上的交互界面。在一個應用程序中通常由多個Activity構成,每個需要顯示的Activity都需要在AndroidManifest.xml文件之中聲明。
通常情況下,開發人員可以使用兩種方式來創建UI組件,一種方式是使用XML方式來配置UI組件的相關屬性,然後裝載這些UI組件,這也是最常用的方式。但是有些特殊情況下,需要動態生成UI組件,則需要使用第二種方式,完全使用Java代碼來創建UI組件。
XML布局文件是Android系統中定義的Layout的常用方式,所有布局文件必須包含在res/layout目錄中,且必須符合Java的命名規范。當在res/layout目錄下新增了布局文件之後,R.java文件會自動收錄該布局資源,Java代碼可通過setContentView方法在Activity中顯示該Layout。
setContentView(R.layout.<資源名稱>);
在布局文件中可以指定UI組件的android:id屬性,該屬性的屬性值代表該組件的唯一標識。通過Activity.findViewById()訪問,並且findViewById()必須在setContentView加載xml文件之後使用,否則會拋出異常。 findViewById(R.id.<android.id屬性值>)Android應用的絕大部分UI組件都放在android.widget包及其子包、android.view包及其子包中,Android應用的所有UI組件都繼承了View類。View類還有一個重要的子類:ViewGroup,ViewGroup類是所有布局管理器的父類。
ViewGroup容器控制其子組件的分布依賴於ViewGroup.LayoutParams、ViewGroup.MarginLayoutParams兩個內部類。
ViewGroup.LayoutParams提供兩個XML屬性設定組件的大小。
對於View的尺寸,android提供了三種單位供選擇使用:
尺寸單位選擇的技巧:如果設置長度、高度等屬性時可以使用dp或sp,但是如果設置字體,需要使用px。如果使用dp或sp,系統會根據屏幕密度的變化進行轉換。
為了適應各種界面風格,Android提供了五種布局規范,利用這五種布局,基本上可以在設備上隨心所欲的擺放任何UI組件,這五種布局分別是:
線性布局(LinearLayout)
LinearLayout是最常用的布局方式,在XML文件中使用<LinearLayout>標記。它會將容器裡的UI組件一個一個挨著排列起來。但是LinearLayout不會換行,當UI組件超出屏幕之後,則不會被顯示出來。LinearLayout有兩個重要的XML屬性:android:gravity(對齊方式);android:orientation(排列方式)。
android:orientation(排列方式),設定了LinearLayout中包含的UI組件的排列方式,有兩個選項vertical(豎向)、horizontal(橫向,默認值)
android:gravity(對齊方式),設定LinearLayout中包含UI組件的對齊方式,其選項很多,常用上(top)、下(bottom)、左(left)、右(right)。
LinearLayout布局示例:
- <LinearLayout xmlns:android="http://schemas.android.com/apk/res/android"
- xmlns:tools="http://schemas.android.com/tools"
- android:layout_width="match_parent"
- android:layout_height="match_parent"
- tools:context=".MainActivity" android:orientation="horizontal" android:gravity="bottom">
- <Button
- android:layout_weight="1"
- android:text="button"
- android:layout_width="wrap_content"
- android:layout_height="wrap_content"/>
- <Button
- android:text="button"
- android:layout_gravity="top"
- android:layout_weight="1"
- android:layout_width="wrap_content"
- android:layout_height="wrap_content"/>
- <Button
- android:text="button"
- android:layout_weight="1"
- android:layout_width="wrap_content"
- android:layout_height="wrap_content"/>
- </LinearLayout>
顯示效果:
幀布局(FrameLayout)
幀布局是最簡單的布局方式,所有添加到這個布局中的視圖都是以層疊的方式顯示,並且後聲明的遮擋先聲明的控件。
幀布局容器為每個加入其中的組件創建一個空白的區域(稱為一幀),所有每個子組件占據一幀,這些幀都會根據gravity屬性執行自動對齊。
下面通過一個例子說明幀布局,以一個經典的漸變色條為例,在FrameLayout中以此添加多個TextView,賦予不同尺寸和顏色,會疊加顯示。
FrameLayout示例代碼:
- <FrameLayout xmlns:android="http://schemas.android.com/apk/res/android"
- xmlns:tools="http://schemas.android.com/tools"
- android:layout_width="match_parent"
- android:layout_height="match_parent"
- android:paddingBottom="@dimen/activity_vertical_margin"
- android:paddingLeft="@dimen/activity_horizontal_margin"
- android:paddingRight="@dimen/activity_horizontal_margin"
- android:paddingTop="@dimen/activity_vertical_margin"
- tools:context=".MainActivity" >
- <TextView
- android:layout_width="wrap_content"
- android:layout_height="wrap_content"
- android:width="210px"
- android:height="50px"
- android:background="#ff0000"
- />
- <TextView
- android:layout_width="wrap_content"
- android:layout_height="wrap_content"
- android:width="180px"
- android:height="50px"
- android:background="#dd0000"
- />
- <TextView
- android:layout_width="wrap_content"
- android:layout_height="wrap_content"
- android:width="150px"
- android:height="50px"
- android:background="#bb0000"
- />
- <TextView
- android:layout_width="wrap_content"
- android:layout_height="wrap_content"
- android:width="120px"
- android:height="50px"
- android:background="#990000"
- />
- <TextView
- android:layout_width="wrap_content"
- android:layout_height="wrap_content"
- android:width="90px"
- android:height="50px"
- android:background="#770000"
- />
- <TextView
- android:layout_width="wrap_content"
- android:layout_height="wrap_content"
- android:width="60px"
- android:height="50px"
- android:background="#550000"
- />
- <TextView
- android:layout_width="wrap_content"
- android:layout_height="wrap_content"
- android:width="30px"
- android:height="50px"
- android:background="#330000"
- />
- </FrameLayout>
以上示例顯示效果圖:
相對布局(RelativeLayout)
RelativeLayout,其內子組件的位置總是相對兄弟UI組件、父親容器來決定的。比如UI組件A相對於UI組件B的位置進行定位,那麼UI組件B需要在UI組件A之前定義。
相對布局用到的主要屬性:
下面通過一個例子來說明RelativeLayout,在該布局XML中,確定一個經典的梅花布局效果,上下左右的UI組件通過中間的UI組件位置確定自己的位置。
示例代碼:
- <RelativeLayout xmlns:android="http://schemas.android.com/apk/res/android"
- xmlns:tools="http://schemas.android.com/tools"
- android:layout_width="match_parent"
- android:layout_height="match_parent"
- android:gravity="top"
- android:paddingBottom="@dimen/activity_vertical_margin"
- android:paddingLeft="@dimen/activity_horizontal_margin"
- android:paddingRight="@dimen/activity_horizontal_margin"
- android:paddingTop="@dimen/activity_vertical_margin"
- tools:context=".MainActivity" >
- <TextView
- android:id="@+id/view1"
- android:layout_width="wrap_content"
- android:layout_height="wrap_content"
- android:text="中"
- android:layout_centerInParent="true"
- />
- <TextView
- android:layout_width="wrap_content"
- android:layout_height="wrap_content"
- android:text="上"
- android:layout_above="@id/view1"
- android:layout_alignLeft="@id/view1"
- />
- <TextView
- android:layout_width="wrap_content"
- android:layout_height="wrap_content"
- android:text="下"
- android:layout_below="@id/view1"
- android:layout_alignLeft="@id/view1"
- />
- <TextView
- android:layout_width="wrap_content"
- android:layout_height="wrap_content"
- android:text="左"
- android:layout_toLeftOf="@id/view1"
- android:layout_alignTop="@id/view1"
- />
- <TextView
- android:layout_width="wrap_content"
- android:layout_height="wrap_content"
- android:text="右"
- android:layout_toRightOf="@id/view1"
- android:layout_alignTop="@id/view1"
- />
- </RelativeLayout>
效果展示
表格布局(TableLayout)
表格布局,采用行、列的形式來管理UI組件,TableLayout通過TableRow、其他UI組件來控制表格的行數和列數。
每次向TableLayout中添加一個TableRow,該TableRow就是一個表格行,TableRow也是容器,因此它也可以不斷添加其他組件,沒添加一個子組件,該表格就增加一列。如果直接向TableLayout中添加組件,那麼這個組件將直接占用一行。
TableLayout支持的XML屬性:注意:TableLayout中所謂的序列號是從0開始計算的。
下面用一個例子來說明TableLayout布局,代碼如下:
- <?xml version="1.0" encoding="utf-8"?>
- <LinearLayout xmlns:android="http://schemas.android.com/apk/res/android"
- android:layout_width="match_parent"
- android:layout_height="match_parent"
- android:orientation="vertical" >
- <TableLayout
- android:layout_width="fill_parent"
- android:layout_height="wrap_content"
- android:stretchColumns="0,1,2,3" >
- <TableRow
- android:layout_width="fill_parent"
- android:layout_height="wrap_content" >
- <Button
- android:layout_width="wrap_content"
- android:layout_height="wrap_content"
- android:text="button" />
- <Button
- android:layout_width="wrap_content"
- android:layout_height="wrap_content"
- android:text="button" />
- <Button
- android:layout_width="wrap_content"
- android:layout_height="wrap_content"
- android:text="button" />
- <Button
- android:layout_width="wrap_content"
- android:layout_height="wrap_content"
- android:text="button" />
- </TableRow>
- <EditText
- android:layout_width="fill_parent"
- android:layout_height="fill_parent"
- android:background="#00ffff" />
- </TableLayout>
- </LinearLayout>
展示效果:
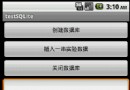
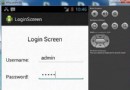
絕對布局(AbsoluteLayout)
對於AbsoluteLayout,android不提供任何布局控制,而是由開發人員自己通過X坐標、Y坐標來控制組件的位置。
在AbsoluteLayout中,每個子組件都需要通過兩個XML屬性來確定坐標:layout_x:指定該子組件的X坐標;layout_y:指定該子組件的Y坐標。
因為此布局比較繁瑣,而且在不同的屏幕上顯示效果差距比較大,所以一般不推薦使用,下面通過一個簡單的示例來展示AbsoluteLayout的用法
示例代碼:
- <?xml version="1.0" encoding="utf-8"?>
- <AbsoluteLayout xmlns:android="http://schemas.android.com/apk/res/android"
- android:layout_width="match_parent"
- android:layout_height="match_parent"
- android:orientation="vertical" >
- <EditText
- android:id="@+id/editText1"
- android:layout_width="wrap_content"
- android:layout_height="wrap_content"
- android:layout_x="84dp"
- android:layout_y="20dp"
- android:ems="10" />
- <EditText
- android:id="@+id/EditText01"
- android:layout_width="wrap_content"
- android:layout_height="wrap_content"
- android:layout_x="84dp"
- android:layout_y="66dp"
- android:ems="10" />
- <Button
- android:id="@+id/button1"
- android:layout_width="wrap_content"
- android:layout_height="wrap_content"
- android:layout_x="214dp"
- android:layout_y="113dp"
- android:text="重置" />
- <Button
- android:id="@+id/button2"
- android:layout_width="wrap_content"
- android:layout_height="wrap_content"
- android:layout_x="130dp"
- android:layout_y="113dp"
- android:text="登錄" />
- <TextView
- android:id="@+id/textView1"
- android:layout_width="wrap_content"
- android:layout_height="wrap_content"
- android:layout_x="33dp"
- android:layout_y="36dp"
- android:text="用戶名" />
- <TextView
- android:id="@+id/textView2"
- android:layout_width="wrap_content"
- android:layout_height="wrap_content"
- android:layout_x="48dp"
- android:layout_y="80dp"
- android:text="密碼" />
- </AbsoluteLayout>
展示效果:
 Android本地化
Android應用程序可以在許多不同地區的許多設備上運行。為了使應用程序更具交互性,應用程序應該處理以適合應用程序將要使用的語言環境方面的文字,數字,文件等。在本章中,我
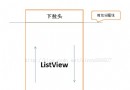
 帶你實現開發者頭條(二) 實現左滑菜單
今天開始模仿開發者頭條的側滑菜單,是本系列第二篇文章,相信大家已經看到很多app使用這種側滑。今天我來教大家用Android自帶DrawerLayo
 Android本地化
Android應用程序可以在許多不同地區的許多設備上運行。為了使應用程序更具交互性,應用程序應該處理以適合應用程序將要使用的語言環境方面的文字,數字,文件等。在本章中,我
 Android加載Spinner
可以顯示在的Android任務,通過加載進度條的進展。進度條有兩種形狀。加載欄和加載微調(spinner)。在本章中,我們將討論微調(spinner)。Spinner 用