編輯:Android開發實例
前言
開門見山,這一篇主要講一下在Android開發中,UI控件TextView的一些使用方式,並且通過四個例子實現一般項目中需要的效果來講解TextView的使用。並且在之後的一段時間之內,都會講解關於AndroidUI控件的開發。
TextView
之前講解Android布局的時候,就已經說明,所有Layout都是View的子類或者間接子類。而TextView也一樣,是View的直接子類。它是一個文本顯示控件,提供了基本的顯示文本的功能,並且是大部分UI控件的父類,因為大部分UI控件都需要展示信息。
如果僅僅是展示文本,那麼TextView的作用就太小了,所以它還預定義了一些類似於HTML的標簽,通過這些標簽可以使TextView控件顯示不同的顏色、大小、字體、圖片、鏈接。這些HTML標簽都需要android.text.Html類的支持,但是並不包括所有的HTML標簽。
常用的可以再TextView中設定的標簽有:
使用這些標簽可以用Html.fromHtml方法將這些標簽的字符串轉換成CharSequence接口,然後在TextView.setText()中進行設置。如果需要響應設置的HTML標簽進行響應,需要設置TextView.setMovementMethod(LinkMovementMethod.getInstance())。
CharSequence為接口類型,大家可能對其有點陌生,但是它的子類肯定會讓大家有熟悉的感覺,String、StringBuffer、StringBuilder、SpannableString、SpannableStringBuilder都是其子類,它包括了字符串的所有類,因為面向對象的多態性,在這裡把他理解成字符串類的抽象即可。
除了使用HTML標簽的方式設定顯示文本中的URL地址、郵箱地址、電話等產生超鏈接出發相應的服務,可以使用android:autoLink屬性來設置,以下是android:autoLink屬性的介紹:
顯示富文本
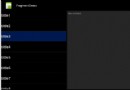
講了這麼多,通過第一個例子來講解一下TextView使用HTML標簽設定樣式和通過autoLink屬性來設置超鏈接效果,在XML布局文件中定義兩個TextView,分別展示HTML標簽和autoLink屬性的使用。
XML布局文件textviewdemo.xml代碼:
- <?xml version="1.0" encoding="utf-8"?>
- <LinearLayout xmlns:android="http://schemas.android.com/apk/res/android"
- android:layout_width="match_parent"
- android:layout_height="match_parent"
- android:orientation="vertical" >
- <TextView
- android:id="@+id/textView1"
- android:layout_width="fill_parent"
- android:layout_height="wrap_content"
- android:padding="20sp"
- />
- <TextView
- android:id="@+id/textView2"
- android:layout_width="fill_parent"
- android:layout_height="wrap_content"
- android:padding="20sp"
- android:autoLink="all"
- android:textSize="20sp"
- />
- </LinearLayout>
Activity文件textViewDemoActivity.java代碼:
- package cn.bgxt.textviewdemo;
- import android.app.Activity;
- import android.os.Bundle;
- import android.text.Html;
- import android.text.method.LinkMovementMethod;
- import android.widget.TextView;
- public class textViewDemoActivity extends Activity {
- private TextView textView1,textView2;
- public textViewDemoActivity() {
- // TODO Auto-generated constructor stub
- }
- @Override
- protected void onCreate(Bundle savedInstanceState) {
- // TODO Auto-generated method stub
- super.onCreate(savedInstanceState);
- setContentView(R.layout.textviewdemo);
- //通過Id獲得兩個TextView控件
- textView1=(TextView)findViewById(R.id.textView1);
- textView2=(TextView)findViewById(R.id.textView2);
- //設置需要顯示的字符串
- String html="<font color ='red'>Hello android</font><br/>";
- html+="<font color='#0000ff'><big><i>Hello android</i></big></font><p>";
- html+="<big><a href='http://www.baidu.com'>百度</a></big>";
- //使用Html.fromHtml,把含HTML標簽的字符串轉換成可顯示的文本樣式
- CharSequence charSequence=Html.fromHtml(html);
- //通過setText給TextView賦值
- textView1.setText(charSequence);
- //設定一個點擊的響應
- textView1.setMovementMethod(LinkMovementMethod.getInstance());
- String text="我的URL:http://www.cnblogs.com/plokmju/\n";
- text+="我的email:[email protected]\n";
- text+="我的電話:+86 010-12345678";
- //因為textView2中有autoLink=”all“的屬性設定,所以會自動識別對應的連接,點擊出發對應的Android程序
- textView2.setText(text);
- }
- }
顯示效果:
TextView顯示圖片
第二個例子講解一下在TextView中顯示圖片的例子,依然是使用HTML標簽的方式定義樣式,但是使用的是Html.fromHtml()的另外一個重載的靜態方法,可以設定<img>標簽中的圖像資源。
static Spanned fromHtml(String source,Html.ImageGetter imageGetter,Html.TagHandler tagHandler)
對於這個方法,在imageGetter參數中設定<img>標簽中的圖像資源文件,tagHandler主要是為了處理Html類無法識別的html標簽的情況,一般不會用上,傳值為null即可。
布局XML文件textvideforimg.xml代碼:
- <?xml version="1.0" encoding="utf-8"?>
- <LinearLayout xmlns:android="http://schemas.android.com/apk/res/android"
- android:layout_width="match_parent"
- android:layout_height="match_parent"
- android:orientation="vertical" >
- <TextView
- android:id="@+id/textImg"
- android:layout_width="fill_parent"
- android:layout_height="match_parent"
- android:layout_margin="10dp" />
- </LinearLayout>
Activity文件textviewForImgActivity.java代碼:
- package cn.bgxt.textviewdemo;
- import java.lang.reflect.Field;
- import android.R.color;
- import android.app.Activity;
- import android.graphics.drawable.Drawable;
- import android.os.Bundle;
- import android.text.Html;
- import android.text.Html.ImageGetter;
- import android.text.method.LinkMovementMethod;
- import android.widget.TextView;
- public class textviewForImgActivity extends Activity {
- private TextView textViewImg;
- public textviewForImgActivity() {
- // TODO Auto-generated constructor stub
- }
- @Override
- protected void onCreate(Bundle savedInstanceState) {
- // TODO Auto-generated method stub
- super.onCreate(savedInstanceState);
- setContentView(R.layout.textvideforimg);
- textViewImg=(TextView)findViewById(R.id.textImg);
- textViewImg.setTextColor(color.white);
- textViewImg.setBackgroundColor(color.black);
- textViewImg.setTextSize(20);
- //設定HTML標簽樣式,圖片3為一個超鏈接標簽a
- String html="圖像1<img src='image1'/>圖像2<img src='image2'/>\n";
- html+="圖像3<a href='http://www,baidu.com'><img src='img3'/></a>";
- //fromHtml中ImageGetter選擇html中<img>的圖片資源
- CharSequence cs=Html.fromHtml(html, new ImageGetter() {
- public Drawable getDrawable(String source) {
- //source為html字符串中定義的<img>中的src的內容
- //返回值Drawable就是對應的<img>顯示的圖片資源
- Drawable draw=null;
- if(source.equals("image1"))
- {
- draw=getResources().getDrawable(R.drawable.image1);
- draw.setBounds(0, 0, draw.getIntrinsicWidth(), draw.getIntrinsicHeight());
- }
- else if(source.equals("image2"))
- {
- //設定image2尺寸等比縮小
- draw=getResources().getDrawable(R.drawable.image2);
- draw.setBounds(0, 0, draw.getIntrinsicWidth()/2, draw.getIntrinsicHeight()/2);
- }
- else
- {
- //使用反射會更簡便,無需知道src與資源Id的對應關系
- draw=getResources().getDrawable(getResourceId(source));
- draw.setBounds(0, 0, draw.getIntrinsicWidth(), draw.getIntrinsicHeight());
- }
- return draw;
- }
- }, null);
- textViewImg.setText(cs);
- textViewImg.setMovementMethod(LinkMovementMethod.getInstance());
- }
- public int getResourceId(String source)
- {
- try {
- //使用反射機制,通過屬性名稱,得到其內的值
- Field field=R.drawable.class.getField(source);
- return Integer.parseInt(field.get(null).toString());
- } catch (Exception e) {
- // TODO: handle exception
- }
- return 0;
- }
- }
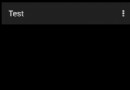
效果截圖,其中第三個圖片點擊會觸發浏覽器訪問百度網址:
在TextView增加Click事件
第三個例子在TextView添加點擊事件,導航到其他的Activity中。使用SpannableString.setSpan()設定那一段文本需要相應點擊事件。與之類似的還有SpannableBuilder對象,他們的關系和String與StringBuilder一樣。
void setSpan(Object what,int start,int end,int flags)
在what參數中傳遞一個抽象類ClickableSpan,需要實現其onClick()方法,此為指定文本的點擊相應時間。start和end分別指定需要響應onClick()方法的文本開始與結束。flags設定一個標識,確定使用什麼方式選擇文本塊,一般使用Spanned接口下的SPAN_EXCLUSIVE_EXCLUSIVE對其進行賦值,表示遵循設定的開始於結束位置的文本塊。
布局文件activityclick.xml的代碼:
- <?xml version="1.0" encoding="utf-8"?>
- <LinearLayout xmlns:android="http://schemas.android.com/apk/res/android"
- android:layout_width="match_parent"
- android:layout_height="match_parent"
- android:orientation="vertical" >
- <TextView
- android:id="@+id/clickTextView1"
- android:textSize="30dp"
- android:layout_marginTop="30dp"
- android:layout_width="match_parent"
- android:layout_height="wrap_content" />
- <TextView
- android:textSize="30dp"
- android:layout_marginTop="30dp"
- android:id="@+id/clickTextView2"
- android:layout_width="match_parent"
- android:layout_height="wrap_content" />
- </LinearLayout>
Activity文件TextViewOnClickActivity.java的代碼:
- package cn.bgxt.textviewdemo;
- import android.app.Activity;
- import android.content.Intent;
- import android.os.Bundle;
- import android.text.SpannableString;
- import android.text.Spanned;
- import android.text.method.LinkMovementMethod;
- import android.text.style.ClickableSpan;
- import android.view.View;
- import android.widget.TextView;
- public class TextViewOnClickActivity extends Activity {
- private TextView clickTextView1,clickTextView2;
- public TextViewOnClickActivity() {
- }
- @Override
- protected void onCreate(Bundle savedInstanceState) {
- super.onCreate(savedInstanceState);
- setContentView(R.layout.activityclick);
- clickTextView1=(TextView)this.findViewById(R.id.clickTextView1);
- clickTextView2=(TextView)this.findViewById(R.id.clickTextView2);
- String text1="顯示Activity1";
- String text2="顯示Activity2";
- //使用SpannableString存放字符串
- SpannableString spannableString=new SpannableString(text1);
- SpannableString spannableString2=new SpannableString(text2);
- //通過setSpan設定文本塊響應的點擊事件
- //此處只設定文本的索引為2開始的文本塊:Activity1
- spannableString.setSpan(new ClickableSpan() {
- @Override
- public void onClick(View widget) {
- //導航到一個新的 Activity1中
- Intent intent=new Intent(TextViewOnClickActivity.this,Activity1.class);
- startActivity(intent);
- }
- }, 2, text1.length(), Spanned.SPAN_EXCLUSIVE_EXCLUSIVE);
- spannableString2.setSpan(new ClickableSpan() {
- @Override
- public void onClick(View widget) {
- // TODO Auto-generated method stub
- Intent intent=new Intent(TextViewOnClickActivity.this,Activity2.class);
- startActivity(intent);
- }
- }, 2, text1.length(), Spanned.SPAN_EXCLUSIVE_EXCLUSIVE);
- //對TextView文本進行賦值
- clickTextView1.setText(spannableString);
- //設置點擊響應
- clickTextView1.setMovementMethod(LinkMovementMethod.getInstance());
- clickTextView2.setText(spannableString2);
- clickTextView2.setMovementMethod(LinkMovementMethod.getInstance());
- }
- }
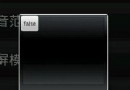
效果圖,從圖中可以看出只有點擊setSpan中設定的代碼塊才可以觸發點擊事件:
跑馬燈效果
說到文本顯示,最常見的效果就是跑馬燈效果,這裡以一個例子展示跑馬燈的效果,基本無需使用Java代碼,在布局文件中設定各項屬性就已經可以實現這個效果了。
在看代碼前,先講解一下等下會碰到的屬性:
介紹屬性後,直接看代碼吧,XML布局文件runlamp_layout.xml代碼:
- <?xml version="1.0" encoding="utf-8"?>
- <LinearLayout xmlns:android="http://schemas.android.com/apk/res/android"
- android:layout_width="match_parent"
- android:layout_height="match_parent"
- android:orientation="vertical" >
- <TextView
- android:id="@+id/tvRunLamp" android:layout_width="fill_parent"
- android:layout_height="wrap_content"
- android:singleLine="true"
- android:ellipsize="marquee"
- android:marqueeRepeatLimit="marquee_forever"
- android:focusable="true"
- android:focusableInTouchMode="true"
- android:background="#FFF"
- android:textColor="#000"
- android:textSize="20dp"
- android:layout_margin="10dp"
- android:padding="10dp"/>
- </LinearLayout>
Activity文件RunLampActivity.java代碼:
- package cn.bgxt.textviewdemo;
- import android.app.Activity;
- import android.os.Bundle;
- import android.text.Html;
- import android.text.method.LinkMovementMethod;
- import android.widget.TextView;
- public class RunLampActivity extends Activity {
- private TextView tvRunLamp;
- public RunLampActivity() {
- // TODO Auto-generated constructor stub
- }
- @Override
- protected void onCreate(Bundle savedInstanceState) {
- // TODO Auto-generated method stub
- super.onCreate(savedInstanceState);
- setContentView(R.layout.runlamp_layout);
- tvRunLamp = (TextView) findViewById(R.id.tvRunLamp);
- String html = "之前講解Android布局的時候,就已經說明,所有<a href='http://www.cnblogs.com/plokmju/p/androidUI_Layout.html'>Layout</a>都是View的子類或者間接子類。而TextView也一樣,是View的直接子類。它是一個文本顯示控件,提供了基本的顯示文本的功能,並且是大部分UI控件的父類,因為大部分UI控件都需要展示信息。";
- CharSequence cs = Html.fromHtml(html);
- tvRunLamp.setText(cs);
- //因為文本中設定了一個<a>標簽,這裡設置響應。
- tvRunLamp.setMovementMethod(LinkMovementMethod.getInstance());
- }
- }
運行效果圖,是一個滾動的效果:
示例源碼下載
總結
在此就說明了Android中TextView,並且以例子的方式說明了一些常用效果的實現。因為TextView是大部分UI控件的父類,所以其內的一些屬性對於其他UI控件都是通用的,可以有借鑒的地方。
 Android本地化
Android應用程序可以在許多不同地區的許多設備上運行。為了使應用程序更具交互性,應用程序應該處理以適合應用程序將要使用的語言環境方面的文字,數字,文件等。在本章中,我
 Facebook Android閃光效果開源庫shimmer的用法
shimmer開源庫介紹 Shimmer是Fa
 android dialog邊框去除白色邊框實現思路及代碼
使用樣式文件,在values 目錄下新建styles.xml文件,編寫如下代碼: 代碼如下: Code highlighting produced by Acti
 Android性能優化以及數據優化方法
Android性能優化-布局優化 今天,繼續Android性能優化 一 編碼細節優化。 編碼細節,對於程序的運行效率也是有很多的影響的。今天這篇主題由於