編輯:Android開發實例
前言
今天講一下Spinner控件,這是一個列表選擇框,可以彈出一個列表供用戶選擇。在本文中,會講解Spinner的基本屬性以及設置之後的效果,以及使用SimpleAdapter綁定自定義格式的數據到Spinner中。
Spinner
Spinner是一個列表選擇框,會在用戶選擇後,展示一個列表供用戶進行選擇。Spinner是ViewGroup的間接子類,它和其他的Android控件一樣,數據需要使用Adapter進行封裝。
下面介紹一下Spinner的常用XML屬性,Android也為其屬性提供了相應的getter、setter方法:
作為一個列表選擇控件,Spinner具有一些選中選項可以觸發的事件,但它本身沒有定義這些事件,均繼承自間接父類AdapterView。Spinner支持的幾個常用事件有以下幾個:
PS:因為適配器可以設置各種不同的樣式,有選擇、單選、多選,所以OnItemCLickListener和OnItemSelectedListener是適用於不同場景的。
Spinner的數據綁定
對於Spinner展示的數據源,一般使用兩種方式設定數據:
先來講講通過XML資源文件設置Spinner數據的方式,首先需要在/res/values目錄下新建XML格式的資源文件,名字不重要,但是一般會使用strings.xml。在其中的<resourse.../>標簽下,定義<string-array.../>標簽,通過它中的<item.../>標簽來設置選擇數據。
XML文件結構:
<resource>
<string-array name="arrayname">
<item>item1</item>
<item>item2</item>
<item>item3</item>
</string-array>
<resource>
通過適配器Adapter可以設定比較復雜的展示效果,一般項目中比較常用的也是這種方式。但是如果對於動態的、簡單的數據,可以使用ArrayAdapter對象來設置適配器,關於ArrayAdapter類的介紹,在我的另外一篇中有介紹,不了解的朋友可以先看看:http://www.fengfly.com/plus/view-213379-1.html。
下面通過一個示例,講解一下上面說的屬性、事件,以及使用ArrayAdapter和XML資源文件設定簡單數據,代碼中注釋已經說的很清楚了,這裡就不再累述了。
布局代碼:
- <?xml version="1.0" encoding="utf-8"?>
- <LinearLayout xmlns:android="http://schemas.android.com/apk/res/android"
- android:layout_width="match_parent"
- android:layout_height="match_parent"
- android:orientation="vertical" >
- <TextView
- android:layout_width="wrap_content"
- android:layout_height="wrap_content"
- android:text="彈出的Spinner" />
- <Spinner
- android:id="@+id/spinnerBase"
- android:layout_width="match_parent"
- android:layout_height="wrap_content"
- android:spinnerMode="dialog" />
- <TextView
- android:layout_width="wrap_content"
- android:layout_height="wrap_content"
- android:text="下拉的Spinner(默認)" />
- <Spinner
- android:id="@+id/spinnerBase1"
- android:layout_width="match_parent"
- android:layout_height="wrap_content"
- android:spinnerMode="dropdown" />
- <TextView
- android:layout_width="wrap_content"
- android:layout_height="wrap_content"
- android:text="entries綁定數據源" />
- <Spinner
- android:id="@+id/spinnerBase2"
- android:layout_width="match_parent"
- android:layout_height="wrap_content"
- android:entries="@array/beijing" />
- <TextView
- android:layout_width="wrap_content"
- android:layout_height="wrap_content"
- android:text="彈出帶標題的Dialog,並且使用entries綁定數據源" />
- <Spinner
- android:id="@+id/spinnerBase3"
- android:layout_width="match_parent"
- android:layout_height="wrap_content"
- android:entries="@array/beijing"
- android:prompt="@string/beij_prompt"
- android:spinnerMode="dialog" />
- </LinearLayout>
實現代碼:
- package com.bgxt.datatimepickerdemo;
- import java.util.ArrayList;
- import java.util.List;
- import android.app.Activity;
- import android.os.Bundle;
- import android.view.View;
- import android.widget.AdapterView;
- import android.widget.AdapterView.OnItemSelectedListener;
- import android.widget.ArrayAdapter;
- import android.widget.Spinner;
- import android.widget.Toast;
- public class SpinnerBaseActivity extends Activity {
- private Spinner spinner1, spinner2;
- @Override
- protected void onCreate(Bundle savedInstanceState) {
- super.onCreate(savedInstanceState);
- setContentView(R.layout.activity_spinnerbase);
- spinner1 = (Spinner) findViewById(R.id.spinnerBase);
- spinner2 = (Spinner) findViewById(R.id.spinnerBase1);
- // 聲明一個ArrayAdapter用於存放簡單數據
- ArrayAdapter<String> adapter = new ArrayAdapter<String>(
- SpinnerBaseActivity.this, android.R.layout.simple_spinner_item,
- getData());
- // 把定義好的Adapter設定到spinner中
- spinner1.setAdapter(adapter);
- spinner2.setAdapter(adapter);
- // 為第一個Spinner設定選中事件
- spinner1.setOnItemSelectedListener(new OnItemSelectedListener() {
- @Override
- public void onItemSelected(AdapterView<?> parent, View view,
- int position, long id) {
- // 在選中之後觸發
- Toast.makeText(SpinnerBaseActivity.this,
- parent.getItemAtPosition(position).toString(),
- Toast.LENGTH_SHORT).show();
- }
- @Override
- public void onNothingSelected(AdapterView<?> parent) {
- // 這個一直沒有觸發,我也不知道什麼時候被觸發。
- //在官方的文檔上說明,為back的時候觸發,但是無效,可能需要特定的場景
- }
- });
- }
- private List<String> getData() {
- // 數據源
- List<String> dataList = new ArrayList<String>();
- dataList.add("北京");
- dataList.add("上海");
- dataList.add("南京");
- dataList.add("宜昌");
- return dataList;
- }
- }
XML資源文件:
- <?xml version="1.0" encoding="utf-8"?>
- <resources>
- <string name="app_name">SpinnerDemo</string>
- <string name="action_settings">Settings</string>
- <string name="hello_world">Hello world!</string>
- <string name="beij_prompt">北京區域</string>
- <string-array name="beijing">
- <item>朝陽區</item>
- <item>海澱區</item>
- <item>房山區</item>
- <item>豐台區</item>
- <item>東城區</item>
- <item>西城區</item>
- </string-array>
- </resources>
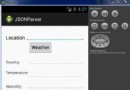
效果展示,圖片順序,從上到下:
SimpleAdapter配置Spinner數據
對於一個稍復雜的數據,如果想對其展示,光使用ArrayAdapter是無法滿足需求的,現在在另外介紹一個Adapter,SimpleAdapter,同樣繼承自Adapter。
SimpleAdapter是一個簡單的適配器,映射靜態的XML格式的布局文件到視圖中。可以指定一個List<Map<P,T>>格式的數據,List中的每一條數據對應一行,而Map中的每一條數據對應數據行的一列。這個數據用來映射到XML定義的布局控件中,對應關系通過構造函數的另外兩個參數來指定,現在來介紹一下SimpleAdapter的構造函數。
SimpleAdapter(Context context, List<? extends Map<String, ?>> data, int resource, String[] from, int[] to)
下面通過一個示例講解一下SimpleAdapter是如何設置自定義格式數據的。
布局代碼:
- <?xml version="1.0" encoding="utf-8"?>
- <LinearLayout xmlns:android="http://schemas.android.com/apk/res/android"
- android:layout_width="match_parent"
- android:layout_height="match_parent"
- android:orientation="vertical" >
- <Spinner android:id="@+id/spinnerAdapter" android:layout_width="match_parent"
- android:layout_height="wrap_content" />
- </LinearLayout>
XML布局資源代碼:
- <?xml version="1.0" encoding="utf-8"?>
- <LinearLayout xmlns:android="http://schemas.android.com/apk/res/android"
- android:layout_width="match_parent"
- android:layout_height="wrap_content"
- android:orientation="horizontal" >
- <ImageView
- android:id="@+id/imageview"
- android:layout_width="60dp"
- android:layout_height="60dp"
- android:paddingLeft="10dp"
- android:src="@drawable/ic_launcher" />
- <TextView
- android:id="@+id/textview"
- android:layout_width="match_parent"
- android:layout_height="wrap_content"
- android:gravity="center_vertical"
- android:paddingLeft="10dp"
- android:textColor="#000"
- android:textSize="16dp" />
- </LinearLayout>
實現代碼:
- package com.bgxt.datatimepickerdemo;
- import java.util.ArrayList;
- import java.util.HashMap;
- import java.util.List;
- import java.util.Map;
- import android.app.Activity;
- import android.os.Bundle;
- import android.view.View;
- import android.widget.AdapterView;
- import android.widget.AdapterView.OnItemSelectedListener;
- import android.widget.SimpleAdapter;
- import android.widget.Spinner;
- import android.widget.Toast;
- public class SpinnerAdapterActivity extends Activity {
- private Spinner spinner;
- @Override
- protected void onCreate(Bundle savedInstanceState) {
- // TODO Auto-generated method stub
- super.onCreate(savedInstanceState);
- setContentView(R.layout.activity_spinneradapter);
- spinner = (Spinner) findViewById(R.id.spinnerAdapter);
- //聲明一個SimpleAdapter獨享,設置數據與對應關系
- SimpleAdapter simpleAdapter = new SimpleAdapter(
- SpinnerAdapterActivity.this, getData(), R.layout.items,
- new String[] { "ivLogo", "applicationName" }, new int[] {
- R.id.imageview, R.id.textview });
- //綁定Adapter到Spinner中
- spinner.setAdapter(simpleAdapter);
- //Spinner被選中事件綁定。
- spinner.setOnItemSelectedListener(new OnItemSelectedListener() {
- @Override
- public void onItemSelected(AdapterView<?> parent, View view,
- int position, long id) {
- //parent為一個Map結構的和數據
- Map<String, Object> map = (Map<String, Object>) parent
- .getItemAtPosition(position);
- Toast.makeText(SpinnerAdapterActivity.this,
- map.get("applicationName").toString(),
- Toast.LENGTH_SHORT).show();
- }
- @Override
- public void onNothingSelected(AdapterView<?> arg0) {
- }
- });
- }
- public List<Map<String, Object>> getData() {
- //生成數據源
- List<Map<String, Object>> list = new ArrayList<Map<String, Object>>();
- //每個Map結構為一條數據,key與Adapter中定義的String數組中定義的一一對應。
- Map<String, Object> map = new HashMap<String, Object>();
- map.put("ivLogo", R.drawable.bmp1);
- map.put("applicationName", "表情1");
- list.add(map);
- Map<String, Object> map2 = new HashMap<String, Object>();
- map2.put("ivLogo", R.drawable.bmp2);
- map2.put("applicationName", "表情2");
- list.add(map2);
- Map<String, Object> map3 = new HashMap<String, Object>();
- map3.put("ivLogo", R.drawable.bmp3);
- map3.put("applicationName", "表情3");
- list.add(map3);
- return list;
- }
- }
效果展示:
源碼下載
 Android JetPlayer實例
Android平台包括JET引擎,可以在應用程序中添加JET音頻內容的交互播放。 Android提供JetPlayer類來處理這些東西。為了使用Jet內容,需要使用Jet
 Android學習筆記之應用單元測試實例分析
本文實例講述了Android學習筆記之應用單元測試。分享給大家供大家參考,具體如下: 第一步:在AndroidManifest.xml中加入如下兩段代碼: &
 Android MediaPlayer(多媒體播放)
Android提供了許多方法來控制播放的音頻/視頻文件和流。其中該方法是通過一類稱為MediaPlayer。Android是提供MediaPlayer類訪問內置的媒體播放
 Android加載Spinner
可以顯示在的Android任務,通過加載進度條的進展。進度條有兩種形狀。加載欄和加載微調(spinner)。在本章中,我們將討論微調(spinner)。Spinner 用