編輯:Android開發實例
我之前寫了一篇關於google Zxing掃描二維碼的文章,效果是仿微信的效果,有興趣的朋友可以去看看http://www.fengfly.com/plus/view-214537-1.html,有時候我們有這樣子的需求,需要掃描手機中有二維碼的的圖片,所以今天實現的就是對手機中的二維碼圖片進行掃描,我這裡是直接在原來的工程上面加的這個功能,下面就簡單介紹下這個小功能的實現,首先我在界面上加了一個ImageButton,圖片還是用的微信的圖片,下面是掃描界面的title
- <?xml version="1.0" encoding="utf-8"?>
- <RelativeLayout xmlns:android="http://schemas.android.com/apk/res/android"
- android:layout_width="fill_parent"
- android:layout_height="wrap_content"
- android:background="@drawable/mmtitle_bg_alpha" >
- <Button
- android:id="@+id/button_back"
- android:layout_width="75.0dip"
- android:layout_height="wrap_content"
- android:layout_alignParentLeft="true"
- android:background="@drawable/mm_title_back_btn"
- android:text="返回"
- android:textColor="@android:color/white" />
- <TextView
- android:id="@+id/textview_title"
- android:layout_width="wrap_content"
- android:layout_height="wrap_content"
- android:layout_centerHorizontal="true"
- android:layout_centerVertical="true"
- android:gravity="center_vertical"
- android:text="二維碼掃描"
- android:textColor="@android:color/white"
- android:textSize="18sp" />
- <ImageButton
- android:id="@+id/button_function"
- android:layout_width="wrap_content"
- android:layout_height="wrap_content"
- android:layout_alignParentRight="true"
- android:layout_marginRight="2dip"
- android:background="@drawable/mm_title_right_btn"
- android:minWidth="70dip"
- android:src="@drawable/mm_title_btn_menu_normal" />
- </RelativeLayout>
在掃描界面MipcaActivityCapture對ImageButton對其點擊監聽,點擊ImageButton從手機中選擇圖片
- //打開手機中的相冊
- Intent innerIntent = new Intent(Intent.ACTION_GET_CONTENT); //"android.intent.action.GET_CONTENT"
- innerIntent.setType("image/*");
- Intent wrapperIntent = Intent.createChooser(innerIntent, "選擇二維碼圖片");
- this.startActivityForResult(wrapperIntent, REQUEST_CODE);
在這裡使用了startActivityForResult來跳轉界面,當我們選中含有二維碼的圖片的時候會回調MipcaActivityCapture的onActivityResult方法,我們需要在onActivityResult方法裡面解析圖片中的二維碼
- @Override
- protected void onActivityResult(int requestCode, int resultCode, Intent data) {
- super.onActivityResult(requestCode, resultCode, data);
- if(resultCode == RESULT_OK){
- switch(requestCode){
- case REQUEST_CODE:
- //獲取選中圖片的路徑
- Cursor cursor = getContentResolver().query(data.getData(), null, null, null, null);
- if (cursor.moveToFirst()) {
- photo_path = cursor.getString(cursor.getColumnIndex(MediaStore.Images.Media.DATA));
- }
- cursor.close();
- mProgress = new ProgressDialog(MipcaActivityCapture.this);
- mProgress.setMessage("正在掃描...");
- mProgress.setCancelable(false);
- mProgress.show();
- new Thread(new Runnable() {
- @Override
- public void run() {
- Result result = scanningImage(photo_path);
- if (result != null) {
- Message m = mHandler.obtainMessage();
- m.what = PARSE_BARCODE_SUC;
- m.obj = result.getText();
- mHandler.sendMessage(m);
- } else {
- Message m = mHandler.obtainMessage();
- m.what = PARSE_BARCODE_FAIL;
- m.obj = "Scan failed!";
- mHandler.sendMessage(m);
- }
- }
- }).start();
- break;
- }
- }
- }
我們先通過圖片的Uri獲取圖片的路徑,然後根據圖片的路徑掃描出圖片裡面的二維碼內容,這將解碼圖片放在了一個子線程中,主要是防止因為解析太久而出現ARN的情況
接下來看scanningImage(String path) 方法,zxing.jar中提供了對二維碼進行解析的類QRCodeReader.java,使用decode(BinaryBitmap image, Map<DecodeHintType, ?> hints)方法就能解析出圖片裡面的二維碼信息,下面是通過圖片的路徑解析出裡面的二維碼內容
- /**
- * 掃描二維碼圖片的方法
- * @param path
- * @return
- */
- public Result scanningImage(String path) {
- if(TextUtils.isEmpty(path)){
- return null;
- }
- Hashtable<DecodeHintType, String> hints = new Hashtable<DecodeHintType, String>();
- hints.put(DecodeHintType.CHARACTER_SET, "UTF8"); //設置二維碼內容的編碼
- BitmapFactory.Options options = new BitmapFactory.Options();
- options.inJustDecodeBounds = true; // 先獲取原大小
- scanBitmap = BitmapFactory.decodeFile(path, options);
- options.inJustDecodeBounds = false; // 獲取新的大小
- int sampleSize = (int) (options.outHeight / (float) 200);
- if (sampleSize <= 0)
- sampleSize = 1;
- options.inSampleSize = sampleSize;
- scanBitmap = BitmapFactory.decodeFile(path, options);
- RGBLuminanceSource source = new RGBLuminanceSource(scanBitmap);
- BinaryBitmap bitmap1 = new BinaryBitmap(new HybridBinarizer(source));
- QRCodeReader reader = new QRCodeReader();
- try {
- return reader.decode(bitmap1, hints);
- } catch (NotFoundException e) {
- e.printStackTrace();
- } catch (ChecksumException e) {
- e.printStackTrace();
- } catch (FormatException e) {
- e.printStackTrace();
- }
- return null;
- }
Result是封裝了解碼的條碼圖像內的結果,我們只需要通過Result的getText()方法就能取出裡面的二維碼內容,這樣子我們就搞定了掃描手機中的二維碼圖片的小功能,接下來我們運行下項目,看看效果
源碼下載
很多朋友下了demo發現出現Conversion to Dalvik format failed: Unable to execute dex: Multiple dex files define Lcom/google/zxing/BarcodeFormat;這個錯誤,是因為剛開始的時候我放了兩個JAR包進去,刪除一個就行了,大家自行修改
轉自:http://blog. csdn. net/ xiaanming/article/details/14450809
 Android筆記之:App應用之啟動界面SplashActivity的使用
當前比較成熟一點的應用基本上都會在進入應用之顯示一個啟動界面.這個啟動界面或簡單,或復雜,或簡陋,或華麗,用意不同,風格也不同.下面來觀摩幾個流行的應用的啟動界面
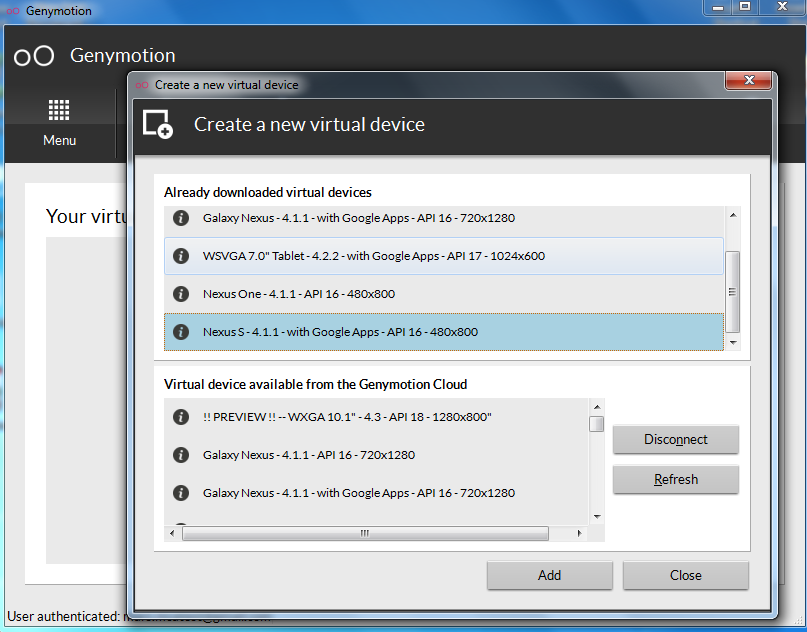 Android開發必備:秒殺真機超快模擬器Genymotion介紹
第一,這貨速度太快,第二,模仿真機環境,第三,秒殺任何Android模擬器包括真機,不多說上圖,我忒忙! 官網: http://www.genymotion.co
 Android JSON解析器
JSON代表JavaScript對象符號。它是一個獨立的數據交換格式,是XML的最佳替代品。本章介紹了如何解析JSON文件,並從中提取所需的信息。Android提供了四個
 Android加載Spinner
可以顯示在的Android任務,通過加載進度條的進展。進度條有兩種形狀。加載欄和加載微調(spinner)。在本章中,我們將討論微調(spinner)。Spinner 用