編輯:Android開發實例
在字體文件放到 assets/fonts 文件夾後,在Java代碼中可以通過 Typeface類訪問它。首先,獲取在代碼文本視圖的參考。它的語法如下:
TextView tx = (TextView)findViewById(R.id.textview1);
需要做的下一件事就是調用Typeface類的createFromAsset()靜態方法,從assets的自定義字體。它的語法如下:
Typeface custom_font = Typeface.createFromAsset(getAssets(), "fonts/font name.ttf");
需要做的最後一件事就是這個自定義字體對象設置TextView的字體屬性。需要調用setTypeface()方法來做到這一點。它的語法如下:
tx.setTypeface(custom_font);
除了這些方法,還有在字體類中定義的其它方法,可以使用更有效地處理字體。
這裡有一個例子演示如何使用字體的處理CustomFont。它創建一個顯示字體文件中指定的自定義字體的基本應用。
為了試驗這個例子,可以在實際設備或模擬器運行此程序。
以下是修改後的主活動文件的內容 src/com.yiibai.customfonts/MainActivity.java.
package com.example.customfonts; import android.app.Activity; import android.graphics.Typeface; import android.os.Bundle; import android.view.Menu; import android.widget.TextView; public class MainActivity extends Activity { @Override protected void onCreate(Bundle savedInstanceState) { super.onCreate(savedInstanceState); setContentView(R.layout.activity_main); TextView tx = (TextView)findViewById(R.id.hello); Typeface custom_font = Typeface.createFromAsset(getAssets(), "fonts/Erika Type.ttf"); tx.setTypeface(custom_font); } @Override public boolean onCreateOptionsMenu(Menu menu) { // Inflate the menu; this adds items to the action bar if it is present. getMenuInflater().inflate(R.menu.main, menu); return true; } }
以下是XML的經修改的內容 res/layout/activity_main.xml.
<LinearLayout xmlns:android="http://schemas.android.com/apk/res/android" android:layout_width="fill_parent" android:layout_height="fill_parent" android:orientation="vertical"> <TextView android:id="@+id/hello" android:layout_width="fill_parent" android:layout_height="wrap_content" android:textSize="70dip" android:text="@string/hello_world" /> </LinearLayout>
以下是 res/values/string.xml.的內容
<?xml version="1.0" encoding="utf-8"?> <resources> <string name="app_name">CustomFonts</string> <string name="action_settings">Settings</string> <string name="hello_world">Hello</string> </resources>
以下是 AndroidManifest.xml 的內容.
<?xml version="1.0" encoding="utf-8"?> <manifest xmlns:android="http://schemas.android.com/apk/res/android" package="com.yiibai.customfonts" android:versionCode="1" android:versionName="1.0" > <uses-sdk android:minSdkVersion="8" android:targetSdkVersion="17" /> <application android:allowBackup="true" android:icon="@drawable/ic_launcher" android:label="@string/app_name" android:theme="@style/AppTheme" > <activity android:name="com.yiibai.customfonts.MainActivity" android:label="@string/app_name" > <intent-filter> <action android:name="android.intent.action.MAIN" /> <category android:name="android.intent.category.LAUNCHER" /> </intent-filter> </activity> </application> </manifest>
讓我們試著來運行上面的程序,這裡只是修改自定義字體。安裝程序在AVD並啟動它,如果一切設置和應用程序都沒有問題,它會顯示以下仿真器窗口:
正如看到的,出現在AVD的文本還沒有一個默認的Android字體,而是在字體文件夾中指定的自定義字體。
注意:需要考慮使用自定義字體字體大小,和支持的字符。
 Android登錄實例
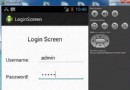
登錄應用程序的屏幕,詢問憑據登錄到一些特定的應用。可能需要登錄到Facebook,微博等本章介紹了,如何創建一個登錄界面,以及如何管理安全問題和錯誤嘗試。首先,必須定義兩
 Android加載Spinner
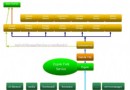
可以顯示在的Android任務,通過加載進度條的進展。進度條有兩種形狀。加載欄和加載微調(spinner)。在本章中,我們將討論微調(spinner)。Spinner 用
 android LinearLayout和RelativeLayout組合實現精確布局方法介紹
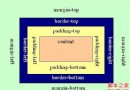
先明確幾個概念的區別: padding margin都是邊距的含義,關鍵問題得明白是什麼相對什麼的邊距. padding是控件的內容相對控件的邊緣的邊距. mar
 Android手機衛士(八):安裝過程中點擊回退按鈕
在手機衛士之前的版本升級的對話框中: 有的用戶暫時不想更新,沒有點擊“稍後再說”,而是選擇點擊回退按鍵,那麼這時候的邏輯應