編輯:Android開發實例
360手機衛士我相信大家都知道,好多人手機上都會裝這一款軟件,那麼我們對它的一個桌面懸浮窗效果想必都不會陌生。請看下圖:
首先是一個小的懸浮窗顯示的是當前使用了百分之多少的內存,點擊一下小懸浮窗,就會彈出一個大的懸浮窗,可以一鍵加速。好,我們現在就來模擬實現一下類似的效果。
先談一下基本的實現原理,這種桌面懸浮窗的效果很類似與Widget,但是它比Widget要靈活的多。主要是通過WindowManager這個類來實現的,調用這個類的addView方法用於添加一個懸浮窗,updateViewLayout方法用於更新懸浮窗的參數,removeView用於移除懸浮窗。其中懸浮窗的參數有必要詳細說明一下。
WindowManager.LayoutParams這個類用於提供懸浮窗所需的參數,其中有幾個經常會用到的變量:
type值用於確定懸浮窗的類型,一般設為2002,表示在所有應用程序之上,但在狀態欄之下。
flags值用於確定懸浮窗的行為,比如說不可聚焦,非模態對話框等等,屬性非常多,大家可以查看文檔。
gravity值用於確定懸浮窗的對齊方式,一般設為左上角對齊,這樣當拖動懸浮窗的時候方便計算坐標。
x值用於確定懸浮窗的位置,如果要橫向移動懸浮窗,就需要改變這個值。
y值用於確定懸浮窗的位置,如果要縱向移動懸浮窗,就需要改變這個值。
width值用於指定懸浮窗的寬度。
height值用於指定懸浮窗的高度。
創建懸浮窗這種窗體需要向用戶申請權限才可以的,因此還需要在AndroidManifest.xml中加入<uses-permission android:name="android.permission.SYSTEM_ALERT_WINDOW" />
原理介紹完了,下面我們開始用代碼實現。首先在Eclipse中新建一個Android項目,項目名就叫做360FloatWindowDemo。然後寫一下布局文件,布局文件非常簡單,只有一個按鈕,打開或新建activity_main.xml,加入如下代碼:
- <RelativeLayout xmlns:android="http://schemas.android.com/apk/res/android"
- xmlns:tools="http://schemas.android.com/tools"
- android:layout_width="fill_parent"
- android:layout_height="fill_parent"
- tools:context=".MainActivity" >
- <Button
- android:id="@+id/start_float_window"
- android:layout_width="fill_parent"
- android:layout_height="wrap_content"
- android:text="Start Float Window" >
- </Button>
- </RelativeLayout>
然後再新建一個名為float_window_small.xml的布局文件,用於做為小懸浮窗的布局,在其中加入如下代碼:
- <?xml version="1.0" encoding="UTF-8"?>
- <LinearLayout
- xmlns:android="http://schemas.android.com/apk/res/android"
- android:id="@+id/small_window_layout"
- android:layout_width="60dip"
- android:layout_height="25dip"
- android:background="@drawable/bg_small"
- >
- <TextView
- android:id="@+id/percent"
- android:layout_width="fill_parent"
- android:layout_height="fill_parent"
- android:gravity="center"
- android:textColor="#ffffff"
- />
- </LinearLayout>
再新建一個名為float_window_big.xml的布局文件,用於做為大懸浮窗的布局,在其中加入如下代碼:
- <?xml version="1.0" encoding="UTF-8"?>
- <LinearLayout
- xmlns:android="http://schemas.android.com/apk/res/android"
- android:id="@+id/big_window_layout"
- android:layout_width="200dip"
- android:layout_height="100dip"
- android:background="@drawable/bg_big"
- android:orientation="vertical"
- >
- <Button
- android:id="@+id/close"
- android:layout_width="100dip"
- android:layout_height="40dip"
- android:layout_gravity="center_horizontal"
- android:layout_marginTop="12dip"
- android:text="關閉懸浮窗"
- />
- <Button
- android:id="@+id/back"
- android:layout_width="100dip"
- android:layout_height="40dip"
- android:layout_gravity="center_horizontal"
- android:text="返回"
- />
- </LinearLayout>
兩個懸浮窗布局文件中用到的圖片資源,大家可以隨便找點圖片來代替,同時我會給出源碼,大家也可以從源碼中取出。
然後打開或創建MainActivity,這是項目的主界面,在裡面加入如下代碼:
- public class MainActivity extends Activity {
- @Override
- protected void onCreate(Bundle savedInstanceState) {
- super.onCreate(savedInstanceState);
- setContentView(R.layout.activity_main);
- Button startFloatWindow = (Button) findViewById(R.id.start_float_window);
- startFloatWindow.setOnClickListener(new OnClickListener() {
- @Override
- public void onClick(View arg0) {
- Intent intent = new Intent(MainActivity.this, FloatWindowService.class);
- startService(intent);
- finish();
- }
- });
- }
- }
這裡可以看到,MainActivity的代碼非窗簡單,就是對開啟懸浮窗的按鈕注冊了一個點擊事件,用於打開一個服務,然後關閉當前Activity。創建懸浮窗的邏輯都交給服務去做了。好,現在我們來創建這個服務。新建一個名為FloatWindowService的類,這個類繼承自Service,在裡面加入如下代碼:
- public class FloatWindowService extends Service {
- /**
- * 用於在線程中創建或移除懸浮窗。
- */
- private Handler handler = new Handler();
- /**
- * 定時器,定時進行檢測當前應該創建還是移除懸浮窗。
- */
- private Timer timer;
- @Override
- public IBinder onBind(Intent intent) {
- return null;
- }
- @Override
- public int onStartCommand(Intent intent, int flags, int startId) {
- // 開啟定時器,每隔0.5秒刷新一次
- if (timer == null) {
- timer = new Timer();
- timer.scheduleAtFixedRate(new RefreshTask(), 0, 500);
- }
- return super.onStartCommand(intent, flags, startId);
- }
- @Override
- public void onDestroy() {
- super.onDestroy();
- // Service被終止的同時也停止定時器繼續運行
- timer.cancel();
- timer = null;
- }
- class RefreshTask extends TimerTask {
- @Override
- public void run() {
- // 當前界面是桌面,且沒有懸浮窗顯示,則創建懸浮窗。
- if (isHome() && !MyWindowManager.isWindowShowing()) {
- handler.post(new Runnable() {
- @Override
- public void run() {
- MyWindowManager.createSmallWindow(getApplicationContext());
- }
- });
- }
- // 當前界面不是桌面,且有懸浮窗顯示,則移除懸浮窗。
- else if (!isHome() && MyWindowManager.isWindowShowing()) {
- handler.post(new Runnable() {
- @Override
- public void run() {
- MyWindowManager.removeSmallWindow(getApplicationContext());
- MyWindowManager.removeBigWindow(getApplicationContext());
- }
- });
- }
- // 當前界面是桌面,且有懸浮窗顯示,則更新內存數據。
- else if (isHome() && MyWindowManager.isWindowShowing()) {
- handler.post(new Runnable() {
- @Override
- public void run() {
- MyWindowManager.updateUsedPercent(getApplicationContext());
- }
- });
- }
- }
- }
- /**
- * 判斷當前界面是否是桌面
- */
- private boolean isHome() {
- ActivityManager mActivityManager = (ActivityManager) getSystemService(Context.ACTIVITY_SERVICE);
- List<RunningTaskInfo> rti = mActivityManager.getRunningTasks(1);
- return getHomes().contains(rti.get(0).topActivity.getPackageName());
- }
- /**
- * 獲得屬於桌面的應用的應用包名稱
- *
- * @return 返回包含所有包名的字符串列表
- */
- private List<String> getHomes() {
- List<String> names = new ArrayList<String>();
- PackageManager packageManager = this.getPackageManager();
- Intent intent = new Intent(Intent.ACTION_MAIN);
- intent.addCategory(Intent.CATEGORY_HOME);
- List<ResolveInfo> resolveInfo = packageManager.queryIntentActivities(intent,
- PackageManager.MATCH_DEFAULT_ONLY);
- for (ResolveInfo ri : resolveInfo) {
- names.add(ri.activityInfo.packageName);
- }
- return names;
- }
- }
FloatWindowService的onStartCommand方法中開啟了一個定時器,每隔500毫秒就會執行RefreshTask。在RefreshTask當中,要進行判斷,如果手機當前是在桌面的話,就應該顯示懸浮窗,如果手機打開了某一個應用程序,就應該移除懸浮窗,如果手機在桌面的話,還應該更新內存使用百分比的數據。而當FloatWindowService被銷毀的時候,應該將定時器停止,否則它還會一直運行。
從上面的代碼我們也可以看出,創建和移除懸浮窗,以及更新懸浮窗內的數據,都是由MyWindowManager這個類來管理的,比起直接把這些代碼寫在Activity或Service當中,使用一個專門的工具類來管理要好的多。不過要想創建懸浮窗,還是先要把懸浮窗的View寫出來。
新建一個名叫FloatWindowSmallView的類,繼承自LinearLayout。新建一個名叫FloatWindowBigView的類,也繼承自LinearLayout。
在FloatWindowSmallView中加入如下代碼:
- public class FloatWindowSmallView extends LinearLayout {
- /**
- * 記錄小懸浮窗的寬度
- */
- public static int viewWidth;
- /**
- * 記錄小懸浮窗的高度
- */
- public static int viewHeight;
- /**
- * 記錄系統狀態欄的高度
- */
- private static int statusBarHeight;
- /**
- * 用於更新小懸浮窗的位置
- */
- private WindowManager windowManager;
- /**
- * 小懸浮窗的參數
- */
- private WindowManager.LayoutParams mParams;
- /**
- * 記錄當前手指位置在屏幕上的橫坐標值
- */
- private float xInScreen;
- /**
- * 記錄當前手指位置在屏幕上的縱坐標值
- */
- private float yInScreen;
- /**
- * 記錄手指按下時在屏幕上的橫坐標的值
- */
- private float xDownInScreen;
- /**
- * 記錄手指按下時在屏幕上的縱坐標的值
- */
- private float yDownInScreen;
- /**
- * 記錄手指按下時在小懸浮窗的View上的橫坐標的值
- */
- private float xInView;
- /**
- * 記錄手指按下時在小懸浮窗的View上的縱坐標的值
- */
- private float yInView;
- public FloatWindowSmallView(Context context) {
- super(context);
- windowManager = (WindowManager) context.getSystemService(Context.WINDOW_SERVICE);
- LayoutInflater.from(context).inflate(R.layout.float_window_small, this);
- View view = findViewById(R.id.small_window_layout);
- viewWidth = view.getLayoutParams().width;
- viewHeight = view.getLayoutParams().height;
- TextView percentView = (TextView) findViewById(R.id.percent);
- percentView.setText(MyWindowManager.getUsedPercentValue(context));
- }
- @Override
- public boolean onTouchEvent(MotionEvent event) {
- switch (event.getAction()) {
- case MotionEvent.ACTION_DOWN:
- // 手指按下時記錄必要數據,縱坐標的值都需要減去狀態欄高度
- xInView = event.getX();
- yInView = event.getY();
- xDownInScreen = event.getRawX();
- yDownInScreen = event.getRawY() - getStatusBarHeight();
- xInScreen = event.getRawX();
- yInScreen = event.getRawY() - getStatusBarHeight();
- break;
- case MotionEvent.ACTION_MOVE:
- xInScreen = event.getRawX();
- yInScreen = event.getRawY() - getStatusBarHeight();
- // 手指移動的時候更新小懸浮窗的位置
- updateViewPosition();
- break;
- case MotionEvent.ACTION_UP:
- // 如果手指離開屏幕時,xDownInScreen和xInScreen相等,且yDownInScreen和yInScreen相等,則視為觸發了單擊事件。
- if (xDownInScreen == xInScreen && yDownInScreen == yInScreen) {
- openBigWindow();
- }
- break;
- default:
- break;
- }
- return true;
- }
- /**
- * 將小懸浮窗的參數傳入,用於更新小懸浮窗的位置。
- *
- * @param params
- * 小懸浮窗的參數
- */
- public void setParams(WindowManager.LayoutParams params) {
- mParams = params;
- }
- /**
- * 更新小懸浮窗在屏幕中的位置。
- */
- private void updateViewPosition() {
- mParams.x = (int) (xInScreen - xInView);
- mParams.y = (int) (yInScreen - yInView);
- windowManager.updateViewLayout(this, mParams);
- }
- /**
- * 打開大懸浮窗,同時關閉小懸浮窗。
- */
- private void openBigWindow() {
- MyWindowManager.createBigWindow(getContext());
- MyWindowManager.removeSmallWindow(getContext());
- }
- /**
- * 用於獲取狀態欄的高度。
- *
- * @return 返回狀態欄高度的像素值。
- */
- private int getStatusBarHeight() {
- if (statusBarHeight == 0) {
- try {
- Class<?> c = Class.forName("com.android.internal.R$dimen");
- Object o = c.newInstance();
- Field field = c.getField("status_bar_height");
- int x = (Integer) field.get(o);
- statusBarHeight = getResources().getDimensionPixelSize(x);
- } catch (Exception e) {
- e.printStackTrace();
- }
- }
- return statusBarHeight;
- }
其中,對這個View的onTouchEvent事件進行了重寫,用於實現拖動和點擊的效果。如果發現用戶觸發了ACTION_DOWN事件,會記錄按下時的坐標等數據。如果發現用戶觸發了ACTION_MOVE事件,則根據當前移動的坐標更新懸浮窗在屏幕中的位置。如果發現用戶觸發了ACTION_UP事件,會和ACTION_DOWN中記下的坐標對比,如果發現是相同的,則視為用戶對懸浮窗進行了點擊。點擊小懸浮窗則打開大懸浮窗,然後我們來實現大懸浮窗的View。
在FloatWindowBigView中加入如下代碼:
- public class FloatWindowBigView extends LinearLayout {
- /**
- * 記錄大懸浮窗的寬度
- */
- public static int viewWidth;
- /**
- * 記錄大懸浮窗的高度
- */
- public static int viewHeight;
- public FloatWindowBigView(final Context context) {
- super(context);
- LayoutInflater.from(context).inflate(R.layout.float_window_big, this);
- View view = findViewById(R.id.big_window_layout);
- viewWidth = view.getLayoutParams().width;
- viewHeight = view.getLayoutParams().height;
- Button close = (Button) findViewById(R.id.close);
- Button back = (Button) findViewById(R.id.back);
- close.setOnClickListener(new OnClickListener() {
- @Override
- public void onClick(View v) {
- // 點擊關閉懸浮窗的時候,移除所有懸浮窗,並停止Service
- MyWindowManager.removeBigWindow(context);
- MyWindowManager.removeSmallWindow(context);
- Intent intent = new Intent(getContext(), FloatWindowService.class);
- context.stopService(intent);
- }
- });
- back.setOnClickListener(new OnClickListener() {
- @Override
- public void onClick(View v) {
- // 點擊返回的時候,移除大懸浮窗,創建小懸浮窗
- MyWindowManager.removeBigWindow(context);
- MyWindowManager.createSmallWindow(context);
- }
- });
- }
- }
比起FloatWindowSmallView,FloatWindowBigView要簡單的多,其中只有兩個按鈕,點擊close按鈕,將懸浮窗全部移除,並將Service終止。單擊back按鈕則移除大懸浮窗,重新創建小懸浮窗。
現在兩個懸浮窗的View都已經寫好了,我們來創建MyWindowManager,代碼如下:
- public class MyWindowManager {
- /**
- * 小懸浮窗View的實例
- */
- private static FloatWindowSmallView smallWindow;
- /**
- * 大懸浮窗View的實例
- */
- private static FloatWindowBigView bigWindow;
- /**
- * 小懸浮窗View的參數
- */
- private static LayoutParams smallWindowParams;
- /**
- * 大懸浮窗View的參數
- */
- private static LayoutParams bigWindowParams;
- /**
- * 用於控制在屏幕上添加或移除懸浮窗
- */
- private static WindowManager mWindowManager;
- /**
- * 用於獲取手機可用內存
- */
- private static ActivityManager mActivityManager;
- /**
- * 創建一個小懸浮窗。初始位置為屏幕的右部中間位置。
- *
- * @param context
- * 必須為應用程序的Context.
- */
- public static void createSmallWindow(Context context) {
- WindowManager windowManager = getWindowManager(context);
- int screenWidth = windowManager.getDefaultDisplay().getWidth();
- int screenHeight = windowManager.getDefaultDisplay().getHeight();
- if (smallWindow == null) {
- smallWindow = new FloatWindowSmallView(context);
- if (smallWindowParams == null) {
- smallWindowParams = new LayoutParams();
- smallWindowParams.type = LayoutParams.TYPE_PHONE;
- smallWindowParams.format = PixelFormat.RGBA_8888;
- smallWindowParams.flags = LayoutParams.FLAG_NOT_TOUCH_MODAL
- | LayoutParams.FLAG_NOT_FOCUSABLE;
- smallWindowParams.gravity = Gravity.LEFT | Gravity.TOP;
- smallWindowParams.width = FloatWindowSmallView.viewWidth;
- smallWindowParams.height = FloatWindowSmallView.viewHeight;
- smallWindowParams.x = screenWidth;
- smallWindowParams.y = screenHeight / 2;
- }
- smallWindow.setParams(smallWindowParams);
- windowManager.addView(smallWindow, smallWindowParams);
- }
- }
- /**
- * 將小懸浮窗從屏幕上移除。
- *
- * @param context
- * 必須為應用程序的Context.
- */
- public static void removeSmallWindow(Context context) {
- if (smallWindow != null) {
- WindowManager windowManager = getWindowManager(context);
- windowManager.removeView(smallWindow);
- smallWindow = null;
- }
- }
- /**
- * 創建一個大懸浮窗。位置為屏幕正中間。
- *
- * @param context
- * 必須為應用程序的Context.
- */
- public static void createBigWindow(Context context) {
- WindowManager windowManager = getWindowManager(context);
- int screenWidth = windowManager.getDefaultDisplay().getWidth();
- int screenHeight = windowManager.getDefaultDisplay().getHeight();
- if (bigWindow == null) {
- bigWindow = new FloatWindowBigView(context);
- if (bigWindowParams == null) {
- bigWindowParams = new LayoutParams();
- bigWindowParams.x = screenWidth / 2 - FloatWindowBigView.viewWidth / 2;
- bigWindowParams.y = screenHeight / 2 - FloatWindowBigView.viewHeight / 2;
- bigWindowParams.type = LayoutParams.TYPE_PHONE;
- bigWindowParams.format = PixelFormat.RGBA_8888;
- bigWindowParams.gravity = Gravity.LEFT | Gravity.TOP;
- bigWindowParams.width = FloatWindowBigView.viewWidth;
- bigWindowParams.height = FloatWindowBigView.viewHeight;
- }
- windowManager.addView(bigWindow, bigWindowParams);
- }
- }
- /**
- * 將大懸浮窗從屏幕上移除。
- *
- * @param context
- * 必須為應用程序的Context.
- */
- public static void removeBigWindow(Context context) {
- if (bigWindow != null) {
- WindowManager windowManager = getWindowManager(context);
- windowManager.removeView(bigWindow);
- bigWindow = null;
- }
- }
- /**
- * 更新小懸浮窗的TextView上的數據,顯示內存使用的百分比。
- *
- * @param context
- * 可傳入應用程序上下文。
- */
- public static void updateUsedPercent(Context context) {
- if (smallWindow != null) {
- TextView percentView = (TextView) smallWindow.findViewById(R.id.percent);
- percentView.setText(getUsedPercentValue(context));
- }
- }
- /**
- * 是否有懸浮窗(包括小懸浮窗和大懸浮窗)顯示在屏幕上。
- *
- * @return 有懸浮窗顯示在桌面上返回true,沒有的話返回false。
- */
- public static boolean isWindowShowing() {
- return smallWindow != null || bigWindow != null;
- }
- /**
- * 如果WindowManager還未創建,則創建一個新的WindowManager返回。否則返回當前已創建的WindowManager。
- *
- * @param context
- * 必須為應用程序的Context.
- * @return WindowManager的實例,用於控制在屏幕上添加或移除懸浮窗。
- */
- private static WindowManager getWindowManager(Context context) {
- if (mWindowManager == null) {
- mWindowManager = (WindowManager) context.getSystemService(Context.WINDOW_SERVICE);
- }
- return mWindowManager;
- }
- /**
- * 如果ActivityManager還未創建,則創建一個新的ActivityManager返回。否則返回當前已創建的ActivityManager。
- *
- * @param context
- * 可傳入應用程序上下文。
- * @return ActivityManager的實例,用於獲取手機可用內存。
- */
- private static ActivityManager getActivityManager(Context context) {
- if (mActivityManager == null) {
- mActivityManager = (ActivityManager) context.getSystemService(Context.ACTIVITY_SERVICE);
- }
- return mActivityManager;
- }
- /**
- * 計算已使用內存的百分比,並返回。
- *
- * @param context
- * 可傳入應用程序上下文。
- * @return 已使用內存的百分比,以字符串形式返回。
- */
- public static String getUsedPercentValue(Context context) {
- String dir = "/proc/meminfo";
- try {
- FileReader fr = new FileReader(dir);
- BufferedReader br = new BufferedReader(fr, 2048);
- String memoryLine = br.readLine();
- String subMemoryLine = memoryLine.substring(memoryLine.indexOf("MemTotal:"));
- br.close();
- long totalMemorySize = Integer.parseInt(subMemoryLine.replaceAll("\D+", ""));
- long availableSize = getAvailableMemory(context) / 1024;
- int percent = (int) ((totalMemorySize - availableSize) / (float) totalMemorySize * 100);
- return percent + "%";
- } catch (IOException e) {
- e.printStackTrace();
- }
- return "懸浮窗";
- }
- /**
- * 獲取當前可用內存,返回數據以字節為單位。
- *
- * @param context
- * 可傳入應用程序上下文。
- * @return 當前可用內存。
- */
- private static long getAvailableMemory(Context context) {
- ActivityManager.MemoryInfo mi = new ActivityManager.MemoryInfo();
- getActivityManager(context).getMemoryInfo(mi);
- return mi.availMem;
- }
- }
這個類負責了控制大懸浮窗,小懸浮窗的創建和移除,系統內存使用百分比的計算等操作。
到這裡基本所有的代碼都已經寫完了,然後我們來看一下AndroidManifest.xml文件吧,裡面代碼如下:
- <?xml version="1.0" encoding="utf-8"?>
- <manifest xmlns:android="http://schemas.android.com/apk/res/android"
- package="com.demo.floatwindowdemo"
- android:versionCode="1"
- android:versionName="1.0" >
- <uses-permission android:name="android.permission.SYSTEM_ALERT_WINDOW" />
- <uses-sdk
- android:minSdkVersion="8"
- android:targetSdkVersion="8" />
- <application
- android:allowBackup="true"
- android:icon="@drawable/ic_launcher"
- android:label="@string/app_name"
- android:theme="@style/AppTheme" >
- <activity
- android:name="com.demo.floatwindowdemo.MainActivity"
- android:label="@string/app_name" >
- <intent-filter>
- <action android:name="android.intent.action.MAIN" />
- <category android:name="android.intent.category.LAUNCHER" />
- </intent-filter>
- </activity>
- <service android:name=".FloatWindowService"></service>
- </application>
- </manifest>
比較簡單,記得把Activity和Service在裡面注冊好,還有一個權限聲明需要添加的android.permission.SYSTEM_ALERT_WINDOW,表示需要用戶授權允許創建系統提示窗口,也就是我們的桌面懸浮窗。
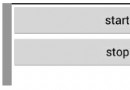
好了,現在讓我們運行一下項目吧,效果如下圖,主界面只有一個簡單的按鈕,點擊按鈕後,Activity被關閉,小懸浮窗顯示在桌面上。其中顯示著當前內存使用的百分比。
小懸浮窗是可以自由拖動的,如果打開了其它的應用程序,小懸浮窗會自動隱藏,回到桌面後小懸浮窗又會顯示出來。
如果點擊了小懸浮窗會彈出大懸浮窗來,這裡我們大懸浮窗做的比較簡單,就只有兩個按鈕。大懸浮窗展示的時候手機的所有其它程序是不可點的,因為焦點都在懸浮窗上了。點擊返回按鈕會重新展示小懸浮窗,點擊關閉懸浮窗按鈕,Service也會一起停掉。
360手機衛士的一鍵加速功能我們就不做了,就像獨孤九劍一樣,重要的是劍意而不是劍招,我相信大家學會了創建懸浮窗的基本原理後可以做出比360更有創意的東西。
源碼下載,請點擊這裡
 Android實現多線程下載文件的方法
本文實例講述了Android實現多線程下載文件的方法。分享給大家供大家參考。具體如下: 多線程下載大概思路就是通過Range 屬性實現文件分段,然後用Random
 Android 第三方應用接入微信平台研究情況分享(一)
微信平台開放後倒是挺火的,許多第三方應用都想試下接入微信這個平台,畢竟可以利用微信建立起來的關系鏈來拓展自己的應用還是挺不錯的,可以節約很多在社交方面的開銷,我最
 Android登錄實例
登錄應用程序的屏幕,詢問憑據登錄到一些特定的應用。可能需要登錄到Facebook,微博等本章介紹了,如何創建一個登錄界面,以及如何管理安全問題和錯誤嘗試。首先,必須定義兩
 Android學習筆記(二)之電話撥號器
目前Android已經在只能手機市場已經具有強大的霸主地位,也吸引了越來越多的追捧者。Android的學習也越來越火。但是,報名費用確實大多人望而卻步 一、新建項