編輯:Android開發實例
在上一篇文章中,我們學習了Android Service相關的許多重要內容,包括Service的基本用法、Service和Activity進行通信、Service的銷毀方式、Service與Thread的關系、以及如何創建前台Service。以上所提到的這些知識點,基本上涵蓋了大部分日常開發工作當中可能使用到的Service技術。不過關於Service其實還有一個更加高端的使用技巧沒有介紹,即遠程Service的用法。使用遠程Service甚至可以實現Android跨進程通信的功能,下面就讓我們具體地學習一下。
如果你還沒有看過前面一篇文章,建議先去閱讀一下http://www.fengfly.com/plus/view-215105-1.html,因為本篇文章中涉及到的代碼是在上篇文章的基礎上進行修改的。
在上篇文章中我們知道了,Service其實是運行在主線程裡的,如果直接在Service中處理一些耗時的邏輯,就會導致程序ANR。
讓我們來做個實驗驗證一下吧,修改上一篇文章中創建的ServiceTest項目,在MyService的onCreate()方法中讓線程睡眠60秒,如下所示:
- public class MyService extends Service {
- ......
- @Override
- public void onCreate() {
- super.onCreate();
- Log.d(TAG, "onCreate() executed");
- try {
- Thread.sleep(60000);
- } catch (InterruptedException e) {
- e.printStackTrace();
- }
- }
- ......
- }
重新運行後,點擊一下Start Service按鈕或Bind Service按鈕,程序就會阻塞住並無法進行任何其它操作,過一段時間後就會彈出ANR的提示框,如下圖所示。
之前我們提到過,應該在Service中開啟線程去執行耗時任務,這樣就可以有效地避免ANR的出現。
那麼本篇文章的主題是介紹遠程Service的用法,如果將MyService轉換成一個遠程Service,還會不會有ANR的情況呢?讓我們來動手嘗試一下吧。
將一個普通的Service轉換成遠程Service其實非常簡單,只需要在注冊Service的時候將它的android:process屬性指定成:remote就可以了,代碼如下所示:
- <?xml version="1.0" encoding="utf-8"?>
- <manifest xmlns:android="http://schemas.android.com/apk/res/android"
- package="com.example.servicetest"
- android:versionCode="1"
- android:versionName="1.0" >
- ......
- <service
- android:name="com.example.servicetest.MyService"
- android:process=":remote" >
- </service>
- </manifest>
現在重新運行程序,並點擊一下Start Service按鈕,你會看到控制台立刻打印了onCreate() executed的信息,而且主界面並沒有阻塞住,也不會出現ANR。大概過了一分鐘後,又會看到onStartCommand() executed打印了出來。
為什麼將MyService轉換成遠程Service後就不會導致程序ANR了呢?這是由於,使用了遠程Service後,MyService已經在另外一個進程當中運行了,所以只會阻塞該進程中的主線程,並不會影響到當前的應用程序。
為了證實一下MyService現在確實已經運行在另外一個進程當中了,我們分別在MainActivity的onCreate()方法和MyService的onCreate()方法裡加入一行日志,打印出各自所在的進程id,如下所示:
Log.d("TAG", "process id is " + Process.myPid());
再次重新運行程序,然後點擊一下Start Service按鈕,打印結果如下圖所示:
可以看到,不僅僅是進程id不同了,就連應用程序包名也不一樣了,MyService中打印的那條日志,包名後面還跟上了:remote標識。
那既然遠程Service這麼好用,干脆以後我們把所有的Service都轉換成遠程Service吧,還省得再開啟線程了。其實不然,遠程Service非但不好用,甚至可以稱得上是較為難用。一般情況下如果可以不使用遠程Service,就盡量不要使用它。
下面就來看一下它的弊端吧,首先將MyService的onCreate()方法中讓線程睡眠的代碼去除掉,然後重新運行程序,並點擊一下Bind Service按鈕,你會發現程序崩潰了!為什麼點擊Start Service按鈕程序就不會崩潰,而點擊Bind Service按鈕就會崩潰呢?這是由於在Bind Service按鈕的點擊事件裡面我們會讓MainActivity和MyService建立關聯,但是目前MyService已經是一個遠程Service了,Activity和Service運行在兩個不同的進程當中,這時就不能再使用傳統的建立關聯的方式,程序也就崩潰了。
那麼如何才能讓Activity與一個遠程Service建立關聯呢?這就要使用AIDL來進行跨進程通信了(IPC)。
AIDL(Android Interface Definition Language)是Android接口定義語言的意思,它可以用於讓某個Service與多個應用程序組件之間進行跨進程通信,從而可以實現多個應用程序共享同一個Service的功能。
下面我們就來一步步地看一下AIDL的用法到底是怎樣的。首先需要新建一個AIDL文件,在這個文件中定義好Activity需要與Service進行通信的方法。新建MyAIDLService.aidl文件,代碼如下所示:
- package com.example.servicetest;
- interface MyAIDLService {
- int plus(int a, int b);
- String toUpperCase(String str);
- }
點擊保存之後,gen目錄下就會生成一個對應的Java文件,如下圖所示:
然後修改MyService中的代碼,在裡面實現我們剛剛定義好的MyAIDLService接口,如下所示:
- public class MyService extends Service {
- ......
- @Override
- public IBinder onBind(Intent intent) {
- return mBinder;
- }
- MyAIDLService.Stub mBinder = new Stub() {
- @Override
- public String toUpperCase(String str) throws RemoteException {
- if (str != null) {
- return str.toUpperCase();
- }
- return null;
- }
- @Override
- public int plus(int a, int b) throws RemoteException {
- return a + b;
- }
- };
- }
這裡先是對MyAIDLService.Stub進行了實現,重寫裡了toUpperCase()和plus()這兩個方法。這兩個方法的作用分別是將一個字符串全部轉換成大寫格式,以及將兩個傳入的整數進行相加。然後在onBind()方法中將MyAIDLService.Stub的實現返回。這裡為什麼可以這樣寫呢?因為Stub其實就是Binder的子類,所以在onBind()方法中可以直接返回Stub的實現。
接下來修改MainActivity中的代碼,如下所示:
- public class MainActivity extends Activity implements OnClickListener {
- private Button startService;
- private Button stopService;
- private Button bindService;
- private Button unbindService;
- private MyAIDLService myAIDLService;
- private ServiceConnection connection = new ServiceConnection() {
- @Override
- public void onServiceDisconnected(ComponentName name) {
- }
- @Override
- public void onServiceConnected(ComponentName name, IBinder service) {
- myAIDLService = MyAIDLService.Stub.asInterface(service);
- try {
- int result = myAIDLService.plus(3, 5);
- String upperStr = myAIDLService.toUpperCase("hello world");
- Log.d("TAG", "result is " + result);
- Log.d("TAG", "upperStr is " + upperStr);
- } catch (RemoteException e) {
- e.printStackTrace();
- }
- }
- };
- ......
- }
我們只是修改了ServiceConnection中的代碼。可以看到,這裡首先使用了MyAIDLService.Stub.asInterface()方法將傳入的IBinder對象傳換成了MyAIDLService對象,接下來就可以調用在MyAIDLService.aidl文件中定義的所有接口了。這裡我們先是調用了plus()方法,並傳入了3和5作為參數,然後又調用了toUpperCase()方法,並傳入hello world字符串作為參數,最後將調用方法的返回結果打印出來。
現在重新運行程序,並點擊一下Bind Service按鈕,可以看到打印日志如下所示:
由此可見,我們確實已經成功實現跨進程通信了,在一個進程中訪問到了另外一個進程中的方法。
不過你也可以看出,目前的跨進程通信其實並沒有什麼實質上的作用,因為這只是在一個Activity裡調用了同一個應用程序的Service裡的方法。而跨進程通信的真正意義是為了讓一個應用程序去訪問另一個應用程序中的Service,以實現共享Service的功能。那麼下面我們自然要學習一下,如何才能在其它的應用程序中調用到MyService裡的方法。
在上一篇文章中我們已經知道,如果想要讓Activity與Service之間建立關聯,需要調用bindService()方法,並將Intent作為參數傳遞進去,在Intent裡指定好要綁定的Service,示例代碼如下:
- Intent bindIntent = new Intent(this, MyService.class);
- bindService(bindIntent, connection, BIND_AUTO_CREATE);
這裡在構建Intent的時候是使用MyService.class來指定要綁定哪一個Service的,但是在另一個應用程序中去綁定Service的時候並沒有MyService這個類,這時就必須使用到隱式Intent了。現在修改AndroidManifest.xml中的代碼,給MyService加上一個action,如下所示:
- <?xml version="1.0" encoding="utf-8"?>
- <manifest xmlns:android="http://schemas.android.com/apk/res/android"
- package="com.example.servicetest"
- android:versionCode="1"
- android:versionName="1.0" >
- ......
- <service
- android:name="com.example.servicetest.MyService"
- android:process=":remote" >
- <intent-filter>
- <action android:name="com.example.servicetest.MyAIDLService"/>
- </intent-filter>
- </service>
- </manifest>
這就說明,MyService可以響應帶有com.example.servicetest.MyAIDLService這個action的Intent。
現在重新運行一下程序,這樣就把遠程Service端的工作全部完成了。
然後創建一個新的Android項目,起名為ClientTest,我們就嘗試在這個程序中遠程調用MyService中的方法。
ClientTest中的Activity如果想要和MyService建立關聯其實也不難,首先需要將MyAIDLService.aidl文件從ServiceTest項目中拷貝過來,注意要將原有的包路徑一起拷貝過來,完成後項目的結構如下圖所示:
然後打開或新建activity_main.xml,在布局文件中也加入一個Bind Service按鈕:
- <LinearLayout xmlns:android="http://schemas.android.com/apk/res/android"
- android:layout_width="match_parent"
- android:layout_height="match_parent"
- android:orientation="vertical"
- >
- <Button
- android:id="@+id/bind_service"
- android:layout_width="match_parent"
- android:layout_height="wrap_content"
- android:text="Bind Service"
- />
- </LinearLayout>
接下來打開或新建MainActivity,在其中加入和MyService建立關聯的代碼,如下所示:
- public class MainActivity extends Activity {
- private MyAIDLService myAIDLService;
- private ServiceConnection connection = new ServiceConnection() {
- @Override
- public void onServiceDisconnected(ComponentName name) {
- }
- @Override
- public void onServiceConnected(ComponentName name, IBinder service) {
- myAIDLService = MyAIDLService.Stub.asInterface(service);
- try {
- int result = myAIDLService.plus(50, 50);
- String upperStr = myAIDLService.toUpperCase("comes from ClientTest");
- Log.d("TAG", "result is " + result);
- Log.d("TAG", "upperStr is " + upperStr);
- } catch (RemoteException e) {
- e.printStackTrace();
- }
- }
- };
- @Override
- protected void onCreate(Bundle savedInstanceState) {
- super.onCreate(savedInstanceState);
- setContentView(R.layout.activity_main);
- Button bindService = (Button) findViewById(R.id.bind_service);
- bindService.setOnClickListener(new OnClickListener() {
- @Override
- public void onClick(View v) {
- Intent intent = new Intent("com.example.servicetest.MyAIDLService");
- bindService(intent, connection, BIND_AUTO_CREATE);
- }
- });
- }
- }
這部分代碼大家一定會非常眼熟吧?沒錯,這和在ServiceTest的MainActivity中的代碼幾乎是完全相同的,只是在讓Activity和Service建立關聯的時候我們使用了隱式Intent,將Intent的action指定成了com.example.servicetest.MyAIDLService。
在當前Activity和MyService建立關聯之後,我們仍然是調用了plus()和toUpperCase()這兩個方法,遠程的MyService會對傳入的參數進行處理並返回結果,然後將結果打印出來。
這樣的話,ClientTest中的代碼也就全部完成了,現在運行一下這個項目,然後點擊Bind Service按鈕,此時就會去和遠程的MyService建立關聯,觀察LogCat中的打印信息如下所示:
不用我說,大家都已經看出,我們的跨進程通信功能已經完美實現了。
不過還有一點需要說明的是,由於這是在不同的進程之間傳遞數據,Android對這類數據的格式支持是非常有限的,基本上只能傳遞Java的基本數據類型、字符串、List或Map等。那麼如果我想傳遞一個自定義的類該怎麼辦呢?這就必須要讓這個類去實現Parcelable接口,並且要給這個類也定義一個同名的AIDL文件。這部分內容並不復雜,而且和Service關系不大,所以就不再詳細進行講解了,感興趣的朋友可以自己去查閱一下相關的資料。
好了,結合上下兩篇,這就是關於Service你所需知道的一切。
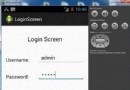 Android登錄實例
登錄應用程序的屏幕,詢問憑據登錄到一些特定的應用。可能需要登錄到Facebook,微博等本章介紹了,如何創建一個登錄界面,以及如何管理安全問題和錯誤嘗試。首先,必須定義兩
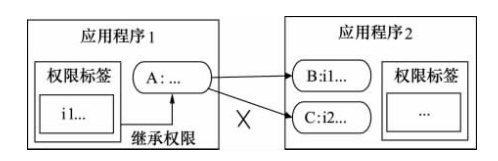 Android中Permission權限機制的具體使用
由上篇Android Permission權限機制引子,我們知道Android 通過在每台設備上實施了基於權限的安全策略來處理安全問題,采用權限來限制安裝應用程序
 Android界面設計(APP設計趨勢 左側隱藏菜單右邊顯示content)
相關文章android popwindow實現左側彈出菜單層http://www.jb51.net/article/33533.htm移動App設計的13大精髓h
 android中實現指針滑動的動態效果方法
代碼如下:<FrameLayout &