編輯:Android開發實例
今天根據騰訊qq,我們做一個練習,來學習如何制作一個漂亮的布局。首先看一下官方圖片

還是一個啟動畫面,之後進入登錄頁面,導航頁面就不介紹了,大家可以參考微信的導航頁面。首先程序進入SplashActivity,就是啟動頁面,Activity代碼如下:
代碼如下:
package com.example.imitateqq;
import android.app.Activity;
import android.content.Intent;
import android.os.Bundle;
import android.os.Handler;
public class SplashActivity extends Activity {
private Intent intent;
@Override
protected void onCreate(Bundle savedInstanceState) {
super.onCreate(savedInstanceState);
setContentView(R.layout.splash);
startMainAvtivity();
}
private void startMainAvtivity() {
new Handler().postDelayed(new Runnable() {
public void run() {
intent=new Intent(SplashActivity.this,QQ.class);
startActivity(intent);
SplashActivity.this.finish();//結束本Activity
}
}, 1000);//設置執行時間
}
}
xml布局文件就是一個全屏的圖片,要注意的是設置android:scaleType ="matrix"這個屬性。不然不會全屏
代碼如下:
<? xml version= "1.0" encoding = "utf-8"?>
< LinearLayout xmlns:android ="http://schemas.android.com/apk/res/android"
android:layout_width= "match_parent"
android:layout_height= "match_parent"
android:orientation= "vertical" >
< ImageView
android:layout_width ="match_parent"
android:layout_height ="match_parent"
android:scaleType ="matrix"
android:src ="@drawable/splash" />
</ LinearLayout>
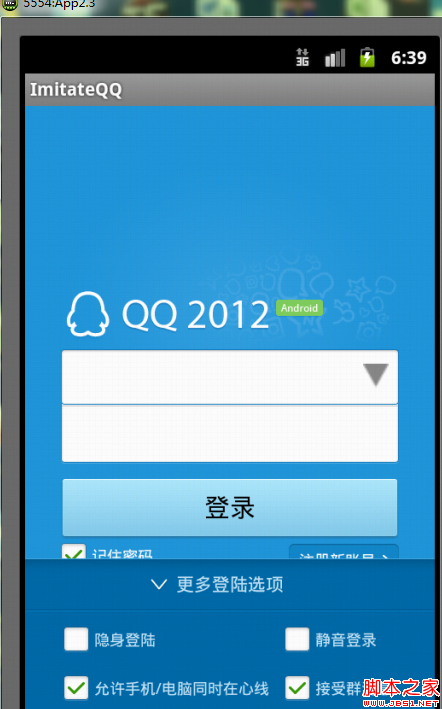
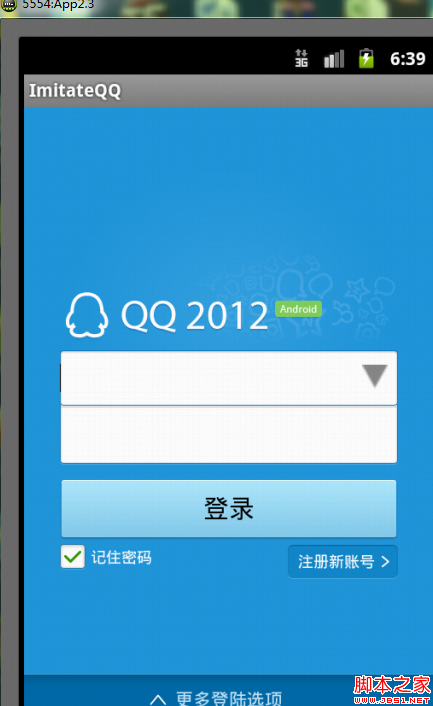
過1秒之後轉入登陸頁面,從圖片我們可以看出,騰訊的UI做的還是相當美觀漂亮的,既簡潔又不失美觀。先分析一下這個登錄界面,從整體可以看出,根布局的背景色是藍色的,而那個QQ 2012 Android其實是一個圖片背景色和根布局的背景色一樣,這樣就不會有視覺偏差。下面就是兩個文本框EditText了,注意這裡和官方給的不一樣,因為後面有一個小箭頭,當點擊這個箭頭時,會在第一個文本框的下面顯示已經輸入的qq號碼,在qq號碼的後面還有刪除qq信息的按鈕。這個地方需要注意一下。再往下就是登陸Button以及那連個“記住密碼”和“注冊新賬號”比較簡單,注意位置的安排即可。最後就是最下面的“更多登陸選項”,當點擊的時候會向上彈出一些內容,其實就是一個隱藏的布局,當點擊上面的時候,使下面隱藏的布局顯示。當然也可以使用滑動抽屜來做,但是相對來說比較麻煩。下面看一下xml代碼,相信大家就會一路了然。
代碼如下:
< RelativeLayout xmlns:android ="http://schemas.android.com/apk/res/android"
xmlns:tools= "http://schemas.android.com/tools"
android:layout_width= "match_parent"
android:layout_height= "match_parent"
android:background= "@drawable/login_bg" >
< ImageView
android:id ="@+id/loginbutton"
android:layout_width ="wrap_content"
android:layout_height ="wrap_content"
android:layout_centerHorizontal ="true"
android:layout_marginTop ="50dp"
android:src ="@drawable/login_pic" />
<LinearLayout
android:id ="@+id/input"
android:layout_width ="fill_parent"
android:layout_height ="wrap_content"
android:layout_below ="@id/loginbutton"
android:layout_marginLeft ="28.0dip"
android:layout_marginRight ="28.0dip"
android:background ="@drawable/login_input"
android:orientation ="vertical" >
< LinearLayout
android:layout_width ="fill_parent"
android:layout_height ="44.0dip"
android:background ="@drawable/login_input"
android:gravity ="center_vertical"
android:orientation ="horizontal" >
< EditText
android:id ="@+id/searchEditText"
android:layout_width ="0dp"
android:layout_height ="fill_parent"
android:layout_weight ="1"
android:background ="@null"
android:ems ="10"
android:imeOptions ="actionDone"
android:singleLine ="true"
android:textSize ="16sp" >
< requestFocus />
</ EditText>
< Button
android:id ="@+id/button_clear"
android:layout_width ="20dip"
android:layout_height ="20dip"
android:layout_marginRight ="8dip"
android:background ="@drawable/login_input_arrow"
android:visibility ="visible" />
</ LinearLayout>
< View
android:layout_width ="fill_parent"
android:layout_height ="1.0px"
android:layout_marginLeft ="1.0px"
android:layout_marginRight ="1.0px"
android:background ="#ffc0c3c4" />
< EditText
android:id ="@+id/password"
android:layout_width ="fill_parent"
android:layout_height ="44.0dip"
android:background ="#00ffffff"
android:gravity ="center_vertical"
android:inputType ="textPassword"
android:maxLength ="16"
android:maxLines ="1"
android:textColor ="#ff1d1d1d"
android:textColorHint ="#ff666666"
android:textSize ="16.0sp" />
</LinearLayout >
<Button
android:id ="@+id/buton1"
android:layout_width ="270dp"
android:background ="@drawable/chat_send_button_bg"
android:paddingTop ="5.0dip"
android:layout_height ="50dp"
android:layout_marginLeft ="28.0dip"
android:layout_marginRight ="28.0dip"
android:layout_marginTop ="12.0dip"
android:layout_below ="@+id/input"
android:gravity ="center"
android:textSize ="20dp"
android:text = "登錄" />
<RelativeLayout
android:id ="@+id/relative"
android:layout_width ="fill_parent"
android:layout_height ="wrap_content"
android:layout_alignLeft ="@+id/input"
android:layout_alignRight ="@+id/input"
android:layout_below ="@id/buton1" >
< CheckBox
android:id ="@+id/auto_save_password"
android:layout_width ="wrap_content"
android:layout_height ="wrap_content"
android:layout_alignParentLeft ="true"
android:background ="@null"
android:button ="@null"
android:checked ="true"
android:drawableLeft ="@drawable/checkbox_bg1"
android:drawablePadding ="4.0dip"
android:text = "記住密碼"
android:textColor ="#ffffffff"
android:textSize ="12.0sp" />
< Button
android:id ="@+id/regist"
android:layout_width ="wrap_content"
android:layout_height ="wrap_content"
android:layout_alignParentRight ="true"
android:background ="@drawable/login_reg_normal"
android:clickable ="true"
android:gravity ="left|center"
android:paddingLeft ="8.0dip"
android:paddingRight ="18.0dip"
android:text = "注冊新賬號"
android:textColor ="#ffffffff"
android:textSize ="12.0sp" />
</RelativeLayout >
<LinearLayout
android:id ="@+id/more_bottom"
android:layout_width ="fill_parent"
android:layout_height ="wrap_content"
android:layout_alignParentBottom ="true"
android:background ="@drawable/login_moremenu_back"
android:orientation ="vertical" >
<RelativeLayout
android:id ="@+id/input2"
android:layout_width ="fill_parent"
android:layout_height ="40dp"
android:background ="@drawable/login_moremenu_back"
android:orientation ="vertical" >
< ImageView
android:id ="@+id/more_image"
android:layout_width ="wrap_content"
android:layout_height ="wrap_content"
android:layout_centerVertical ="true"
android:layout_marginRight ="5.0dip"
android:layout_toLeftOf ="@+id/more_text"
android:clickable ="false"
android:src ="@drawable/login_more_up" />
< TextView
android:id ="@+id/more_text"
android:layout_width ="wrap_content"
android:layout_height ="wrap_content"
android:layout_centerInParent ="true"
android:background ="@null"
android:gravity ="center"
android:maxLines ="1"
android:text = "更多登陸選項"
android:textColor ="#ffc6e6f9"
android:textSize ="14.0sp" />
</RelativeLayout >
<LinearLayout
android:id ="@+id/morehidebottom"
android:layout_width ="fill_parent"
android:layout_height ="wrap_content"
android:orientation ="vertical"
android:visibility ="gone" >
< View
android:layout_width ="fill_parent"
android:layout_height ="1.0px"
android:background ="#ff005484" />
< View
android:layout_width ="fill_parent"
android:layout_height ="1.0px"
android:background ="#ff0883cb" />
< LinearLayout
android:layout_width ="fill_parent"
android:layout_height ="wrap_content"
android:layout_marginLeft ="30.0dip"
android:layout_marginRight ="30.0dip"
android:layout_marginTop ="12.0dip"
android:orientation ="horizontal" >
< CheckBox
android:id ="@+id/hide_login"
android:layout_width ="1.0px"
android:layout_height ="wrap_content"
android:layout_weight ="2.0"
android:background ="@null"
android:button ="@null"
android:checked ="false"
android:drawableLeft ="@drawable/checkbox_bg1"
android:drawablePadding ="4.0dip"
android:text = "隱身登陸"
android:textColor ="#ffc6e6f9"
android:textSize ="12.0sp" />
< CheckBox
android:id ="@+id/silence_login"
android:layout_width ="1.0px"
android:layout_height ="wrap_content"
android:layout_weight ="1.0"
android:background ="@null"
android:button ="@null"
android:checked ="false"
android:drawableLeft ="@drawable/checkbox_bg1"
android:drawablePadding ="4.0dip"
android:text = "靜音登錄"
android:textColor ="#ffc6e6f9"
android:textSize ="12.0sp" />
</ LinearLayout>
< LinearLayout
android:layout_width ="fill_parent"
android:layout_height ="wrap_content"
android:layout_marginBottom ="18.0dip"
android:layout_marginLeft ="30.0dip"
android:layout_marginRight ="30.0dip"
android:layout_marginTop ="18.0dip"
android:orientation ="horizontal" >
< CheckBox
android:id ="@+id/accept_accounts"
android:layout_width ="1.0px"
android:layout_height ="wrap_content"
android:layout_weight ="2.0"
android:background ="@null"
android:button ="@null"
android:checked ="true"
android:drawableLeft ="@drawable/checkbox_bg1"
android:drawablePadding ="4.0dip"
android:singleLine ="true"
android:text = "允許手機/電腦同時在心線"
android:textColor ="#ffc6e6f9"
android:textSize ="12.0sp" />
< CheckBox
android:id ="@+id/accept_troopmsg"
android:layout_width ="1.0px"
android:layout_height ="wrap_content"
android:layout_weight ="1.0"
android:background ="@null"
android:button ="@null"
android:checked ="true"
android:drawableLeft ="@drawable/checkbox_bg1"
android:drawablePadding ="4.0dip"
android:text = "接受群消息"
android:textColor ="#ffc6e6f9"
android:textSize ="12.0sp" />
</ LinearLayout>
</ LinearLayout>
</LinearLayout >
</ RelativeLayout>
各個組件的使用沒有問題,關鍵是如何設置他們的屬性,來獲得一個比較美觀的效果,大家可以參考這個例子,來做一下練習,來強化UI的設計。從這個例子中就可以學到很多東西,比如ViwGroup的使用(如何槍套),background的設置,例如同時使用兩個Edittext,設置android:background ="@null"設置為空的時候就不會產生間隔了。這個要自己多做設計,時間長了就會有感悟了。最後看一下MainActivity的代碼,布局簡單
代碼如下:
package com.example.imitateqq;
import android.os.Bundle;
import android.app.Activity;
import android.app.Dialog;
import android.view.Menu;
import android.view.View;
import android.view.View.OnClickListener;
import android.widget.Button;
import android.widget.ImageView;
public class QQ extends Activity implements OnClickListener{
private Button login_Button;
private View moreHideBottomView,input2;
private ImageView more_imageView;
private boolean mShowBottom = false;
@Override
public void onCreate(Bundle savedInstanceState) {
super.onCreate(savedInstanceState);
setContentView(R.layout.activity_qq);
initView();
}
private void initView() {
login_Button=(Button) findViewById(R.id.buton1);
login_Button.setOnClickListener(this);
moreHideBottomView=findViewById(R.id.morehidebottom);
more_imageView=(ImageView) findViewById(R.id.more_image);
input2=findViewById(R.id.input2);
input2.setOnClickListener( this);
}
public void showBottom(boolean bShow){
if(bShow){
moreHideBottomView.setVisibility(View.GONE);
more_imageView.setImageResource(R.drawable.login_more_up);
mShowBottom = true;
}else{
moreHideBottomView.setVisibility(View.VISIBLE);
more_imageView.setImageResource(R.drawable.login_more);
mShowBottom = false;
}
}
public void onClick(View v) {
switch(v.getId())
{
case R.id.input2:
showBottom(!mShowBottom);
break;
case R.id.buton1:
showRequestDialog();
break;
default:
break;
}
}
private Dialog mDialog = null;
private void showRequestDialog()
{
if (mDialog != null)
{
mDialog.dismiss();
mDialog = null;
}
mDialog = DialogFactory.creatRequestDialog(this, "正在驗證賬號...");
mDialog.show();
}
@Override
public boolean onCreateOptionsMenu(Menu menu) {
getMenuInflater().inflate(R.menu.activity_qq, menu);
return true;
}
}
最後效果如下:
總結:本文可以作為一個UI練習Demo,大家可以自己獨立去寫,有問題的可以留下郵箱我給你發一下源碼作為參考。下一篇將寫主頁面的實現,歡迎大家關注。
 APK包名修改 請問如何修改APK包名
今天,想在android手機上安裝兩個相同的應用,本以為可以安裝不同版本的,試了幾次,均相互覆蓋了,於是,只能設法修改apk所對應的包名(package name
 Android編程之菜單實現方法
本文實例講述了Android編程之菜單實現方法。分享給大家供大家參考,具體如下: 菜單是許多應用程序不可或缺的一部分,Android中更是如此,所有搭載Andro
 Android提高之藍牙隱藏API探秘
前面文章講解了Android的藍牙基本用法,本文講得深入些,探討下藍牙方面的隱藏API。用過Android系統設置(Setting)的人都知道藍牙搜索之後可以建立
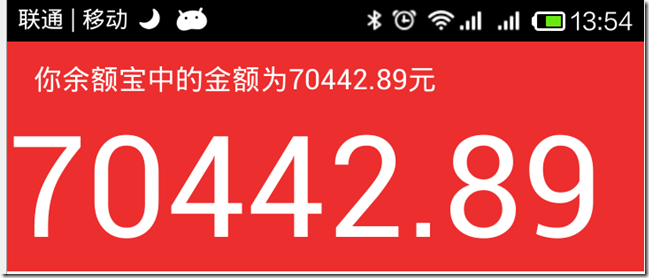 android編程實現類似於支付寶余額快速閃動效果的方法
本文實例講述了android編程實現類似於支付寶余額快速閃動效果的方法。分享給大家供大家參考,具體如下: 效果如下: 此圖片不會動,但實際上是會快速跳動的。 之前