編輯:Android開發實例
前面文章介紹了如何使用JAVA的反射機制來調用藍牙的隱藏API,本文繼續來練習JAVA的反射機制,探秘TelephonyManager在Framework裡包含卻在SDK隱藏的幾項功能。
先來看一下本文程序運行的效果圖,如下所示:
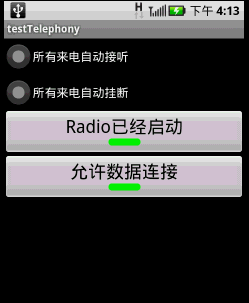
本文程序演示了以下功能:
1.所有來電自動接聽;
2.所有來電自動掛斷;
3.開啟/關閉Radio;
4.開啟/關閉數據連接(WAP or NET的連接)。
調用TelephonyManager的隱藏API是先參考Framework的/base/telephony/java/com/android/internal/telephony/ITelephony.aidl,然後自己實現一個ITelephony.aidl,最後在TelephonyManager中通過反射機制實例化自定義的ITelephony,實例化之後就可以調用ITelephony裡面的函數了。
本文程序需要在AndroidManifest.xml添加以下兩行代碼,以獲得權限:
<uses-permission android:name="android.permission.CALL_PHONE" />
<uses-permission android:name="android.permission.MODIFY_PHONE_STATE" />
main.xml源碼如下:
<?xml version="1.0" encoding="utf-8"?>
<LinearLayout xmlns:android="http://schemas.android.com/apk/res/android"
 android:orientation="vertical" android:layout_width="fill_parent"
 android:layout_height="fill_parent">
 <RadioGroup android:layout_height="wrap_content"
 android:layout_width="fill_parent" android:id="@+id/rGrpSelect">
 <RadioButton android:layout_height="wrap_content"
  android:layout_width="fill_parent" android:id="@+id/rbtnAutoAccept"
  android:text="所有來電自動接聽"></RadioButton>
 <RadioButton android:layout_height="wrap_content"
  android:layout_width="fill_parent" android:id="@+id/rbtnAutoReject"
  android:text="所有來電自動掛斷"></RadioButton>
 </RadioGroup>
 <ToggleButton android:layout_height="wrap_content"
 android:layout_width="fill_parent" android:id="@+id/tbtnRadioSwitch"
 android:textOn="Radio已經啟動" android:textOff="Radio已經關閉"
 android:textSize="24dip" android:text></ToggleButton>
 <ToggleButton android:layout_height="wrap_content"
 android:layout_width="fill_parent" android:id="@+id/tbtnDataConn"
 android:textSize="24dip" android:text android:textOn="允許數據連接"
 android:textOff="禁止數據連接"></ToggleButton>
</LinearLayout>
PhoneUtils.java是手機功能類,從TelephonyManager中實例化ITelephony並返回,源碼如下:
package com.testTelephony;
import java.lang.reflect.Field;
import java.lang.reflect.Method;
import com.android.internal.telephony.ITelephony;
import android.telephony.TelephonyManager;
import android.util.Log;
public class PhoneUtils {
 /**
 * 從TelephonyManager中實例化ITelephony,並返回
 */
 static public ITelephony getITelephony(TelephonyManager telMgr) throws Exception {
 Method getITelephonyMethod = telMgr.getClass().getDeclaredMethod("getITelephony");
 getITelephonyMethod.setAccessible(true);//私有化函數也能使用
 return (ITelephony)getITelephonyMethod.invoke(telMgr);
 }
 static public void printAllInform(Class clsShow) {
   try {
     // 取得所有方法
     Method[] hideMethod = clsShow.getDeclaredMethods();
     int i = 0;
     for (; i < hideMethod.length; i++) {
       Log.e("method name", hideMethod[i].getName());
     }
     // 取得所有常量
     Field[] allFields = clsShow.getFields();
     for (i = 0; i < allFields.length; i++) {
       Log.e("Field name", allFields[i].getName());
     }
   } catch (SecurityException e) {
     // throw new RuntimeException(e.getMessage());
     e.printStackTrace();
   } catch (IllegalArgumentException e) {
     // throw new RuntimeException(e.getMessage());
     e.printStackTrace();
   } catch (Exception e) {
     // TODO Auto-generated catch block
     e.printStackTrace();
   }
 }
}
testTelephony.java是主類,使用PhoneStateListener監聽通話狀態,以及實現上述4種電話控制功能,源碼如下:
package com.testTelephony;
import android.app.Activity;
import android.os.Bundle;
import android.telephony.PhoneStateListener;
import android.telephony.TelephonyManager;
import android.util.Log;
import android.view.View;
import android.widget.RadioGroup;
import android.widget.ToggleButton;
public class testTelephony extends Activity {
  /** Called when the activity is first created. */
 RadioGroup rg;//來電操作單選框
 ToggleButton tbtnRadioSwitch;//Radio開關
 ToggleButton tbtnDataConn;//數據連接的開關
 TelephonyManager telMgr;
 CallStateListener stateListner;
 int checkedId=0;
 @Override
 public void onCreate(Bundle savedInstanceState) {
 super.onCreate(savedInstanceState);
 setContentView(R.layout.main);
 telMgr= (TelephonyManager)getSystemService(TELEPHONY_SERVICE);
   telMgr.listen(new CallStateListener(), CallStateListener.LISTEN_CALL_STATE);
 PhoneUtils.printAllInform(TelephonyManager.class);
 rg = (RadioGroup)findViewById(R.id.rGrpSelect);
 rg.setOnCheckedChangeListener(new CheckEvent());
 tbtnRadioSwitch=(ToggleButton)this.findViewById(R.id.tbtnRadioSwitch);
 tbtnRadioSwitch.setOnClickListener(new ClickEvent());
 try {
  tbtnRadioSwitch.setChecked(PhoneUtils.getITelephony(telMgr).isRadioOn());
 } catch (Exception e) {
  Log.e("error",e.getMessage());
 }
 tbtnDataConn=(ToggleButton)this.findViewById(R.id.tbtnDataConn);
 tbtnDataConn.setOnClickListener(new ClickEvent());
 try {
  tbtnDataConn.setChecked(PhoneUtils.getITelephony(telMgr).isDataConnectivityPossible());
 } catch (Exception e) {
  Log.e("error",e.getMessage());
 }
 }
 /**
 * 來電時的操作
 * @author GV
 *
 */
 public class CheckEvent implements RadioGroup.OnCheckedChangeListener{

 @Override
 public void onCheckedChanged(RadioGroup group, int checkedId) {
  testTelephony.this.checkedId=checkedId;
 }
 }
 /**
 * Radio和數據連接的開關
 * @author GV
 *
 */
 public class ClickEvent implements View.OnClickListener{

 @Override
 public void onClick(View v) {
  if (v == tbtnRadioSwitch) {
  try {
   PhoneUtils.getITelephony(telMgr).setRadio(tbtnRadioSwitch.isChecked());
  } catch (Exception e) {
   Log.e("error", e.getMessage());
  }
  }
  else if(v==tbtnDataConn){
  try {
   if(tbtnDataConn.isChecked())
   PhoneUtils.getITelephony(telMgr).enableDataConnectivity();
   else if(!tbtnDataConn.isChecked())
   PhoneUtils.getITelephony(telMgr).disableDataConnectivity();
  } catch (Exception e) {
   Log.e("error", e.getMessage());
  }
  }
 }
 }
 /**
 * 監視電話狀態
 * @author GV
 *
 */
 public class CallStateListener extends PhoneStateListener {
 @Override
 public void onCallStateChanged(int state, String incomingNumber) {
  if(state==TelephonyManager.CALL_STATE_IDLE)//掛斷
  {
  Log.e("IDLE",incomingNumber);
  }
  else if(state==TelephonyManager.CALL_STATE_OFFHOOK)//接聽
  {
  Log.e("OFFHOOK",incomingNumber);
  }
  else if(state==TelephonyManager.CALL_STATE_RINGING)//來電
  {
  if(testTelephony.this.checkedId==R.id.rbtnAutoAccept)
  {
   try {
   //需要<uses-permission android:name="android.permission.MODIFY_PHONE_STATE" />
   PhoneUtils.getITelephony(telMgr).silenceRinger();//靜鈴
   PhoneUtils.getITelephony(telMgr).answerRingingCall();//自動接聽

   } catch (Exception e) {
   Log.e("error",e.getMessage());
   }
  }
  else if(testTelephony.this.checkedId==R.id.rbtnAutoReject)
  {
   try {
   PhoneUtils.getITelephony(telMgr).endCall();//掛斷
   PhoneUtils.getITelephony(telMgr).cancelMissedCallsNotification();//取消未接顯示
   } catch (Exception e) {
   Log.e("error",e.getMessage());
   }
  }
  }
  super.onCallStateChanged(state, incomingNumber);
 }
 }
}
感興趣的讀者可以測試一下本文實例代碼,希望能夠對大家的Android項目開發有所幫助。
 Android MediaPlayer(多媒體播放)
Android提供了許多方法來控制播放的音頻/視頻文件和流。其中該方法是通過一類稱為MediaPlayer。Android是提供MediaPlayer類訪問內置的媒體播放
 使用ViewPager實現高仿launcher左右拖動效果
前面一篇高仿launcher和墨跡左右拖動效果獲得了很多朋友的好評,上一篇文章主要是通過自定義ViewGroup實現的,有點麻煩。今天用ViewPager這個類實
 Java4Android開發教程(四)java的變量
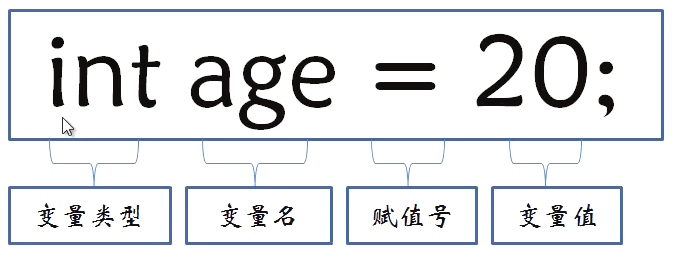
什麼是變量? 在計算機中用來存儲信息,通過聲明語句來指明存儲位置和所需空間。 變量的聲明方法及賦值 分號:語句結束標志 賦值號:將=右邊的值賦給左邊的變量 變量
 Android JSON解析器
JSON代表JavaScript對象符號。它是一個獨立的數據交換格式,是XML的最佳替代品。本章介紹了如何解析JSON文件,並從中提取所需的信息。Android提供了四個