本文要演示的Android開發實例是如何完成一個Android中的miniTwitter登錄界面,下面將分步驟講解怎樣實現圖中的界面效果,讓大家都能輕松的做出美觀的登錄界面。
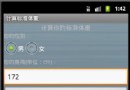
miniTwitter登錄界面效果圖
先貼上最終要完成的效果圖:

miniTwitter登錄界面的布局分析
首先由界面圖分析布局,基本可以分為三個部分,下面分別講解每個部分。
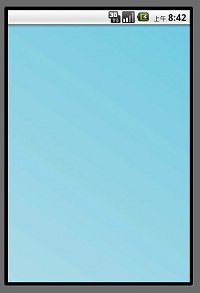
第一部分是一個帶漸變色背景的LinearLayout布局,關於背景漸變色就不再貼代碼了,效果如下圖所示:
第二部分,紅色線區域內,包括1,2,3,4 如圖所示:
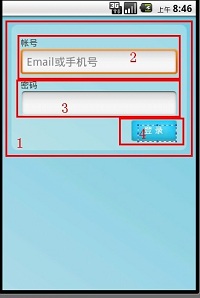
紅色的1表示的是一個帶圓角且背景色為#55FFFFFF(淡藍色)的RelativeLayout布局,代碼如下:
XML/HTML代碼
- <?xml version="1.0" encoding="UTF-8"?>
- <shape xmlns:android="http://schemas.android.com/apk/res/android">
- <solid android:color="#55FFFFFF" />
- <!-- 設置圓角
- 注意: bottomRightRadius是左下角而不是右下角 bottomLeftRadius右下角-->
- <corners android:topLeftRadius="10dp" android:topRightRadius="10dp"
- android:bottomRightRadius="10dp" android:bottomLeftRadius="10dp"/>
- </shape>
solid表示填充色,這裡填充的是淡藍色。corners是設置圓角。
dp (即dip,device independent pixels)設備獨立像素:這個和設備硬件有關,一般我們為了支持WVGA、HVGA和QVGA ,不依賴像素。在android上開發的程序將會在不同分辨率的手機上運行。為了讓程序外觀不至於相差太大,所以引入了dip的概念。比如定義一個矩形10 x 10dip. 在分辨率為160dpi 的屏上,比如G1,正好是10 x 10像素。 而在240 dpi 的屏,則是15 x 15 像素。換算公式為 pixs = dips * (density/160)。density 就是屏的分辨率。
然後RelativeLayou的background引用此drawable,具體RelativeLayout設置如下:
XML/HTML代碼
- <RelativeLayout
- android:id="@+id/login_div"
- android:layout_width="fill_parent"
- android:layout_height="wrap_content"
- android:padding="15dip"
- android:layout_margin="15dip"
- android:background="@drawable/background_login_div_bg"
- >
- </RelativeLayout>
padding 是指內邊距(也就是指內容與邊框的距離),layout_margin為外邊距(它的上一層與邊框的距離)。
接下來是區域2,為賬號的文本和輸入框,首先是賬號的文本,代碼如下:
XML/HTML代碼
- <TextView
- android:id="@+id/login_user_input"
- android:layout_width="wrap_content"
- android:layout_height="wrap_content"
- android:layout_alignParentTop="true"
- android:layout_marginTop="5dp"
- android:text="@string/login_label_username"
- style="@style/normalText"/>
android:layout_alignParentTop 這裡表示此TextView的位置處於頂部
android:layout_marginTop="5dp" 這裡表示此TextView的邊框與RelativeLayout的頂部邊框距離有5dp
這裡需要對這個TextView設置下字體顏色和字體大小,定義在res/style.xml裡面:
XML/HTML代碼
- <style name="normalText" parent="@android:style/TextAppearance">
- <item name="android:textColor">#444</item>
- <item name="android:textSize">14sp</item>
- </style>
定義賬號的輸入框,如下:
XML/HTML代碼
- <EditText
- android:id="@+id/username_edit"
- android:layout_width="fill_parent"
- android:layout_height="wrap_content"
- android:hint="@string/login_username_hint"
- android:layout_below="@id/login_user_input"
- android:singleLine="true"
- android:inputType="text"/>
android:hint 輸入框裡面的提示文字,android:layout_below這裡是設置為在賬號的文本框的下面,android:singleLine 為單行輸入(即你輸入回車的時候不會在換行了),android:inputType這裡text表示輸入的類型為文本。
區域3是密碼文本和輸入框,同區域2,代碼如下:
XML/HTML代碼
- <TextView
- android:id="@+id/login_password_input"
- android:layout_width="wrap_content"
- android:layout_height="wrap_content"
- android:layout_below="@id/username_edit"
- android:layout_marginTop="3dp"
- android:text="@string/login_label_password"
- style="@style/normalText"/>
- <EditText
- android:id="@+id/password_edit"
- android:layout_width="fill_parent"
- android:layout_height="wrap_content"
- android:layout_below="@id/login_password_input"
- android:password="true"
- android:singleLine="true"
- android:inputType="textPassword"
- />
區域4,登錄按鈕:
XML/HTML代碼
- <Button
- android:id="@+id/signin_button"
- android:layout_width="wrap_content"
- android:layout_height="wrap_content"
- android:layout_below="@id/password_edit"
- android:layout_alignRight="@id/password_edit"
- android:text="@string/login_label_signin"
- android:background="@drawable/blue_button"
- />
第三部分:底下的文字和兩張圖片,分別標記了1,2,3,4:
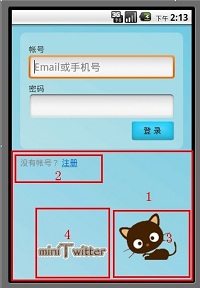
區域1:還是一個RelativeLayout,但這裡設置的很簡單,代碼如下:
XML/HTML代碼
- <RelativeLayout
- android:layout_width="fill_parent"
- android:layout_height="wrap_content">
- </RelativeLayout>
區域2:"沒有賬號?注冊"這幾個文字定義在string裡面,包含了一個<a>標簽:
XML/HTML代碼
- <string name="login_register_link">沒有帳號? <a href="#" mce_href="#">注冊</a></string>
定義如下:
XML/HTML代碼
- <TextView android:id="@+id/register_link"
- android:text="@string/login_register_link"
- android:layout_width="wrap_content"
- android:layout_height="wrap_content"
- android:layout_marginLeft="15dp"
- android:textColor="#888"
- android:textColorLink="#FF0066CC"
- />
TextView是支持簡單的html標簽的,如<a>標簽,但並不是支持所有標簽,支持更復雜的html標簽得用webView組件。
android:textColorLink是設置文字鏈接的顏色. 雖然TextView支持<a>標簽,但是這裡是不能點此鏈接的,不要被假象迷惑。
區域3是一直貓的卡通圖片,貌似有點丑,將就下吧:
XML/HTML代碼
- <ImageView android:id="@+id/miniTwitter_logo"
- android:src="@drawable/cat"
- android:layout_width="wrap_content"
- android:layout_height="wrap_content"
- android:layout_alignParentRight="true"
- android:layout_alignParentBottom="true"
- android:layout_marginRight="25dp"
- android:layout_marginLeft="10dp"
- android:layout_marginBottom="25dp"
- />
-
android:layout_alignParentRight="true" 位於layout的最右邊
android:layout_alignParentBottom="true" 位於layout的最底部
android:layout_marginRight="25dp" 該imageView的邊框距離layout邊框有25dp,其他的margin類似。
區域4 是一個帶文字的圖片的ImageView:
XML/HTML代碼
- <ImageView android:src="@drawable/logo"
- android:layout_width="wrap_content"
- android:layout_height="wrap_content"
- android:layout_toLeftOf="@id/miniTwitter_logo"
- android:layout_alignBottom="@id/miniTwitter_logo"
- android:paddingBottom="8dp"
- />
android:layout_toLeftOf="@id/miniTwitter_logo" 在那個小貓ImageView的左邊(水平位置)
android:layout_alignBottom="@id/miniTwitter_logo" 這裡意思是這兩個ImageView(區域3和區域4)下邊緣對齊
android:paddingBottom="8dp" 圖片距離ImageView底部邊框8dp,也就是將圖片上抬個8dp
實現miniTwitter登陸界面的具體步驟
具體步驟如下:
第一步:一些字符串定義
/miniTwitterLoginDemo/res/values/strings.xml
XML/HTML代碼
- <?xml version="1.0" encoding="utf-8"?>
- <resources>
- <string name="hello">Hello World, LoginActivity!</string>
- <string name="login_label_username">帳號</string>
- <string name="login_label_password">密碼</string>
- <string name="login_label_signin">登 錄</string>
- <string name="login_status_logging_in">登錄中...</string>
- <string name="login_username_hint">Email或手機號</string>
- <string name="login_register_link">沒有帳號? <a href="#" mce_href="#">注冊</a></string>
- <string name="app_name">miniTwitter</string>
- </resources>
第二步:
/miniTwitterLoginDemo/res/values/style.xml
XML/HTML代碼
- <?xml version="1.0" encoding="utf-8"?>
- <resources>
- <style name="normalText" parent="@android:style/TextAppearance">
- <item name="android:textColor">#444</item>
- <item name="android:textSize">14sp</item>
- </style>
- </resources>
第三步:背景色為漸變色
/miniTwitterLoginDemo/res/drawable-mdpi/background_login.xml
XML/HTML代碼
- <?xml version="1.0" encoding="utf-8"?>
- <shape xmlns:android="http://schemas.android.com/apk/res/android">
- <gradient
- android:startColor="#FFACDAE5"
- android:endColor="#FF72CAE1"
- android:angle="45"
- />
- </shape>
第四步:背景色味淡藍色且為圓角
/miniTwitterLoginDemo/res/drawable-mdpi/background_login_div_bg.xml
XML/HTML代碼
- <?xml version="1.0" encoding="UTF-8"?>
- <shape xmlns:android="http://schemas.android.com/apk/res/android">
- <solid android:color="#55FFFFFF" />
- <!-- 設置圓角
- 注意: bottomRightRadius是左下角而不是右下角 bottomLeftRadius右下角-->
- <corners android:topLeftRadius="10dp" android:topRightRadius="10dp"
- android:bottomRightRadius="10dp" android:bottomLeftRadius="10dp"/>
- </shape>
第五步:
/miniTwitterLoginDemo/res/layout/login.xml
XML/HTML代碼
- <?xml version="1.0" encoding="utf-8"?>
- <LinearLayout
- xmlns:android="http://schemas.android.com/apk/res/android"
- android:orientation="vertical"
- android:layout_width="fill_parent"
- android:layout_height="fill_parent"
- android:background="@drawable/background_login">
- <!-- padding 內邊距 layout_margin 外邊距
- android:layout_alignParentTop 布局的位置是否處於頂部 -->
- <RelativeLayout
- android:id="@+id/login_div"
- android:layout_width="fill_parent"
- android:layout_height="wrap_content"
- android:padding="15dip"
- android:layout_margin="15dip"
- android:background="@drawable/background_login_div_bg"
- >
- <!-- 賬號 -->
- <TextView
- android:id="@+id/login_user_input"
- android:layout_width="wrap_content"
- android:layout_height="wrap_content"
- android:layout_alignParentTop="true"
- android:layout_marginTop="5dp"
- android:text="@string/login_label_username"
- style="@style/normalText"/>
- <EditText
- android:id="@+id/username_edit"
- android:layout_width="fill_parent"
- android:layout_height="wrap_content"
- android:hint="@string/login_username_hint"
- android:layout_below="@id/login_user_input"
- android:singleLine="true"
- android:inputType="text"/>
- <!-- 密碼 text -->
- <TextView
- android:id="@+id/login_password_input"
- android:layout_width="wrap_content"
- android:layout_height="wrap_content"
- android:layout_below="@id/username_edit"
- android:layout_marginTop="3dp"
- android:text="@string/login_label_password"
- style="@style/normalText"/>
- <EditText
- android:id="@+id/password_edit"
- android:layout_width="fill_parent"
- android:layout_height="wrap_content"
- android:layout_below="@id/login_password_input"
- android:password="true"
- android:singleLine="true"
- android:inputType="textPassword"
- />
- <!-- 登錄button -->
- <Button
- android:id="@+id/signin_button"
- android:layout_width="wrap_content"
- android:layout_height="wrap_content"
- android:layout_below="@id/password_edit"
- android:layout_alignRight="@id/password_edit"
- android:text="@string/login_label_signin"
- android:background="@drawable/blue_button"
- />
- </RelativeLayout>
-
-
- <RelativeLayout
- android:layout_width="fill_parent"
- android:layout_height="wrap_content"
- >
- <TextView android:id="@+id/register_link"
- android:text="@string/login_register_link"
- android:layout_width="wrap_content"
- android:layout_height="wrap_content"
- android:layout_marginLeft="15dp"
- android:textColor="#888"
- android:textColorLink="#FF0066CC"
- />
- <ImageView android:id="@+id/miniTwitter_logo"
- android:src="@drawable/cat"
- android:layout_width="wrap_content"
- android:layout_height="wrap_content"
- android:layout_alignParentRight="true"
- android:layout_alignParentBottom="true"
- android:layout_marginRight="25dp"
- android:layout_marginLeft="10dp"
- android:layout_marginBottom="25dp"
- />
- <ImageView android:src="@drawable/logo"
- android:layout_width="wrap_content"
- android:layout_height="wrap_content"
- android:layout_toLeftOf="@id/miniTwitter_logo"
- android:layout_alignBottom="@id/miniTwitter_logo"
- android:paddingBottom="8dp"
- />
- </RelativeLayout>
-
- </LinearLayout>
第七步:
/miniTwitterLoginDemo/src/com/mytwitter/acitivity/LoginActivity.java
這裡要注意的是,該Activity是無標題的,設置無標題需要在setContentView之前設置,否則會報錯。
Java代碼
- package com.mytwitter.acitivity;
-
- import android.app.Activity;
- import android.os.Bundle;
- import android.view.Window;
-
- public class LoginActivity extends Activity {
- @Override
- public void onCreate(Bundle savedInstanceState) {
- super.onCreate(savedInstanceState);
- requestWindowFeature(Window.FEATURE_NO_TITLE);
- setContentView(R.layout.login);
- }
- }
到此,Android中的miniTwitter登錄界面的制作就介紹完畢了,是不是做出不錯的登錄界面並不算難呢?
 Android本地化
 Android控件系列之相冊Gallery&Adapter適配器入門&控件縮放動畫入門
 Android JSON解析器
 Android 完全退出應用程序的解決方法