Android中可以直接在位圖上進行人臉檢測。Android SDK為人臉檢測提供了兩個類,分別是android.media.FaceDetector和android.media.FaceDetector.Face。
所謂人臉檢測就是指從一副圖片或者一幀視頻中標定出所有人臉的位置和尺寸。人臉檢測是人臉識別系統中的一個重要環節,也可以獨立應用於視頻監控。在數字媒體日益普及的今天,利用人臉檢測技術還可以幫助我們從海量圖片數據中快速篩選出包含人臉的圖片。 在目前的數碼相機中,人臉檢測可以用來完成自動對焦,即“臉部對焦”。“臉部對焦”是在自動曝光和自動對焦發明後,二十年來最重要的一次攝影技術革新。家用數碼相機,占絕大多數的照片是以人為拍攝主體的,這就要求相機的自動曝光和對焦以人物為基准。
構建一個人臉檢測的Activity
你可以構建一個通用的Android Activity,我們擴展了基類ImageView,成為MyImageView,而我們需要進行檢測的包含人臉的位圖文件必須是565格式,API才能正常工作。被檢測出來的人臉需要一個置信測度(confidence measure),這個措施定義在android.media.FaceDetector.Face.CONFIDENCE_THRESHOLD。
最重要的方法實現在setFace(),它將FaceDetector對象實例化,同時調用findFaces,結果存放在faces裡,人臉的中點轉移到MyImageView。代碼如下:
Java代碼
- public class TutorialOnFaceDetect1 extends Activity {
- private MyImageView mIV;
- private Bitmap mFaceBitmap;
- private int mFaceWidth = 200;
- private int mFaceHeight = 200;
- private static final int MAX_FACES = 1;
- private static String TAG = "TutorialOnFaceDetect";
-
- @Override
- public void onCreate(Bundle savedInstanceState) {
- super.onCreate(savedInstanceState);
-
- mIV = new MyImageView(this);
- setContentView(mIV, new LayoutParams(LayoutParams.WRAP_CONTENT, LayoutParams.WRAP_CONTENT));
-
- // load the photo
- Bitmap b = BitmapFactory.decodeResource(getResources(), R.drawable.face3);
- mFaceBitmap = b.copy(Bitmap.Config.RGB_565, true);
- b.recycle();
-
- mFaceWidth = mFaceBitmap.getWidth();
- mFaceHeight = mFaceBitmap.getHeight();
- mIV.setImageBitmap(mFaceBitmap);
-
- // perform face detection and set the feature points setFace();
-
- mIV.invalidate();
- }
-
- public void setFace() {
- FaceDetector fd;
- FaceDetector.Face [] faces = new FaceDetector.Face[MAX_FACES];
- PointF midpoint = new PointF();
- int [] fpx = null;
- int [] fpy = null;
- int count = 0;
-
- try {
- fd = new FaceDetector(mFaceWidth, mFaceHeight, MAX_FACES);
- count = fd.findFaces(mFaceBitmap, faces);
- } catch (Exception e) {
- Log.e(TAG, "setFace(): " + e.toString());
- return;
- }
-
- // check if we detect any faces
- if (count > 0) {
- fpx = new int[count];
- fpy = new int[count];
-
- for (int i = 0; i < count; i++) {
- try {
- faces<I>.getMidPoint(midpoint);
-
- fpx = (int)midpoint.x;
- fpy = (int)midpoint.y;
- } catch (Exception e) {
- Log.e(TAG, "setFace(): face " + i + ": " + e.toString());
- }
- }
- }
-
- mIV.setDisplayPoints(fpx, fpy, count, 0);
- }
- }
接下來的代碼中,我們在MyImageView中添加setDisplayPoints() ,用來在被檢測出的人臉上標記渲染。
Java代碼
- public class TutorialOnFaceDetect1 extends Activity {
- private MyImageView mIV;
- private Bitmap mFaceBitmap;
- private int mFaceWidth = 200;
- private int mFaceHeight = 200;
- private static final int MAX_FACES = 1;
- private static String TAG = "TutorialOnFaceDetect";
-
- @Override
- public void onCreate(Bundle savedInstanceState) {
- super.onCreate(savedInstanceState);
-
- mIV = new MyImageView(this);
- setContentView(mIV, new LayoutParams(LayoutParams.WRAP_CONTENT, LayoutParams.WRAP_CONTENT));
-
- // load the photo
- Bitmap b = BitmapFactory.decodeResource(getResources(), R.drawable.face3);
- mFaceBitmap = b.copy(Bitmap.Config.RGB_565, true);
- b.recycle();
-
- mFaceWidth = mFaceBitmap.getWidth();
- mFaceHeight = mFaceBitmap.getHeight();
- mIV.setImageBitmap(mFaceBitmap);
-
- // perform face detection and set the feature points setFace();
-
- mIV.invalidate();
- }
-
- public void setFace() {
- FaceDetector fd;
- FaceDetector.Face [] faces = new FaceDetector.Face[MAX_FACES];
- PointF midpoint = new PointF();
- int [] fpx = null;
- int [] fpy = null;
- int count = 0;
-
- try {
- fd = new FaceDetector(mFaceWidth, mFaceHeight, MAX_FACES);
- count = fd.findFaces(mFaceBitmap, faces);
- } catch (Exception e) {
- Log.e(TAG, "setFace(): " + e.toString());
- return;
- }
-
- // check if we detect any faces
- if (count > 0) {
- fpx = new int[count];
- fpy = new int[count];
-
- for (int i = 0; i < count; i++) {
- try {
- faces<I>.getMidPoint(midpoint);
-
- fpx = (int)midpoint.x;
- fpy = (int)midpoint.y;
- } catch (Exception e) {
- Log.e(TAG, "setFace(): face " + i + ": " + e.toString());
- }
- }
- }
-
- mIV.setDisplayPoints(fpx, fpy, count, 0);
- }
- }
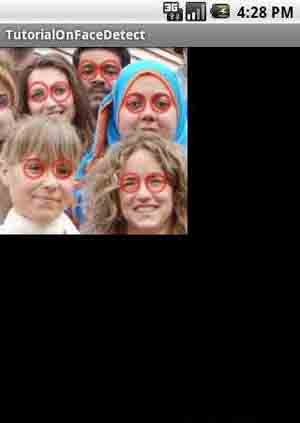
多人臉檢測
通過FaceDetector可以設定檢測到人臉數目的上限。比如設置最多只檢測10張臉:
Java代碼
- private static final int MAX_FACES = 10;
下圖展示了檢測到多張人臉的情況:

定位眼睛中心位置
Android人臉檢測返回其他有用的信息,例同時會返回如eyesDistance,pose,以及confidence。我們可以通過eyesDistance來定位眼睛的中心位置。
下面的代碼中,我們將setFace()放在doLengthyCalc()中。
Java代碼
- public class TutorialOnFaceDetect extends Activity {
- private MyImageView mIV;
- private Bitmap mFaceBitmap;
- private int mFaceWidth = 200;
- private int mFaceHeight = 200;
- private static final int MAX_FACES = 10;
- private static String TAG = "TutorialOnFaceDetect";
- private static boolean DEBUG = false;
-
- protected static final int GUIUPDATE_SETFACE = 999;
- protected Handler mHandler = new Handler(){
- // @Override
- public void handleMessage(Message msg) {
- mIV.invalidate();
-
- super.handleMessage(msg);
- }
- };
-
- @Override
- public void onCreate(Bundle savedInstanceState) {
- super.onCreate(savedInstanceState);
-
- mIV = new MyImageView(this);
- setContentView(mIV, new LayoutParams(LayoutParams.WRAP_CONTENT, LayoutParams.WRAP_CONTENT));
-
- // load the photo
- Bitmap b = BitmapFactory.decodeResource(getResources(), R.drawable.face3);
- mFaceBitmap = b.copy(Bitmap.Config.RGB_565, true);
- b.recycle();
-
- mFaceWidth = mFaceBitmap.getWidth();
- mFaceHeight = mFaceBitmap.getHeight();
- mIV.setImageBitmap(mFaceBitmap);
- mIV.invalidate();
-
- // perform face detection in setFace() in a background thread
- doLengthyCalc();
- }
-
- public void setFace() {
- FaceDetector fd;
- FaceDetector.Face [] faces = new FaceDetector.Face[MAX_FACES];
- PointF eyescenter = new PointF();
- float eyesdist = 0.0f;
- int [] fpx = null;
- int [] fpy = null;
- int count = 0;
-
- try {
- fd = new FaceDetector(mFaceWidth, mFaceHeight, MAX_FACES);
- count = fd.findFaces(mFaceBitmap, faces);
- } catch (Exception e) {
- Log.e(TAG, "setFace(): " + e.toString());
- return;
- }
-
- // check if we detect any faces
- if (count > 0) {
- fpx = new int[count * 2];
- fpy = new int[count * 2];
-
- for (int i = 0; i < count; i++) {
- try {
- faces<I>.getMidPoint(eyescenter);
- eyesdist = faces<I>.eyesDistance();
-
- // set up left eye location
- fpx[2 * i] = (int)(eyescenter.x - eyesdist / 2);
- fpy[2 * i] = (int)eyescenter.y;
-
- // set up right eye location
- fpx[2 * i + 1] = (int)(eyescenter.x + eyesdist / 2);
- fpy[2 * i + 1] = (int)eyescenter.y;
-
- if (DEBUG) {
- Log.e(TAG, "setFace(): face " + i + ": confidence = " + faces<I>.confidence()
- + ", eyes distance = " + faces<I>.eyesDistance()
- + ", pose = ("+ faces<I>.pose(FaceDetector.Face.EULER_X) + ","
- + faces<I>.pose(FaceDetector.Face.EULER_Y) + ","
- + faces<I>.pose(FaceDetector.Face.EULER_Z) + ")"
- + ", eyes midpoint = (" + eyescenter.x + "," + eyescenter.y +")");
- }
- } catch (Exception e) {
- Log.e(TAG, "setFace(): face " + i + ": " + e.toString());
- }
- }
- }
-
- mIV.setDisplayPoints(fpx, fpy, count * 2, 1);
- }
-
- private void doLengthyCalc() {
- Thread t = new Thread() {
- Message m = new Message();
-
- public void run() {
- try {
- setFace();
- m.what = TutorialOnFaceDetect.GUIUPDATE_SETFACE;
- TutorialOnFaceDetect.this.mHandler.sendMessage(m);
- } catch (Exception e) {
- Log.e(TAG, "doLengthyCalc(): " + e.toString());
- }
- }
- };
-
- t.start();
- }
- }
下圖展示了定位眼睛中心位置的效果:
 Android本地化
 教你輕松制作Android音樂播放器
 Android SQLite數據庫增刪改查操作的案例分析
 Android登錄實例