一、軟鍵盤介紹
實現軟鍵盤主要用到了系統的兩個類:Keyboard和KeyboardView。
Keyboard類源碼的介紹是: Listener for virtual keyboard events.即用於監聽虛擬鍵盤。
KeyboardView類源碼的介紹是: A view that renders a virtual {@link Keyboard}. It handles rendering of keys and detecting key presses and touch movements.即它處理繪制鍵盤和檢測按鍵和觸摸動作。
它裡面有很多方法,在我們自定義的軟鍵盤很多屬性,就需要我們用這個類來設置。比如:
Java代碼
- keyboardView = (KeyboardView) act.findViewById(R.id.keyboard_view);
- keyboardView.setKeyboard(k);
- keyboardView.setEnabled(true);
- keyboardView.setPreviewEnabled(true);
- keyboardView.setVisibility(View.VISIBLE);
- keyboardView.setOnKeyboardActionListener(listener);
了解一些源碼,就可以是我們知道我們為什麼要這樣寫,為什麼要這樣做了!
二、數字軟鍵盤的布局
首先在res下新建xml文件夾,在xml文件夾中新建symbols.xml文件,這個布局文件主要是實現數字軟鍵盤的布局,每一個按鍵都有一個codes值,在類中就是通過codes值來監聽每一個按鈕。
XML/HTML代碼
- <?xml version="1.0" encoding="utf-8"?>
- <Keyboard xmlns:android="http://schemas.android.com/apk/res/android"
- android:keyWidth="20%p" android:horizontalGap="0px"
- android:verticalGap="0px" android:keyHeight="@dimen/key_height">
-
- <Row>
- <Key android:codes="49" android:keyLabel="1" />
- <Key android:codes="50" android:keyLabel="2" />
- <Key android:codes="51" android:keyLabel="3" />
- <Key android:codes="52" android:keyLabel="4" />
- <Key android:codes="-5" android:keyIcon="@drawable/sym_keyboard_delete" />
- </Row>
-
- <Row>
- <Key android:codes="53" android:keyLabel="5" />
- <Key android:codes="54" android:keyLabel="6" />
- <Key android:codes="55" android:keyLabel="7" />
- <Key android:codes="56" android:keyLabel="8" />
- <Key android:codes="-2" android:keyLabel="中文" />
- </Row>
-
- <Row>
- <Key android:codes="57" android:keyLabel="9" />
- <Key android:codes="48" android:keyLabel="0" />
- <Key android:codes="46" android:keyLabel="." />
- <Key android:codes="-3" android:keyWidth="40%p"
- android:isRepeatable="true" android:keyLabel="完成" />
- </Row>
-
- </Keyboard>
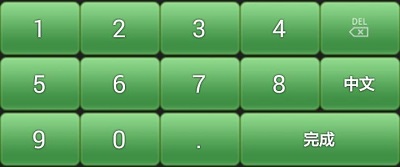
數字鍵盤界面如下:
在上面的鍵盤定義中,通過Keyboard說明是一個軟鍵盤定義文件,Row元素說明這是一行按鍵的定義,Key元素說明這是一個按鍵的定義。Key元素通過一些屬性來定義每個按鍵,下面是一些常用的屬性介紹:
Codes:代表按鍵對應的輸出值,可以為unicode值或者逗號(,)分割的多個值,也可以為一個字符串。在字符串中通過“\”來轉義特殊字符,例如 ‘\n’ 或則 ‘\uxxxx’ 。Codes通常用來定義該鍵的鍵碼,例如上圖中的數字按鍵1對應的為49;如果提供的是逗號分割的多個值則和普通手機輸入鍵盤一樣在多個值之間切換。
keyLabel:代表按鍵顯示的文本內容。
keyIcon:代表按鍵顯示的圖標內容,如果指定了該值則在顯示的時候顯示為圖片不顯示文本。
keyWidth:代表按鍵的寬度,可以為精確值或則相對值,對於精確值支持多種單位,例如:像素,英寸 等;相對值為相對於基礎取值的百分比,為以% 或%p 結尾,其中%p表示相對於父容器。
keyHeight:代表按鍵的高度,取值同上。
horizontalGap:代表按鍵前的間隙(水平方向),取值同上。
isSticky:指定按鍵是否為sticky的。例如Shift大小寫切換按鍵,具有兩種狀態,按下狀態和正常狀態,取值為true或者false。
isModifier:指定按鍵是否為功能鍵( modifier key ) ,例如 Alt 或者 Shift ,取值為true或false。
keyOutputText:指定按鍵輸出的文本內容,取值為字符串。
isRepeatable:指定按鍵是否是可重復的,如果長按該鍵可以觸發重復按鍵事件則為true,否則為false。
keyEdgeFlags:指定按鍵的對齊指令,取值為left或right。
我們在設置每一個按鍵的code時,就是根據keyboard類中定義的一些屬性,比如回退,切換,完成等都是固定的。
Java代碼
- public static final int KEYCODE_SHIFT = -1;
- public static final int KEYCODE_MODE_CHANGE = -2;
- public static final int KEYCODE_CANCEL = -3;
- public static final int KEYCODE_DONE = -4;
- public static final int KEYCODE_DELETE = -5;
- public static final int KEYCODE_ALT = -6;
知道了這些,我們就不會有太多的疑惑了!也是說,我們自定義的每一個按鍵都將會有一個codes值,比如回退我們就寫成:
XML/HTML代碼
- <Key android:codes="-5" android:keyIcon="@drawable/sym_keyboard_delete" />
在監聽處就是:
Java代碼
- if (primaryCode == Keyboard.KEYCODE_DELETE){}
這就表示,監聽回退事件了!
三、中文軟鍵盤的布局
然後在xml文件夾中新建chinese.xml文件,這個布局文件主要是實現中文軟鍵盤的布局,每一個按鍵都有一個codes值,這個codes就是一個漢字在utf16標准中的編碼值。
查找漢字的編碼,有兩種方法:
1,直接查找utf16表,可以參考:http://blog.csdn.net/lintax/article/details/51866861
如果漢字個數比較多,需要將漢字與編碼值一個個准確對應的鍵入xml中,也是一個挺費神的事情。
2,使用程序員的辦法,用代碼來幫我們實現:
Java代碼
- //get the codes for xml
- char c;
- int i;
- String[] strings = { "一", "二", "三", "四", "五", "六", "年", "級", "班", "."};
- for(String str : strings){
- c=str.toCharArray()[0];
- i=c;
- //xml中格式:<Key android:codes="19968" android:keyLabel="一" />
- Log.i("key","<Key android:codes=\""+i+"\" android:keyLabel=\""+c+"\" />");
- }
這樣,就按照xml中的格式,寫好了漢字與編碼值的關聯語句。
剩下還有一個小問題:在logcat的輸出中,還有其他的信息,如時間、log等級等,如下:
XML/HTML代碼
- 07-16 18:20:12.220: I/key(5200): <Key android:codes="29677" android:keyLabel="班" />
我們可以將logcat信息保存到文本文件中,使用一個文本編輯器將前面的不想要的信息(此處是“07-16 18:20:12.220: I/key(5200): ”)全部替換為8個空格即可。
為何是8個空格?是為了xml中的格式對齊。
最終,xml中文件內容如下:
XML/HTML代碼
- <?xml version="1.0" encoding="UTF-8"?>
- <Keyboard android:keyWidth="25.000002%p" android:keyHeight="@dimen/key_height"
- android:horizontalGap="0.0px" android:verticalGap="0.0px"
- xmlns:android="http://schemas.android.com/apk/res/android">
-
- <Row>
- <Key android:codes="19968" android:keyLabel="一" />
- <Key android:codes="20108" android:keyLabel="二" />
- <Key android:codes="19977" android:keyLabel="三" />
- <Key android:codes="-5" android:isRepeatable="true"
- android:keyIcon="@drawable/sym_keyboard_delete" />
- </Row>
-
- <Row>
- <Key android:codes="22235" android:keyLabel="四" />
- <Key android:codes="20116" android:keyLabel="五" />
- <Key android:codes="20845" android:keyLabel="六" />
- <Key android:codes="-2" android:keyLabel="數字" />
- </Row>
-
- <Row>
- <Key android:codes="24180" android:keyLabel="年" />
- <Key android:codes="32423" android:keyLabel="級" />
- <Key android:codes="29677" android:keyLabel="班" />
- <Key android:keyWidth="25.000004%p" android:codes="-3"
- android:keyEdgeFlags="right" android:keyLabel="完成" />
- </Row>
-
- </Keyboard>
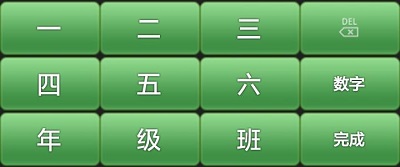
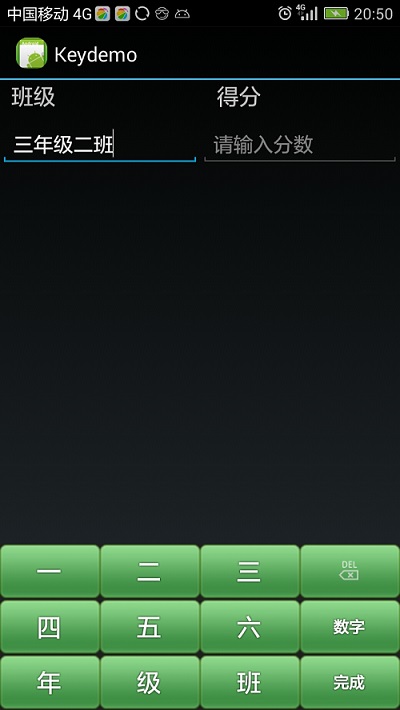
中文鍵盤最終畫面如下:
四、鍵盤事件處理
然後創建一個類,用於處理軟鍵盤事件,文件名為KeyboardUtil.Java,內容如下:
Java代碼
- package cn.key;
-
- import java.util.List;
-
- import android.app.Activity;
- import android.content.Context;
- import android.inputmethodservice.Keyboard;
- import android.inputmethodservice.KeyboardView;
- import android.inputmethodservice.Keyboard.Key;
- import android.inputmethodservice.KeyboardView.OnKeyboardActionListener;
- import android.text.Editable;
- import android.view.View;
- import android.widget.EditText;
-
- public class KeyboardUtil {
- private Context ctx;
- private Activity act;
- private KeyboardView keyboardView;
- private Keyboard k1;// 中文鍵盤
- private Keyboard k2;// 數字鍵盤
- public boolean isNumber = false;// 是否數字鍵盤
- public boolean isUpper = false;// 是否大寫
-
- private EditText ed;
-
- public KeyboardUtil(Activity act, Context ctx, EditText edit) {
- this.act = act;
- this.ctx = ctx;
- this.ed = edit;
- k1 = new Keyboard(ctx, R.xml.chinese);
- k2 = new Keyboard(ctx, R.xml.symbols);
- keyboardView = (KeyboardView) act.findViewById(R.id.keyboard_view);
- keyboardView.setKeyboard(k1);
- keyboardView.setEnabled(true);
- keyboardView.setPreviewEnabled(true);
- keyboardView.setOnKeyboardActionListener(listener);
- }
-
- private OnKeyboardActionListener listener = new OnKeyboardActionListener() {
- @Override
- public void swipeUp() {
- // super.swipeUp();
-
- }
-
- @Override
- public void swipeRight() {
- }
-
- @Override
- public void swipeLeft() {
- }
-
- @Override
- public void swipeDown() {
- }
-
- @Override
- public void onText(CharSequence text) {
- // super.onText(text);
- }
-
- @Override
- public void onRelease(int primaryCode) {
- }
-
- @Override
- public void onPress(int primaryCode) {
- }
-
- @Override
- public void onKey(int primaryCode, int[] keyCodes) {
- Editable editable = ed.getText();
- int start = ed.getSelectionStart();
- if (primaryCode == Keyboard.KEYCODE_CANCEL) {//完成
- hideKeyboard();
- } else if (primaryCode == Keyboard.KEYCODE_DELETE) {//回退
- if (editable != null && editable.length() > 0) {
- if (start > 0) {
- editable.delete(start - 1, start);
- }
- }
- } else if (primaryCode == Keyboard.KEYCODE_SHIFT) {//大小寫切換
-
-
- changeKey();
- keyboardView.setKeyboard(k1);
-
- } else if (primaryCode == Keyboard.KEYCODE_MODE_CHANGE) {//數字鍵盤切換
- if (isNumber) {
- isNumber = false;
- keyboardView.setKeyboard(k1);
- } else {
- isNumber = true;
- keyboardView.setKeyboard(k2);
- }
- } else if (primaryCode == 57419) { // go left
- if (start > 0) {
- ed.setSelection(start - 1);
- }
- } else if (primaryCode == 57421) { // go right
- if (start < ed.length()) {
- ed.setSelection(start + 1);
- }
- } else {
- editable.insert(start, Character.toString((char) primaryCode));
- }
- }
- };
-
- /**
- * 鍵盤大小寫切換
- */
- private void changeKey() {
- List<Key> keylist = k1.getKeys();
- if (isUpper) {//大寫切換小寫
- isUpper = false;
- for(Key key:keylist){
- if (key.label!=null && isword(key.label.toString())) {
- key.label = key.label.toString().toLowerCase();
- key.codes[0] = key.codes[0]+32;
- }
- }
- } else {//小寫切換大寫
- isUpper = true;
- for(Key key:keylist){
- if (key.label!=null && isword(key.label.toString())) {
- key.label = key.label.toString().toUpperCase();
- key.codes[0] = key.codes[0]-32;
- }
- }
- }
- }
-
- public void showKeyboard() {
- int visibility = keyboardView.getVisibility();
- if (visibility == View.GONE || visibility == View.INVISIBLE) {
- keyboardView.setVisibility(View.VISIBLE);
- }
- }
-
- public void hideKeyboard() {
- int visibility = keyboardView.getVisibility();
- if (visibility == View.VISIBLE) {
- keyboardView.setVisibility(View.INVISIBLE);
- }
- }
-
- private boolean isword(String str){
- String wordstr = "abcdefghijklmnopqrstuvwxyz";
- if (wordstr.indexOf(str.toLowerCase())>-1) {
- return true;
- }
- return false;
- }
-
- public void showChinese() {
- showKeyboard();
- isNumber = false;
- keyboardView.setKeyboard(k1);
- }
-
- public void showNumber() {
- showKeyboard();
- isNumber = true;
- keyboardView.setKeyboard(k2);
- }
-
- }
五、主界面布局
接下來就是實現activity的視圖布局文件了,文件名為main.xml,內容如下:
XML/HTML代碼
- <?xml version="1.0" encoding="utf-8"?>
- <RelativeLayout xmlns:android="http://schemas.android.com/apk/res/android"
- android:layout_width="fill_parent"
- android:layout_height="fill_parent"
- android:orientation="vertical" >
-
- <LinearLayout
- android:id="@+id/ll_hint"
- android:layout_width="fill_parent"
- android:layout_height="wrap_content"
- android:orientation="horizontal" >
-
- <TextView
- android:id="@+id/tv_class"
- android:layout_width="wrap_content"
- android:layout_height="wrap_content"
- android:layout_weight="1"
- android:layout_marginLeft="10dp"
- android:text="班級"
- android:textSize="20dip" />
-
- <TextView
- android:id="@+id/tv_scrore"
- android:layout_width="0dp"
- android:layout_height="wrap_content"
- android:layout_weight="1"
- android:layout_marginRight="20dp"
- android:text="得分"
- android:textSize="20dip" />
- </LinearLayout>
-
- <LinearLayout
- android:id="@+id/ll_content"
- android:layout_width="fill_parent"
- android:layout_height="wrap_content"
- android:layout_below="@id/ll_hint"
- android:layout_marginTop="10dp"
- android:orientation="horizontal" >
-
- <EditText
- android:id="@+id/edit_class"
- android:layout_width="0dp"
- android:layout_height="wrap_content"
- android:layout_weight="1"
- android:hint="請輸入班級" />
-
- <EditText
- android:id="@+id/edit_score"
- android:layout_width="0dp"
- android:layout_height="wrap_content"
- android:layout_weight="1"
- android:hint="請輸入分數" />
- </LinearLayout>
-
-
- <RelativeLayout
- android:layout_width="fill_parent"
- android:layout_height="wrap_content" >
-
- <android.inputmethodservice.KeyboardView
- android:id="@+id/keyboard_view"
- android:layout_width="fill_parent"
- android:layout_height="wrap_content"
- android:layout_alignParentBottom="true"
- android:background="@color/lightblack"
- android:focusable="true"
- android:focusableInTouchMode="true"
- android:keyBackground="@drawable/btn_keyboard_chinese"
- android:keyTextColor="@color/white"
- android:visibility="gone" />
- </RelativeLayout>
-
- </RelativeLayout>
界面比較簡單,主要是兩個文本輸入框,一個是班級(輸入漢字),一個是分數(輸入數字)。另外有一個隱藏的KeyboardView,在我們點擊文本輸入框時,會顯示出來。
六、主類的實現
最後就在你要執行的activity中,添加一些代碼就行了,剩下的就和其他控件使用方式一樣了,類名為KeydemoActivity.java,內容如下:
Java代碼
- package cn.key;
-
- import java.lang.reflect.Method;
- import android.app.Activity;
- import android.content.Context;
- import android.os.Bundle;
- import android.text.InputType;
- import android.util.Log;
- import android.view.ActionMode;
- import android.view.ActionMode.Callback;
- import android.view.Menu;
- import android.view.MenuItem;
- import android.view.MotionEvent;
- import android.view.View;
- import android.view.View.OnTouchListener;
- import android.view.WindowManager;
- import android.widget.EditText;
-
- public class KeydemoActivity extends Activity {
- private Context ctx;
- private Activity act;
- private EditText edit_class;
- private EditText edit_score;
-
- @Override
- public void onCreate(Bundle savedInstanceState) {
- super.onCreate(savedInstanceState);
- setContentView(R.layout.main);
-
- //get the codes for xml
- char c;
- int i;
- String[] strings = { "一", "二", "三", "四", "五", "六", "年", "級", "班", "."};
- for(String str : strings){
- c=str.toCharArray()[0];
- i=c;
- //xml中格式:<Key android:codes="19968" android:keyLabel="一" />
- Log.i("key","<Key android:codes=\""+i+"\" android:keyLabel=\""+c+"\" />");
- }
-
-
- edit_class = (EditText) this.findViewById(R.id.edit_class);
- edit_score = (EditText) this.findViewById(R.id.edit_score);
-
-
- //禁止彈出系統默認的軟鍵盤
- if (android.os.Build.VERSION.SDK_INT <= 10) {
- edit_class.setInputType(InputType.TYPE_NULL);
- } else {
- this.getWindow().setSoftInputMode
-
- (WindowManager.LayoutParams.SOFT_INPUT_STATE_ALWAYS_HIDDEN);
- try {
- Class<EditText> cls = EditText.class;
- Method setSoftInputShownOnFocus;
- setSoftInputShownOnFocus = cls.getMethod("setShowSoftInputOnFocus",
-
- boolean.class);
- setSoftInputShownOnFocus.setAccessible(true);
- setSoftInputShownOnFocus.invoke(edit_class, false);
- setSoftInputShownOnFocus.invoke(edit_score, false);
- } catch (Exception e) {
- e.printStackTrace();
- }
- }
-
-
- //禁止長按選擇
- edit_class.setCustomSelectionActionModeCallback(new Callback() {
- @Override
- public boolean onPrepareActionMode(ActionMode mode, Menu menu) {
- return false;
- }
- @Override
- public void onDestroyActionMode(ActionMode mode) {
- }
- @Override
- public boolean onCreateActionMode(ActionMode mode, Menu menu) {
- //這裡可以添加自己的菜單選項(前提是要返回true的)
- return false;//返回false 就是屏蔽ActionMode菜單
- }
- @Override
- public boolean onActionItemClicked(ActionMode mode, MenuItem item) {
- return false;
- }
- });
-
- edit_score.setCustomSelectionActionModeCallback(new Callback() {
- @Override
- public boolean onPrepareActionMode(ActionMode mode, Menu menu) {
- return false;
- }
- @Override
- public void onDestroyActionMode(ActionMode mode) {
- }
- @Override
- public boolean onCreateActionMode(ActionMode mode, Menu menu) {
- //這裡可以添加自己的菜單選項(前提是要返回true的)
- return false;//返回false 就是屏蔽ActionMode菜單
- }
- @Override
- public boolean onActionItemClicked(ActionMode mode, MenuItem item) {
- return false;
- }
- });
-
-
- //設置監聽動作,彈出自定義鍵盤
- ctx = this;
- act = this;
- edit_class.setOnTouchListener(new OnTouchListener() {
- @Override
- public boolean onTouch(View v, MotionEvent event) {
- new KeyboardUtil(act, ctx, edit_class).showChinese();
- return false;
- }
- });
-
- edit_score.setOnTouchListener(new OnTouchListener() {
- @Override
- public boolean onTouch(View v, MotionEvent event) {
- new KeyboardUtil(act, ctx, edit_score).showNumber();
- return false;
- }
- });
-
- }
- }
最後的運行界面如下:
七、demo地址
http://download.csdn.net/detail/lintax/9577994
 Android本地化
 Android編程使WebView支持HTML5 Video全屏播放的解決方法
 Android6.0指紋識別開發實例
 Android JSON解析器