編輯:Android編程入門
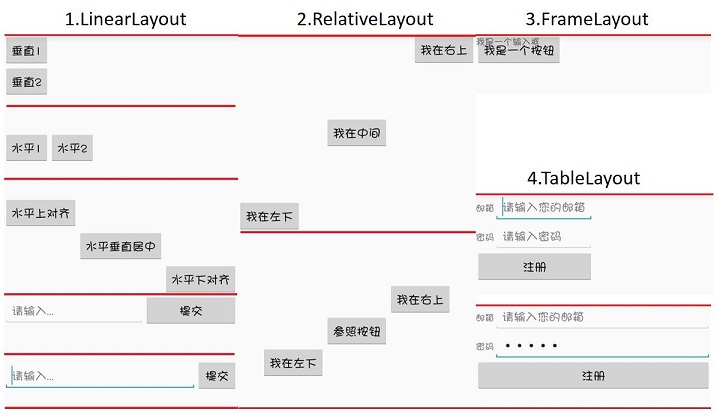
本文介紹 Android 界面開發中最基本的四種布局LinearLayout、RelativeLayout、FrameLayout、TableLayout 的使用方法及這四種布局中常用的屬性。
- LinearLayout
線性布局,布局中空間呈線性排列- RelativeLayout
相對布局,通過相對定位的方式,控制控件位置- FrameLayout
幀布局,最簡單的布局,所有控件放置左上角- TableLayout
表格布局,以行列方式控制控件位置
<LinearLayout xmlns:android="http://schemas.android.com/apk/res/android"
    android:layout_width="match_parent"
    android:layout_height="match_parent"
    android:orientation="vertical">

    <LinearLayout xmlns:android="http://schemas.android.com/apk/res/android"
        android:layout_width="match_parent"
        android:layout_height="150dp"
        android:orientation="vertical">

        <Button
            android:layout_width="wrap_content"
            android:layout_height="wrap_content"
            android:text="垂直1" />
        <Button
            android:layout_width="wrap_content"
            android:layout_height="wrap_content"
            android:text="垂直2" />
    </LinearLayout>

    <LinearLayout xmlns:android="http://schemas.android.com/apk/res/android"
        android:layout_width="match_parent"
        android:layout_height="100dp"
        android:orientation="horizontal">

        <Button
            android:layout_width="wrap_content"
            android:layout_height="wrap_content"
            android:text="水平1" />
        <Button
            android:layout_width="wrap_content"
            android:layout_height="wrap_content"
            android:text="水平2" />
    </LinearLayout>

    <LinearLayout xmlns:android="http://schemas.android.com/apk/res/android"
        android:layout_width="match_parent"
        android:layout_height="150dp"
        android:orientation="horizontal">

        <Button
            android:layout_width="wrap_content"
            android:layout_height="wrap_content"
            android:layout_gravity="top"
            android:text="水平上對齊" />
        <Button
            android:layout_width="wrap_content"
            android:layout_height="wrap_content"
            android:layout_gravity="center_vertical"
            android:text="水平垂直居中" />
        <Button
            android:layout_width="wrap_content"
            android:layout_height="wrap_content"
            android:layout_gravity="bottom"
            android:text="水平下對齊" />
    </LinearLayout>

    <LinearLayout xmlns:android="http://schemas.android.com/apk/res/android"
        android:layout_width="match_parent"
        android:layout_height="100dp"
        android:orientation="horizontal">
        <EditText
            android:layout_width="0dp"
            android:layout_height="wrap_content"
            android:layout_weight="3"
            android:hint="請輸入..."/>
        <Button
            android:layout_width="0dp"
            android:layout_height="wrap_content"
            android:layout_weight="2"
            android:text="提交" />
    </LinearLayout>

    <LinearLayout xmlns:android="http://schemas.android.com/apk/res/android"
        android:layout_width="match_parent"
        android:layout_height="100dp"
        android:orientation="horizontal">
        <EditText
            android:layout_width="0dp"
            android:layout_height="wrap_content"
            android:layout_weight="1"
            android:hint="請輸入..."/>
        <Button
            android:layout_width="wrap_content"
            android:layout_height="wrap_content"
            android:text="提交" />
    </LinearLayout>
</LinearLayout>
- orientation:horizontal(水平)/vertical(垂直),表示線性排列的方向。
- layout_width/layout_height:元素的寬度與高度
- layout_gravity:top/bottom/center/left/right/etc,表示當前元素相對父元素的對齊方式,多種對齊方式用“|”隔開,右上對齊:
top|right。- layout_weight:占據空間的比例,例如元素A和B,A設置為1,B設置為3, 元素A、B分別占空間的1/4、3/4,此時元素寬度不由layout_width決定,設置為
0dp是比較規范的寫法。- layout_weight 若元素A設置為1,元素B不設置,將layout_width設置為具體的值或wrap_content,那麼元素B的寬度由layout_width決定,元素A將占滿屏幕剩下的空間。
<LinearLayout ...>
    <RelativeLayout xmlns:android="http://schemas.android.com/apk/res/android"
        android:layout_width="match_parent"
        android:layout_height="300dp">
        <Button
            android:layout_width="wrap_content"
            android:layout_height="wrap_content"
            android:layout_alignParentLeft="true"
            android:layout_alignParentBottom="true"
            android:text="我在左下"/>
        <Button
            android:layout_width="wrap_content"
            android:layout_height="wrap_content"
            android:layout_centerInParent="true"
            android:text="我在中間"/>
        <Button
            android:layout_width="wrap_content"
            android:layout_height="wrap_content"
            android:layout_alignParentRight="true"
            android:layout_alignParentTop="true"
            android:text="我在右上"/>
    </RelativeLayout>

    <RelativeLayout xmlns:android="http://schemas.android.com/apk/res/android"
        android:layout_width="match_parent"
        android:layout_height="300dp">
        <Button
            android:id="@+id/button_2"
            android:layout_width="wrap_content"
            android:layout_height="wrap_content"
            android:layout_centerInParent="true"
            android:text="參照按鈕"/>
        <Button
            android:layout_width="wrap_content"
            android:layout_height="wrap_content"
            android:layout_above="@id/button_2"
            android:layout_toRightOf="@id/button_2"
            android:text="我在右上"/>
        <Button
            android:layout_width="wrap_content"
            android:layout_height="wrap_content"
            android:layout_below="@id/button_2"
            android:layout_toLeftOf="@id/button_2"
            android:text="我在左下"/>
    </RelativeLayout>
</LinearLayout>
以下屬性值為true/false
- layout_centerHorizontal/layout_centerVertical: 水平居中、垂直居中
- layout_centerInparent: 相對父元素垂直&水平居中
- layout_alignParentBottom: 元素下邊界和父元素下邊界對齊
- layout_alignParentLeft: 左邊界對齊
- layout_alignParentRight: 右邊界對齊
- layout_alignParentTop: 上邊界對齊
以下屬性值為控件id
- layout_above/layout_below: 在某元素的上方/下方
- layout_toLeftOf/layout_toRightOf: 在某元素的左方/右方
- layout_alignTop/layout_alignBottom: 元素上(下)邊界與某元素上(下)邊界對齊
- layout_alignLeft/layout_alignRight: 左(右)邊界對齊
所有元素都放置在布局的左上角
<FrameLayout xmlns:android="http://schemas.android.com/apk/res/android"
    android:layout_width="match_parent"
    android:layout_height="match_parent">

    <Button
        android:layout_width="wrap_content"
        android:layout_height="wrap_content"
        android:text="我是一個按鈕"/>
    <TextView
        android:layout_width="wrap_content"
        android:layout_height="wrap_content"
        android:text="我是一個輸入框"/>
</FrameLayout><TableLayout xmlns:android="http://schemas.android.com/apk/res/android"
android:layout_width="match_parent"
android:layout_height="match_parent">
<TableRow>
<TextView
android:layout_height="wrap_content"
android:text="郵箱"/>
<EditText
android:layout_height="wrap_content"
android:inputType="textEmailAddress"
android:hint="請輸入您的郵箱" />
</TableRow>
<TableRow>
<TextView
android:layout_height="wrap_content"
android:text="密碼"/>
<EditText
android:layout_height="wrap_content"
android:inputType="textPassword"
android:hint="請輸入密碼" />
</TableRow>
<TableRow>
<Button
android:layout_height="wrap_content"
android:layout_span="2"
android:text="注冊" />
</TableRow>
</TableLayout><TableLayout xmlns:android="http://schemas.android.com/apk/res/android"
android:layout_width="match_parent"
android:layout_height="match_parent"
android:stretchColumns="1">
...
</TableLayout>
- TableRow: 代表表格布局的一行,行內一個元素代表一列。
- layout_span: 合並單元格,設置為2,代表該元素占據2列空間。
- stretchColumns: TableRow中無法指定空間寬度,那麼需要用到該屬性,設置為1,表示拉伸第2列(0為第1列)與屏幕一樣寬,效果如TableLayout的第二張圖。
Android中,布局下可以放置控件,也可以放置子布局。如果子布局內容較為獨立且經常使用,例如標題欄,或者布局比較復雜,這時候可以考慮使用自定義布局的形式導入。方法很簡單。
example.xml<LinearLayout xmlns:android="http://schemas.android.com/apk/res/android"
android:orientation="vertical"
android:layout_width="match_parent"
android:layout_height="match_parent">
<include layout="@layout/example"/>
</LinearLayout>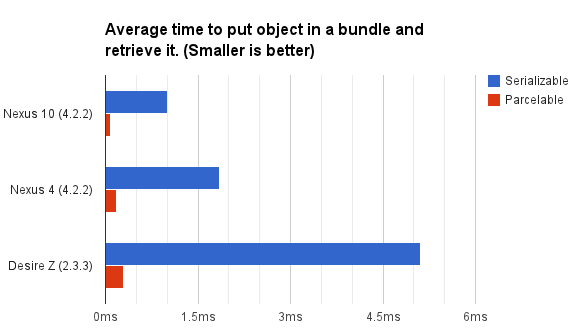 Android序列化之Serializable和Parcelable
PS:還有幾天就開學了.先來一發. 學習內容:1.序列化的目的2.Android中序列化的兩種方式3.Parcelable與Serializable的性能比較4
 Android開發的那些坑和小技巧
1、android:clipToPadding意思是控件的繪制區域是否在padding裡面。默認為true。如果你設置了此屬性值為false,就能實現一個在布局上事半功陪
 java/android線程池詳解
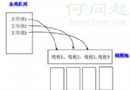
一,簡述線程池:線程池是如何工作的:一系列任務出現後,根據自己的線程池安排任務進行。如圖: 線程池的好處:重用線程池中的線程,避免因為線程的創建和銷毀所帶來的性能開銷。能
 Android Studio 單元測試
單元測試(unit testing),是指對軟件中的最小可測試單元進行檢查和驗證。 針對Android開發,目前網上有很多在Eclipse環境下進行單元測試的教程,然而