編輯:中級開發
(2) RelativeLayout
相對布局,它是依靠與父容器,同一容器中其它控件的相對位置來排列顯示的。主要常用的屬性如下:
相對父容器的屬性:
android:layout_alignParentTop: 控件的頂部與父容器的頂部對齊,類似的幾個屬性從名字可以看出它們的作用:android:layout_alignParentBottom, android:layout_alignParentLeft, android:layout_alignParentRight.
相對同一容器中其它控件的屬性:
android:layout_above: 表示此控件在另一控件的上面,類似的還有android:layout_below, android:layout_toLeftOf, android:layout_toRightOf.
android:layout_alignTop: 表示此控件與另一控件頂部對齊,類似的還有android:layout_alignBottom, android:layout_alignLeft, android:layout_alignRight.
既然是相對於另一個控件,就必須在定義這控件時候指定是哪個控件,如控件A的ID為@+id/widget_a, 控件B若要在控件A下面可以這樣設置android:layout_below="@id/widget_a"。
來看一下官方的一個Demo:
vIEw source
< id="highlighter_157329_clipboard" title="copy to clipboard" classid="clsid:d27cdb6e-ae6d-11cf-96b8-444553540000" width="16" height="16" codebase="http://download.Macromedia.com/pub/shockwave/cabs/flash/swflash.cab#version=9,0,0,0" type="application/x-shockwave-Flash"> print?
01 <RelativeLayout XMLns:android="http://schemas.android.com/apk/res/android"
02 android:layout_width="fill_parent" android:layout_height="fill_parent">
03 <TextVIEw android:id="@+id/label" android:layout_width="fill_parent"
04 android:layout_height="wrap_content" android:text="Type here:" />
05 <EditText android:id="@+id/entry" android:layout_width="fill_parent"
06 android:layout_height="wrap_content" android:background="@android:drawable/editbox_background"
07 android:layout_below="@id/label" />
08 <Button android:id="@+id/ok" android:layout_width="wrap_content"
09 android:layout_height="wrap_content" android:layout_below="@id/entry"
10 android:layout_alignParentRight="true" android:layout_marginLeft="10dip"
11 android:text="OK" />
12 <Button android:layout_width="wrap_content"
13 android:layout_height="wrap_content" android:layout_toLeftOf="@id/ok"
14 android:layout_alignTop="@id/ok" android:text="Cancel" />
15 </RelativeLayout>
運行效果如下:

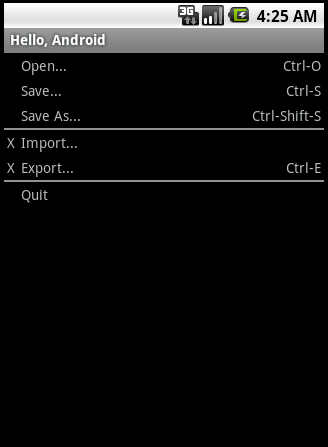
(3) TableLayout
表格布局,類似於HTML的Table和Silverlight的Grid。通過TableRow來定義一行,如果一個控件占用多列可以設置android:layout_span, 類似於Html的colspan。默認情況下一個控件是按順序放置在每一列的(column 0, column 1….), 也可以通過android:layout_column指定放在哪一列。如果一列內容過長或者過短,可以通過android:stretchColumns和android:shrinkColumns來增加或者減少此列的寬度。
來看一下官方的一個Demo:
vIEw source
< id="highlighter_952325_clipboard" title="copy to clipboard" classid="clsid:d27cdb6e-ae6d-11cf-96b8-444553540000" width="16" height="16" codebase="http://download.Macromedia.com/pub/shockwave/cabs/flash/swflash.cab#version=9,0,0,0" type="application/x-shockwave-Flash"> print?
01 <TableLayout XMLns:android="http://schemas.android.com/apk/res/android"
02 android:layout_width="fill_parent" android:layout_height="fill_parent"
03 android:stretchColumns="1">
04 <TableRow>
05 <TextVIEw android:layout_column="1" android:text="Open..."
06 android:padding="3dip" />
07 <TextVIEw android:text="Ctrl-O" android:gravity="right"
08 android:padding="3dip" />
09 </TableRow>
10 <TableRow>
11 <TextVIEw android:layout_column="1" android:text="Save..."
12 android:padding="3dip" />
13 <TextVIEw android:text="Ctrl-S" android:gravity="right"
14 android:padding="3dip" />
15 </TableRow>
16 <TableRow>
17 <TextVIEw android:layout_column="1" android:text="Save As..."
18 android:padding="3dip" />
19 <TextVIEw android:text="Ctrl-Shift-S" android:gravity="right"
20 android:padding="3dip" />
21 </TableRow>
22 <VIEw android:layout_height="2dip" android:background="#FF909090" />
23 <TableRow>
24 <TextVIEw android:text="X" android:padding="3dip" />
25 <TextVIEw android:text="Import..." android:padding="3dip" />
26 </TableRow>
27 <TableRow>
28 <TextVIEw android:text="X" android:padding="3dip" />
29 <TextVIEw android:text="Export..." android:padding="3dip" />
30 <TextVIEw android:text="Ctrl-E" android:gravity="right"
31 android:padding="3dip" />
32 </TableRow>
33 <VIEw android:layout_height="2dip" android:background="#FF909090" />
34 <TableRow>
35 <TextVIEw android:layout_column="1" android:text="Quit"
36 android:padding="3dip" />
37 </TableRow>
38 </TableLayout>
這個表格有三列,通過設置android:stretchColumns="1"來增加了第二列的寬度。運行效果如下:
參考書籍:Beginning Android 2 和android官方文檔
本文來自CSDN博客,轉載請標明出處:http://blog.csdn.Net/titidaxia/archive/2010/11/12/6005747.ASPx
 使用混合應用程序編程模型為 WebSphere Commerce 構建移動應用程序(2)
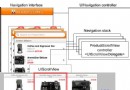
可翻頁的產品細節屏幕為增強產品細節屏幕的可用性,我們定義了一個自定義視圖控制器(ProductScrollVIEwController 類)來支持用戶通過翻頁
 Android學習之使用 HTML 5 開發新的可視化 UI 特性
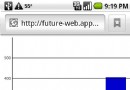
簡介: HTML 5 針對移動 Web 應用程序引入了大量新特性,其中包括一些可視化特性,它們通常會帶來強烈的視覺沖擊。Canvas 是最引人注目的新 UI
 使用 Android 和 XML 構建動態用戶界面(一)
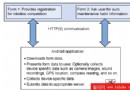
簡介: 有幾個網站從事一些非盈利服務,提供一些可輕松設置和使用的表單來進行民意測驗和數據收集。本教程介紹一個簡單的架構來為 android 設計類似的應用程
 ListView的右邊滾動滑塊啟用方法
很多開發者不知道ListVIEw列表控件的快速滾動滑塊是如何啟用的,這裡android開發網告訴大家,輔助滾動滑塊只需要一行代碼就可以搞定,如果你使用XML布局只需要在