安卓應用的界面編程(2),安卓應用界面編程
第一組UI組件:布局管理器(以ViewGroup為基類派生的布局管理器)
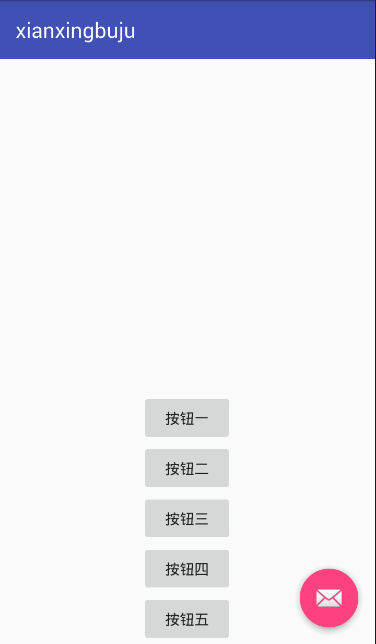
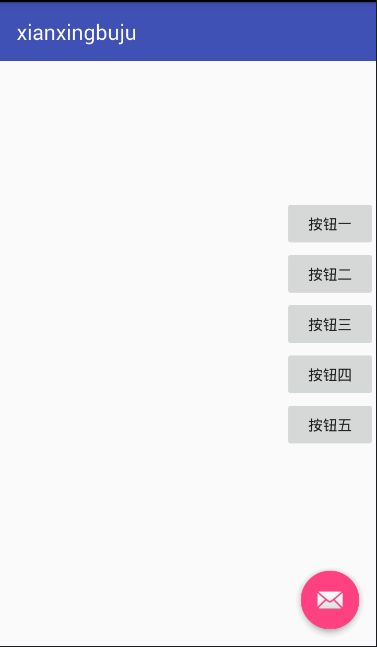
1.線性布局 LinearLayout類

![]()
1 <LinearLayout xmlns:android="http://schemas.android.com/apk/res/android"
2 android:orientation="vertical"
3 android:layout_width="match_parent"
4 android:layout_height="match_parent"
5 android:gravity="bottom|center_horizontal">
6 <Button
7 android:id="@+id/bn1"
8 android:layout_width="wrap_content"
9 android:layout_height="wrap_content"
10 android:text="按鈕一"/>
11 <Button
12 android:id="@+id/bn2"
13 android:layout_width="wrap_content"
14 android:layout_height="wrap_content"
15 android:text="按鈕二"/>
16 <Button
17 android:id="@+id/bn3"
18 android:layout_width="wrap_content"
19 android:layout_height="wrap_content"
20 android:text="按鈕三"/>
21 <Button
22 android:id="@+id/bn4"
23 android:layout_width="wrap_content"
24 android:layout_height="wrap_content"
25 android:text="按鈕四"/>
26 <Button
27 android:id="@+id/bn5"
28 android:layout_width="wrap_content"
29 android:layout_height="wrap_content"
30 android:text="@string/bn5"/>
31 </LinearLayout>
View Code
效果圖如下
如果將android:gravity="bottom|center_horizontal"改為android:gravity="right|center_vertical",效果圖如下
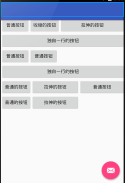
2.表格布局 TableLayout(繼承自LinearLayout,本質是線性布局管理器,采用行列形式管理UI組件)
單元格的三種行為方式Shrinkable/Stretchable/Collapsed見名知意分別為可收縮/可拉伸/被隱藏
下面是一個范例
![]()
1 <LinearLayout xmlns:android="http://schemas.android.com/apk/res/android"
2 android:orientation="vertical"
3 android:layout_width="match_parent"
4 android:layout_height="match_parent">
5 <!-- 定義第一個表格布局,指定第二列允許收縮,第三列允許拉伸 -->
6 <TableLayout
7 android:id="@+id/TableLayout01"
8 android:layout_width="match_parent"
9 android:layout_height="wrap_content"
10 android:shrinkColumns="1"
11 android:stretchColumns="2">
12 <!-- 直接添加按鈕,它自己會占一行 -->
13 <Button
14 android:id="@+id/ok1"
15 android:layout_width="wrap_content"
16 android:layout_height="wrap_content"
17 android:text="獨自一行的按鈕"/>
18 <!-- 添加一個表格行 -->
19 <TableRow>
20 <!-- 為該表格行添加3個按鈕 -->
21 <Button
22 android:id="@+id/ok2"
23 android:layout_height="wrap_content"
24 android:layout_width="wrap_content"
25 android:text="普通按鈕"/>
26 <Button
27 android:id="@+id/ok3"
28 android:layout_height="wrap_content"
29 android:layout_width="wrap_content"
30 android:text="收縮的按鈕"/>
31 <Button
32 android:id="@+id/ok4"
33 android:layout_height="wrap_content"
34 android:layout_width="wrap_content"
35 android:text="拉伸的按鈕"/>
36 </TableRow>
37 </TableLayout>
38 <!-- 定義第二個表格布局,指定第二列隱藏-->
39 <TableLayout
40 android:id="@+id/TableLayout02"
41 android:layout_width="match_parent"
42 android:layout_height="wrap_content"
43 android:collapseColumns="1">
44 <Button
45 android:id="@+id/ok5"
46 android:layout_height="wrap_content"
47 android:layout_width="wrap_content"
48 android:text="獨自一行的按鈕"/>
49 <TableRow>
50 <Button
51 android:id="@+id/ok6"
52 android:layout_height="wrap_content"
53 android:layout_width="wrap_content"
54 android:text="普通按鈕"/>
55 <Button
56 android:id="@+id/ok7"
57 android:layout_height="wrap_content"
58 android:layout_width="wrap_content"
59 android:text="普通按鈕"/>
60 <Button
61 android:id="@+id/ok8"
62 android:layout_height="wrap_content"
63 android:layout_width="wrap_content"
64 android:text="普通按鈕"/>
65 </TableRow>
66 </TableLayout>
67 <!-- 定義第三個表格布局,指定第二列和第三列可以被拉伸-->
68 <TableLayout
69 android:id="@+id/TableLayout03"
70 android:layout_width="match_parent"
71 android:layout_height="wrap_content"
72 android:stretchColumns="1,2">
73 <Button
74 android:id="@+id/ok9"
75 android:layout_height="wrap_content"
76 android:layout_width="wrap_content"
77 android:text="獨自一行的按鈕"/>
78 <TableRow>
79 <Button
80 android:id="@+id/ok10"
81 android:layout_height="wrap_content"
82 android:layout_width="wrap_content"
83 android:text="普通的按鈕"/>
84 <Button
85 android:id="@+id/ok11"
86 android:layout_height="wrap_content"
87 android:layout_width="wrap_content"
88 android:text="拉伸的按鈕"/>
89 <Button
90 android:id="@+id/ok12"
91 android:layout_height="wrap_content"
92 android:layout_width="wrap_content"
93 android:text="普通按鈕"/>
94 </TableRow>
95 <TableRow>
96 <Button
97 android:id="@+id/ok13"
98 android:layout_height="wrap_content"
99 android:layout_width="wrap_content"
100 android:text="普通的按鈕"/>
101 <Button
102 android:id="@+id/ok14"
103 android:layout_height="wrap_content"
104 android:layout_width="wrap_content"
105 android:text="拉伸的按鈕"/>
106 </TableRow>
107 </TableLayout>
108 </LinearLayout>
View Code
效果圖如下,第一行不見了,具體原因我感覺是被藍條遮住了,後期學到再進行修改。
3.幀布局 FrameLayout
幀布局容器為每個加入其中的組件創建一個空白的區域(稱為一幀),每個子組件占據一幀,這些幀會根據gravity屬性執行自動對齊
下面的例子示范了用法,上面的TextView遮住下面的TextView,後添加的遮住先添加的
![]()
1 <FrameLayout xmlns:android="http://schemas.android.com/apk/res/android"
2 android:layout_width="match_parent"
3 android:layout_height="match_parent">
4 <!-- 依次定義6個TextView,先定義的TextView位於底層,後定義的TextView位於上層-->
5 <TextView
6 android:id="@+id/view01"
7 android:layout_width="wrap_content"
8 android:layout_height="wrap_content"
9 android:layout_gravity="center"
10 android:width="320pt"
11 android:height="320pt"
12 android:background="#0ff"/>
13 <TextView
14 android:id="@+id/view02"
15 android:layout_width="wrap_content"
16 android:layout_height="wrap_content"
17 android:layout_gravity="center"
18 android:width="280pt"
19 android:height="280pt"
20 android:background="#0f0"/>
21 <TextView
22 android:id="@+id/view03"
23 android:layout_width="wrap_content"
24 android:layout_height="wrap_content"
25 android:layout_gravity="center"
26 android:width="240pt"
27 android:height="240pt"
28 android:background="#00f"/>
29 <TextView
30 android:id="@+id/view04"
31 android:layout_width="wrap_content"
32 android:layout_height="wrap_content"
33 android:layout_gravity="center"
34 android:width="200pt"
35 android:height="200pt"
36 android:background="#ff0"/>
37 <TextView
38 android:id="@+id/view05"
39 android:layout_width="wrap_content"
40 android:layout_height="wrap_content"
41 android:layout_gravity="center"
42 android:width="160pt"
43 android:height="160pt"
44 android:background="#f0f"/>
45 <TextView
46 android:id="@+id/view06"
47 android:layout_width="wrap_content"
48 android:layout_height="wrap_content"
49 android:layout_gravity="center"
50 android:width="120pt"
51 android:height="120pt"
52 android:background="#0ff"/>
53 </FrameLayout>
View Code
效果圖如下

如果在程序中啟動一個線程來控制周期性地改變這6個TextView的背景色,可以實現鄉村殺馬特非主流霓虹燈效果,源碼如下,具體效果自行腦補。。精神污染
![]()
1 public class FrameLayout extends AppCompatActivity {
2 private int currentColor = 0;
3 //定義一個顏色數組
4 final int[] colors = new int[]{
5 R.color.color1,
6 R.color.color2,
7 R.color.color3,
8 R.color.color4,
9 R.color.color5,
10 R.color.color6
11 };
12 public final int[] names = new int[]{
13 R.id.view01,
14 R.id.view02,
15 R.id.view03,
16 R.id.view04,
17 R.id.view05,
18 R.id.view06
19 };
20 TextView[] views = new TextView[names.length];
21 Handler handler = new Handler()
22 {
23 @Override
24 public void handleMessage(Message msg) {
25 //表明消息來自本程序所發送的
26 if (msg.what == 0x123) {
27 for (int i = 0; i < names.length; i++) {
28 views[i].setBackgroundResource(colors[(i + currentColor) % names.length]);
29 }
30 currentColor++;
31 }
32 super.handleMessage(msg);
33 }
34 };
35 /**
36 * ATTENTION: This was auto-generated to implement the App Indexing API.
37 * See https://g.co/AppIndexing/AndroidStudio for more information.
38 */
39 private GoogleApiClient client;
40
41 @Override
42 protected void onCreate(Bundle savedInstanceState) {
43 super.onCreate(savedInstanceState);
44 setContentView(R.layout.activity_frame_layout);
45 for (int i = 0; i < names.length; i++) {
46 views[i] = (TextView) findViewById(names[i]);
47 }
48 //定義一個線程周期性地改變currentColor變量值
49 new Timer().schedule(new TimerTask() {
50 @Override
51 public void run() {
52 //發送一條空消息通知系統改變6個TextView組件的背景色
53 handler.sendEmptyMessage(0x123);
54 }
55 }, 0, 200);
56 }
57 }
View Code
4.相對布局
相對布局容器內子組件的位置總是相對兄弟組件/父容器來決定。下面是梅花布局的效果。。
![]()
1 <RelativeLayout
2 xmlns:android="http://schemas.android.com/apk/res/android"
3 android:layout_width="match_parent"
4 android:layout_height="match_parent">
5 <!-- 定義該組件位於父容器中間 -->
6 <TextView
7 android:id="@+id/view01"
8 android:layout_width="wrap_content"
9 android:layout_height="wrap_content"
10 android:background="@drawable/moxing"
11 android:layout_centerInParent="true"/>
12 <!-- 定義該組件位於view01組件的上方 -->
13 <TextView
14 android:id="@+id/view02"
15 android:layout_width="wrap_content"
16 android:layout_height="wrap_content"
17 android:background="@drawable/moxing"
18 android:layout_above="@+id/view01"
19 android:layout_alignLeft="@+id/view01"/>
20 <!-- 定義該組件尾魚view01組件的下方-->
21 <TextView
22 android:id="@+id/view03"
23 android:layout_width="wrap_content"
24 android:layout_height="wrap_content"
25 android:background="@drawable/moxing"
26 android:layout_below="@+id/view01"
27 android:layout_alignLeft="@+id/view01"/>
28 <!-- 定義該組件尾魚view01組件的左邊-->
29 <TextView
30 android:id="@+id/view04"
31 android:layout_width="wrap_content"
32 android:layout_height="wrap_content"
33 android:background="@drawable/moxing"
34 android:layout_toLeftOf="@+id/view01"
35 android:layout_alignTop="@+id/view01"/>
36 <!-- 定義該組件尾魚view01組件的右邊-->
37 <TextView
38 android:id="@+id/view05"
39 android:layout_width="wrap_content"
40 android:layout_height="wrap_content"
41 android:background="@drawable/moxing"
42 android:layout_toRightOf="@+id/view01"
43 android:layout_alignTop="@+id/view01"/>
44 </RelativeLayout>
View Code

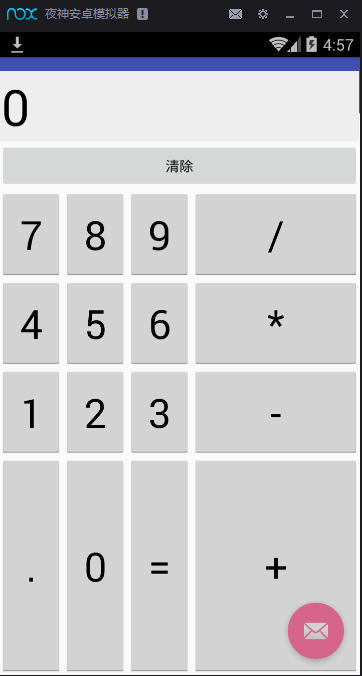
5.網格布局 GridLayout(4.0版本後才能使用)
下面是一個計算器界面
首先在布局管理器中定義一個GridLayout,並在該GridLayout中依次定義文本框/按鈕,該文本框/按鈕各橫跨4列。
![]()
1 <GridLayout
2 xmlns:android="http://schemas.android.com/apk/res/android"
3 android:layout_width="match_parent"
4 android:layout_height="match_parent"
5 android:rowCount="6"
6 android:columnCount="4"
7 android:id="@+id/root">
8 <!-- 定義一個橫跨4列的文本框,並設置該文本框的前景色/背景色等屬性 -->
9 <TextView
10 android:layout_width="match_parent"
11 android:layout_height="wrap_content"
12 android:layout_columnSpan="4"
13 android:textSize="50sp"
14 android:layout_marginTop="28pt"
15 android:layout_marginLeft="2pt"
16 android:layout_marginRight="2pt"
17 android:padding="3pt"
18 android:layout_gravity="right"
19 android:background="#eee"
20 android:textColor="#000"
21 android:text="0"/>
22 <!-- 定義一個橫跨4列的按鈕 -->
23 <Button
24 android:layout_width="match_parent"
25 android:layout_height="wrap_content"
26 android:layout_columnSpan="4"
27 android:text="清除"/>
28 </GridLayout>
View Code
然後再java代碼中采用循環控制添加16個按鈕
![]()
1 public class GridLayout_index extends AppCompatActivity {
2 GridLayout gridLayout;
3 //定義16個按鈕的文本
4 String[] chars=new String[]
5 {
6 "7","8","9","/",
7 "4","5","6","*",
8 "1","2","3","-",
9 ".","0","=","+"
10 };
11 @Override
12 protected void onCreate(Bundle savedInstanceState) {
13 super.onCreate(savedInstanceState);
14 setContentView(R.layout.activity_grid_layout_index);
15 gridLayout=(GridLayout)findViewById(R.id.root);
16 for(int i=0;i<chars.length;i++)
17 {
18 Button bn=new Button(this);
19 bn.setText(chars[i]);
20 //設置該按鈕的字號大小
21 bn.setTextSize(40);
22 //設置按鈕四周的空白區域
23 bn.setPadding(5,35,5,35);
24 //指定該組件所在的行
25 GridLayout.Spec rowSpec=GridLayout.spec(i/4+2);
26 //指定該組件所在的列
27 GridLayout.Spec columnSpec=GridLayout.spec(i/4);
28 GridLayout.LayoutParams params=new GridLayout.LayoutParams(rowSpec,columnSpec);
29 //指定該組件占滿父容器
30 params.setGravity(Gravity.FILL);
31 gridLayout.addView(bn,params);
32 }
33 }
34 }
View Code
效果圖如下,我承認丑哭了
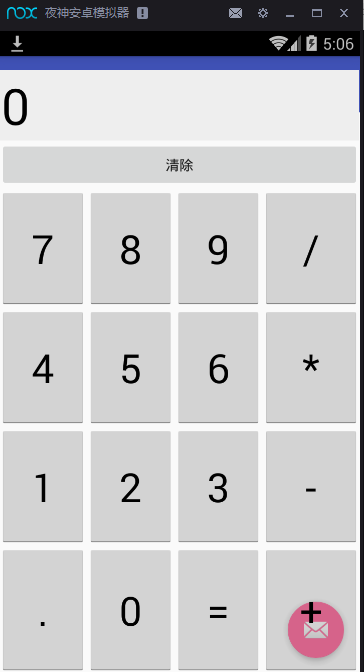
所以我改了參數,感覺以後這個地方得用一個全能的辦法阿。。不然不同的手機不同的分辨率都歪掉了---
bn.setPadding(65,65,65,65);
新的效果圖,依舊丑但是整齊了。。。
6.絕對布局
因為手機的屏幕大小/分辨率存在較大差異,絕對布局不是一個好思路,我就跳過了
下一篇是第二組UI組件:TextView及其子類(我看的是瘋狂Android講義,李剛老師的)
 Android學習指南之十六:Android菜單詳解
 android:Activity數據傳遞之全局對象(application)
 我的Android進階之旅之Android自定義View來實現解析lrc歌詞同步滾動、上下拖動、縮放歌詞等功能
 安卓圖片滑動,實現帶小點的導航頁面效果,安卓小點