編輯:關於android開發
相關文章
Android View體系(一)視圖坐標系
Android View體系(二)實現View滑動的六種方法
Android View體系(三)屬性動畫
Android View體系(四)從源碼解析Scroller
Android View體系(五)從源碼解析View的事件分發機制
本來這篇是要講View的工作流程的,View的工作流程主要指的measure、layout、draw這三大流程,在講到這三大流程之前我們有必要要先了解下Activity的構成,所以就有了這篇文章。
當我們寫Activity時會調用setContentView()方法,來加載布局,來看看setContentView()方法是怎麼實現的(Activity.java):
public void setContentView(@LayoutRes int layoutResID) {
        getWindow().setContentView(layoutResID);
        initWindowDecorActionBar();
    }
這裡調用了getWindow().setContentView(layoutResID),getWindow()指的是什麼呢?接著往下看,getWindow()返回mWindow:
    public Window getWindow() {
        return mWindow;
    }
在Activity的attach()方法發現mWindow:
  final void attach(Context context, ActivityThread aThread,
            Instrumentation instr, IBinder token, int ident,
            Application application, Intent intent, ActivityInfo info,
            CharSequence title, Activity parent, String id,
            NonConfigurationInstances lastNonConfigurationInstances,
            Configuration config, String referrer, IVoiceInteractor voiceInteractor) {
        attachBaseContext(context);

        mFragments.attachHost(null /*parent*/);

        mWindow = new PhoneWindow(this);
...省略
}
原來mWindow指的就是PhoneWindow,PhoneWindow是繼承抽象類Window的,這樣就知道getWindow()得到的是一個PhoneWindow,我們來看看PhoneWindow.java的setContentView()方法(PhoneWindow.java):
 @Override
    public void setContentView(View view, ViewGroup.LayoutParams params) {
        // Note: FEATURE_CONTENT_TRANSITIONS may be set in the process of installing the window
        // decor, when theme attributes and the like are crystalized. Do not check the feature
        // before this happens.
        if (mContentParent == null) {
            installDecor();
        } else if (!hasFeature(FEATURE_CONTENT_TRANSITIONS)) {
            mContentParent.removeAllViews();
        }

        if (hasFeature(FEATURE_CONTENT_TRANSITIONS)) {
            view.setLayoutParams(params);
            final Scene newScene = new Scene(mContentParent, view);
            transitionTo(newScene);
        } else {
            mContentParent.addView(view, params);
        }
        final Callback cb = getCallback();
        if (cb != null && !isDestroyed()) {
            cb.onContentChanged();
        }
    }
在第5行看到了 installDecor()方法,來看看這個方法裡寫了什麼:
 if (mDecor == null) {
            mDecor = generateDecor();
            mDecor.setDescendantFocusability(ViewGroup.FOCUS_AFTER_DESCENDANTS);
            mDecor.setIsRootNamespace(true);
            if (!mInvalidatePanelMenuPosted && mInvalidatePanelMenuFeatures != 0) {
                mDecor.postOnAnimation(mInvalidatePanelMenuRunnable);
            }
        }
        if (mContentParent == null) {
            mContentParent = generateLayout(mDecor);
        }
        ...省略
  }
  ...省略
 }
再接著追蹤看看generateDecor()方法裡寫了什麼:
   protected DecorView generateDecor() {
        return new DecorView(getContext(), -1);
    }
這裡創建了一個DecorView,這個DecorView就是Activity中的根View。接著查看DecorView的源碼,發現DecorView是PhoneWindow類的內部類,並且繼承FrameLayout。我們再來看看第10行generateLayout()方法:
 protected ViewGroup generateLayout(DecorView decor) {
...省略
        //根據不同的情況加載不同的布局給layoutResource
        int layoutResource;
        int features = getLocalFeatures();
        // System.out.println("Features: 0x" + Integer.toHexString(features));
        if ((features & ((1 << FEATURE_LEFT_ICON) | (1 << FEATURE_RIGHT_ICON))) != 0) {
            if (mIsFloating) {
                TypedValue res = new TypedValue();
                getContext().getTheme().resolveAttribute(
                        com.android.internal.R.attr.dialogTitleIconsDecorLayout, res, true);
                layoutResource = res.resourceId;
            } else {
                layoutResource = com.android.internal.R.layout.screen_title_icons;
            }
            // XXX Remove this once action bar supports these features.
            removeFeature(FEATURE_ACTION_BAR);
            // System.out.println("Title Icons!");
        } else if ((features & ((1 << FEATURE_PROGRESS) | (1 << FEATURE_INDETERMINATE_PROGRESS))) != 0
                && (features & (1 << FEATURE_ACTION_BAR)) == 0) {
            // Special case for a window with only a progress bar (and title).
            // XXX Need to have a no-title version of embedded windows.
            layoutResource = com.android.internal.R.layout.screen_progress;
            // System.out.println("Progress!");
        } else if ((features & (1 << FEATURE_CUSTOM_TITLE)) != 0) {
            // Special case for a window with a custom title.
            // If the window is floating, we need a dialog layout
            if (mIsFloating) {
                TypedValue res = new TypedValue();
                getContext().getTheme().resolveAttribute(
                        com.android.internal.R.attr.dialogCustomTitleDecorLayout, res, true);
                layoutResource = res.resourceId;
            } else {
                layoutResource = com.android.internal.R.layout.screen_custom_title;
            }
            // XXX Remove this once action bar supports these features.
            removeFeature(FEATURE_ACTION_BAR);
...省略

 mDecor.startChanging();
        //將layoutResource加載到View中並添加到DecorView中
        View in = mLayoutInflater.inflate(layoutResource, null);
        decor.addView(in, new ViewGroup.LayoutParams(MATCH_PARENT, MATCH_PARENT));
...省略

}
第42行加載layoutResource的布局,來看看其中的一種布局R.layout.screen_title,這個文件在frameworks\base\core\res\res\layout目錄中(screen_title.xml)
<code class=" hljs xml"><linearlayout xmlns:android="http://schemas.android.com/apk/res/android" android:orientation="vertical" android:fitssystemwindows="true">
    <!--{cke_protected}{C}%3C!%2D%2D%20Popout%20bar%20for%20action%20modes%20%2D%2D%3E-->
    <viewstub android:id="@+id/action_mode_bar_stub" android:inflatedid="@+id/action_mode_bar" android:layout="@layout/action_mode_bar" android:layout_width="match_parent" android:layout_height="wrap_content" android:theme="?attr/actionBarTheme">
    <framelayout android:layout_width="match_parent" android:layout_height="?android:attr/windowTitleSize">
        <textview android:id="@android:id/title" android:background="@null" android:fadingedge="horizontal" android:gravity="center_vertical" android:layout_width="match_parent" android:layout_height="match_parent">
    </textview></framelayout>
    <framelayout android:id="@android:id/content" android:layout_width="match_parent" android:layout_height="0dip" android:layout_weight="1" android:foregroundgravity="fill_horizontal|top" android:foreground="?android:attr/windowContentOverlay">
</framelayout></viewstub></linearlayout></code>
上面的ViewStub是用來顯示ActionBar的,下面的兩個FrameLayout,一個是title用來顯示標題,一個是content用來顯示內容。
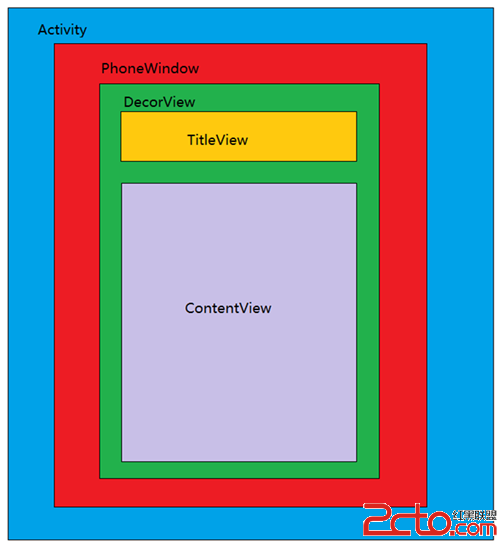
看到如上的源碼大家就知道了一個Activity包含一個window對象,這個對象是由PhoneWindow來實現的,PhoneWindow將DecorView做為整個應用窗口的根View,而這個DecorView又將屏幕劃分為兩個區域一個是TitleView一個是ContentView,而我們平常做應用所寫的布局正是展示在ContentView中的。
 Android開發自學筆記(Android Studio)—4.3ImageView及其子類,androidstudio自學
Android開發自學筆記(Android Studio)—4.3ImageView及其子類,androidstudio自學一、引言 ImageView繼承自View組件
 android重復的文件復制APK META-INF許可證錯誤記錄,apkmeta-inf
android重復的文件復制APK META-INF許可證錯誤記錄,apkmeta-inf* What went wrong:Execution failed for t
 Android,androidsdk
Android,androidsdk續上一篇博客《Android -- 桌面懸浮,仿360》,傳送門:http://www.cnblogs.com/yydcdut/p/3
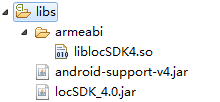
 高仿餓了麼應用項目源碼,高仿餓項目源碼
高仿餓了麼應用項目源碼,高仿餓項目源碼 高仿餓了麼界面效果,動畫效果還是不錯滴,分享給大家一下。 源碼下載:http://code.662p.com/list/11