android復合控件,android復合
一.復合控件TopBar
創建復合控件可以很好地創建出具有重用功能的控件集合。比如TopBar。
做法:一般需要繼承ViewGroup,再給它添加指定功能的控件。
以TopBar為例:
1.自定義屬性
在values目錄下創建attrs.xml文件,在該文件中定義相關的屬性即可。
<?xml version="1.0" encoding="utf-8"?>
<resources>
<declare-styleable name="TopBar">
<!--<attr name="android:title"/>-->
<attr name="title1" format="string" />
<attr name="titleTextSize1" format="dimension" />
<attr name="titleTextColor1" format="color" />
<attr name="leftTextColor" format="color" />
<attr name="leftBackground" format="reference|color" />
<attr name="leftText" format="string" />
<attr name="rightTextColor" format="color" />
<attr name="rightBackground" format="reference|color" />
<attr name="rightText" format="string" />
</declare-styleable>
</resources>
遇到的問題:
我在寫代碼的時候,開始是寫成<attr name="title" format="string" />;當我運行的時候會出現錯誤:Attribute "title" has already been defined。
後來我將所有的title,titleTextSize,titleTextColor都改成title1,titleTextSize1,titleTextColor1,就不會出錯了。
其實原因在於title等在系統中已經有了明確的語義定義了,也就是已經存在了。
我們也可以直接使用系統中已經定義好的屬性<attr name="android:title" />,記住不要寫format(判斷是自己申明的,還是直接使用系統的,就看format)。
2.創建自定義控件,這裡簡單點,只是繼承RelativeLayout,然後在構造方法中,寫如下代碼。這裡需要使用帶AttributeSet類型的構造方法,因為需要解析屬性。
//1.通過這個方法,將你在attrs.xml中定義的所有屬性的值存儲到TypedArray集合中。
TypedArray ta = context.obtainStyledAttributes(attrs, R.styleable.TopBar);
//2.從TypedArray中取出對應的值來為要設置的屬性賦值。
String mTitle = ta.getString(R.styleable.TopBar_title1);
float mTitleTextSize = ta.getDimension(R.styleable.TopBar_titleTextSize1, 10);
int mTitleTextColor = ta.getColor(R.styleable.TopBar_titleTextColor1, 0);
String mLeftText = ta.getString(R.styleable.TopBar_leftText);
Drawable mLeftBackground = ta.getDrawable(R.styleable.TopBar_leftBackground);
int mLeftTextColor = ta.getColor(R.styleable.TopBar_leftTextColor, 0);
String mRightText = ta.getString(R.styleable.TopBar_rightText);
Drawable mRightBackground = ta.getDrawable(R.styleable.TopBar_rightBackground);
int mRightTextColor = ta.getColor(R.styleable.TopBar_rightTextColor, 0);
//3.獲取完TypedArray的值後,調用recycle進行資源的回收,避免重新創建的時候的錯誤。
ta.recycle();
分析:
1.獲取存儲自定義屬性的TypedArray集合。
2.取出對應的屬性值,注意其類型。
3.資源回收,避免重新創建時出現錯誤。
3.動態添加控件(在TopBar中,需要左右Button,和一個TextView)
//1.創建需要的控件
mLeftButton = new Button(context);
mRightButton = new Button(context);
mTitleView = new TextView(context);
//2.為控件賦值(自定義的屬性)
mLeftButton.setText(mLeftText);
mLeftButton.setBackground(mLeftBackground);
mLeftButton.setTextColor(mLeftTextColor);
mRightButton.setText(mRightText);
mRightButton.setBackground(mRightBackground);
mRightButton.setTextColor(mRightTextColor);
mTitleView.setText(mTitle);
mTitleView.setTextSize(mTitleTextSize);
mTitleView.setTextColor(mTitleTextColor);
mTitleView.setGravity(Gravity.CENTER);
//3.設置布局
LayoutParams mLeftParams = new LayoutParams(LayoutParams.WRAP_CONTENT, LayoutParams.MATCH_PARENT);
mLeftParams.addRule(RelativeLayout.ALIGN_PARENT_LEFT, TRUE);
addView(mLeftButton, mLeftParams);
LayoutParams mRightParams = new LayoutParams(LayoutParams.WRAP_CONTENT,LayoutParams.MATCH_PARENT);
mRightParams.addRule(RelativeLayout.ALIGN_PARENT_RIGHT, TRUE);
addView(mRightButton, mRightParams);
LayoutParams mTitleParams = new LayoutParams(LayoutParams.WRAP_CONTENT,LayoutParams.MATCH_PARENT);
mTitleParams.addRule(RelativeLayout.CENTER_IN_PARENT,TRUE);;
addView(mTitleView, mTitleParams);
分析:
動態添加控件更加具有重用性,而不是僅僅寫在xml文件中。
1.創建控件實例
2.為控件設置自定義屬性
3.設置控件的布局參數(注意是RelativeLayout.LayoutParams)
4.添加控件到View中
4.在構造方法中實現左右按鈕的點擊事件,但是具體的邏輯不給出。因為想要做的是整個UI模板。所以具體的邏輯給調用者去寫。這裡也涉及到了接口回調。詳見接口回調。
接口回調的具體步驟(要去理解,而不是去死記硬背):
1.定義接口,抽象方法
2.定義接口對象,在要實現的地方調用方法
3.暴露一個公共方法給調用者使用
mLeftButton.setOnClickListener(new OnClickListener() {
@Override
public void onClick(View v) {
mListener.leftClick();
}
});
mRightButton.setOnClickListener(new OnClickListener() {
@Override
public void onClick(View v) {
mListener.rightClick();
}
});
5.實現接口回調的最後步驟
在調用者代碼中,實現上述接口,並且完成暴露出來的方法。具體要實現的邏輯由調用者決定。
topBar.setOnTopbarClickListener(new TopBar.topbarClickListener() {
@Override
public void leftClick() {
Toast.makeText(MainActivity.this,"點擊左邊按鈕",Toast.LENGTH_SHORT).show();
}
@Override
public void rightClick() {
Toast.makeText(MainActivity.this,"點擊右邊按鈕",Toast.LENGTH_SHORT).show();
}
});
6.引用UI模板
上述1~5點是完整的TopBar.java
1.在引用前,需要指定引用第三方控件的名字空間(xmlns---xmlnamespace)
xmlns:custom="http://schemas.android.com/apk/res-auto" custom就是命名空間,該名字可以隨便取
系統的引用:xmlns:android="http:schemas.android.com/apk/res/android"。現在明白了為什麼在創建xml文件的時候,總會有這句話了吧。
之後在XML文件中使用自定義屬性的時候,就可以通過這個名字空間來引用
<?xml version="1.0" encoding="utf-8"?>
<RelativeLayout xmlns:android="http://schemas.android.com/apk/res/android"
xmlns:custom="http://schemas.android.com/apk/res-auto"
android:layout_width="match_parent"
android:layout_height="match_parent">
<com.example.geyan.textviewdemo.TopBar
android:id="@+id/topbar"
android:layout_width="match_parent"
android:layout_height="40dp"
custom:leftBackground="#ffa4c161"
custom:leftText="Back"
custom:leftTextColor="#FFFFFF"
custom:rightBackground="#ffa4c161"
custom:rightText="More"
custom:rightTextColor="#FFFFFF"
custom:title1="自定義標題"
custom:titleTextColor1="#000000"
custom:titleTextSize1="8sp"></com.example.geyan.textviewdemo.TopBar>
</RelativeLayout>
分析:
最好不要寫到activity_main.xml文件中,創建一個xml文件寫入,是為了讓activity_main.xml文件看起來不會太復雜;而且很方便的可以在其他布局文件中引用。
從代碼中可以看出,使用自定義的View和系統原生的View最大區別在於申明控件時,需要指定完整的包名;而引用自定義屬性時,需要使用自定義的xmlns
2.在主布局文件中引用topbar.xml即可
<include layout="@layout/topbar" />
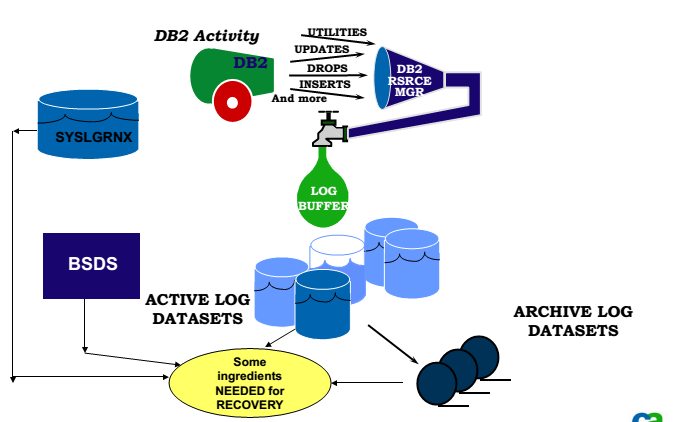 A DB2 Performance Tuning Roadmap --LOG INTRODUCTION
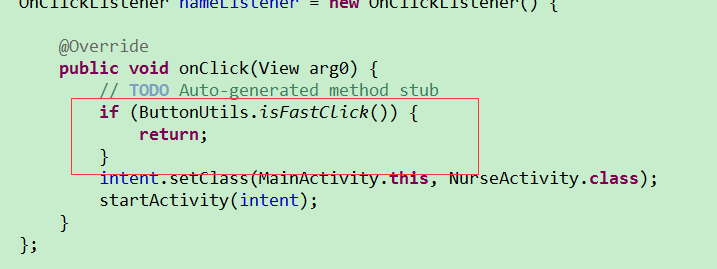 android不同的按鈕一起點擊崩潰解決,android一起
 Android自定義View系列之動態變化的Button
 Android特效專輯(八)——實現心型起泡飛舞的特效,讓你的APP瞬間暖心