編輯:關於android開發
啦啦啦~博主又來騷擾大家啦~大家是不是感覺上次的Android開發博文有點長呢~主要是因為博主也是小白,在做實驗的過程中查詢了很多很多概念,努力去理解每一個知識點,才完成了最終的實驗。還有就是隨著我們的實驗的進行,代碼量也會越來越多,所以在接下來的博文中會對源碼進行取捨,而不會把全部的實驗代碼都放到博文中~
大家在看博文時如果有什麼意見或者感覺博主有說錯、說的不清楚的地方可以在評論中留言,博主會第一時間回復大家~我們一起學習,共同進步~
好啦~進入正題~
本次Android開發,我們主要探討一下Intent、Bundle的使用和ListVie的應用——即在實驗中我們將復習事件處理、學習 Intent、Bundle 在Activity 跳轉中的應用,並學習 ListView 以及各類適配器的用法,在其中我們也會簡單講述一下RelativeLayout(相對布局)的使用。
1、ListView 的使用
布局上比較簡單,在布局文件中寫上
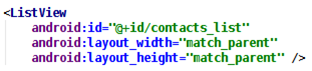
即可,這樣就創建了一個空的列表,然後在.java 文件中再填充數據,所以 id 是一定要設 的。
在.java 文件中獲得這個 ListView 之後,使用 Adapter 為這個 ListView 填充數據,常用 的 Adapter 有 ArrayAdapter、SimpleAdapter,這兩種在下面會詳細講述如何使用。隨著 ListView 中內容的豐富,以上兩種 Adapter 已經很難滿足需要,因此現在一般使用自定義 的 Adapter 來填充數據,如何使用自定義的 Adapter 會在拓展知識中講。(Adapter的作用:數據在adapter中做了處理之後,顯示在視圖上)
最簡單的 Adapter,創建 ArrayAdapter 時需指定如下三個參數:
Context:這個參數無須多說,它代表了訪問整個 Android 應用的接口。幾乎創建所有組件 都需要傳入 Context 對象。
textViewResourceId:一個資源 ID,該資源 ID 代表一個 TextView,該 TextView 組件將作 為 ArrayAdapter 的列表項組件。
數組或 List:該數組或 List 將負責為多個列表項提供數據。
示例:

在創建完 ArrayAdapter 之後,調用 ListView 的 setAdapter 方法即可將數據填充到 ListView 中。
這裡有一點要特別注意的是 textViewResourceId 是一個 layout,在這個 layout 中只能有 一個 TextView,其它任何組件都不能有,包括 LinearLayout 等布局組件,否則會報錯。
一般的對於ArrayAdapter來說,只需要把一個數組和一個樣式傳遞給ArrayAdapter之後就可以在視圖上用一個列表顯示出這個字符串數組。
但是,比如我們手機的聯系人目錄所示,不僅僅是有列表,而且有頭像,可能還有手機號碼。所以,單純的ArrayAdapter是不能夠實現這種復雜的視圖的。
我們可以用SimpleAdapter來實現這種復雜的視圖,不過需要設計樣式。
由於 ArrayAdapter 只能顯示文字,功能實在有限,如果需要多填充一些內容的話指望不 上,這時候可以使用 SimpleAdapter。
SimpleAdapter 相比 ArrayAdapter 強大很多,創建 SimpleAdapter 需要 5 個參數,第一個 參數依然是 Context,就不多說了,下面介紹余下的 4 個參數:
第 2 個參數:該參數應該是一個 List<? Extends Map<String, ?>>類型的集合對象,該集 合中每個 Map<String, ?>對象生成一個列表項。
第 3 個參數:該參數指定一個界面布局的 ID。該界面布局指定每一個列表項的樣式。
第 4 個參數:該參數應該是一個 String[]類型的參數,該參數決定提取 Map<String, ?>對 象中哪些 key 對應的 value 來生成列表項。
第 5 個參數:該參數應該是一個 int[]類型的參數,該參數決定填充哪些組件。
示例:
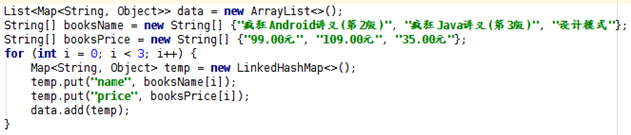
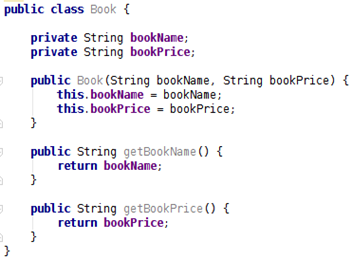
首先構建好數據,這裡模擬了一個圖書清單,一個 map 中有兩個 key,存放書名和價格, 然後添加到 list 中。
然後創建 SimpleAdapter:

之後還是用 ListView 的 setAdapter 方法添加 Adapter。
看一下 R.layout.item 文件:
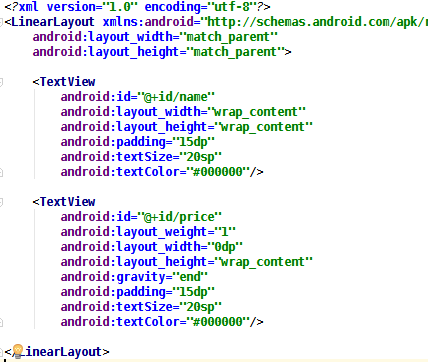
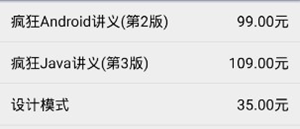
可以看到,一個 LinearLayout 包含兩個 TextView,一個用於顯示書名,一個用於顯示價 格,這個 layout 用於規定 ListView 中每一個列表項的樣式。SimpleAdapter 中的第四個 參數 String 數組與 map 的兩個 key 對應,第五個參數 int 數組與這個 layout 中兩個 TextView 的 id 相對應,注意 String[]數組與 int[]數組中的值要一一對應,在這個示例 中,key 為 name 的 value 填充到 id 為 name 的 TextView 中。效果如下圖所示:
方法原型如下:
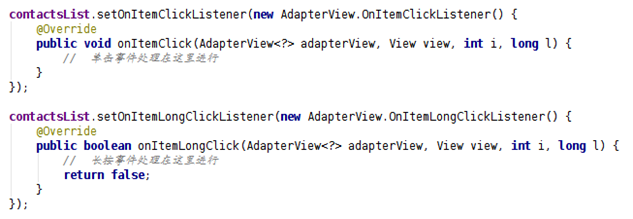
長按有返回值,在理論課的課件中寫的很清楚了,這裡就不解釋了。注意在兩個方法的參 數中都有 int i, long l 這兩個參數,i 指的是這一項在列表中的位置,l 指的是這一項的 id,在 ArrayAdapter 和 SimpleAdapter 中,i 和 l 是相等的,在另一種 Adapter—— CursorAdapter 中,l 指的是從數據庫中取出的數據在數據庫中的 id 值。
直觀地想,要實現數據更新,只要更新 List,重新創建一個 SimpleAdapter 就可以了,這 樣會比較麻煩,SimpleAdapter 有一個 notifyDataSetChanged()方法,當之前創建該 SimpleAdapter 的 List 發生改變時,調用該方法就可以刷新列表了。要特別注意的一點 是,List 不能指向新的內存地址,即不能 list = new ArrayList<>();這樣是不起作用 的,只能調用它的 remove(),add()等方法來改變數據集。
示例:

錯誤寫法:

正常的我們平時使用的Android應用都是不包含我們在使用AS調試時出現的標題欄的,那麼,這個煩人的標題欄如何去掉呢~
要去掉標題欄有多種做法,這裡舉一種方法。 Android Studio 創建項目時默認的 theme 是:

它的定義是:
修改 parent 即可:

星星的切換難點在於如何得知星星此時是空心的還是實心的,這個也有多種做法,這裡也 只介紹一種。
每個 View 都可以設置 tag,通過 tag 可以用來判斷該 View 現在的狀態。在初始化的時 候,將 tag 設置為 0,標記此時為空心星星,如果星星被點擊了,並且 tag 為 0,那麼就把 圖片換為實心的星星,然後設置 tag 為 1;如果 tag 為 1,那麼就把圖片換為空心的星星, 然後設置 tag 為 0。建議在 java 文件中給需要的 view 設置 tag。
RelativeLayout(相對布局)是除線性布局之外最常用的,它相對於線性布局來說比較靈活,在進行組件布局的時候用線性布局往往需要進行布局嵌套,而相對布局就不會那麼麻煩,每個組件都可以指定與其它組件或父組件的位置,只是必須通過ID來進行指定。
RelativeLayout按照各子元素之間的位置關系完成布局。在此布局中的子元素裡與位置相關的屬性將生效。例如android:layout_below, android:layout_above等。子元素就通過這些屬性和各自的ID配合指定位置關系。注意在指定位置關系時,引用的ID必須在引用之前,先被定義,否則將出現異常。
補充一下用到的屬性的說明:
表1.組件之間的位置關系屬性 屬性名稱 作用說明 android:layout_above 將組件放在指定ID組件的上方 android:layout_below 將組件放在指定ID組件的下方 android:layout_toLeftOf 將組件放在指定ID組件的左方 android:layout_toRightOf 將組件放在指定ID組件的右方 表2.組件對齊關系屬性 android:layout_alignBaseline 將該組件放在指定ID組件進行中心線對齊 android:layout_alignTop 將該組件放在指定ID組件進行頂部對齊 android:layout_alignBottom 將該組件放在指定ID組件進行底部對齊 android:layout_alignLeft 將該組件放在指定ID組件進行左邊緣對齊 android:layout_alignRight 將該組件放在指定ID組件進行右邊緣對齊 表3.當前組件與父組件對齊關系屬性 android:layout_centerHorizontal 將該組件放置在水平方向中央的位置 android:layout_centerVertical 將該組件放置在垂直方向的中央的位置 anroid:layout_centerInParent 將該組件放置在父組件的水平及垂直中央
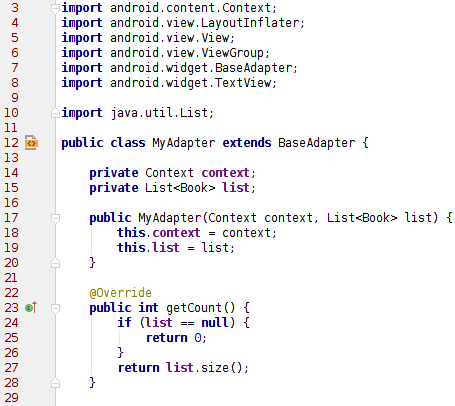
自定義 Adapter 來適配自己的列表,只在某些簡單的情況下才使用前面介紹的兩種 Adapter。
自定義的 Adapter 需要繼承 BaseAdapter:
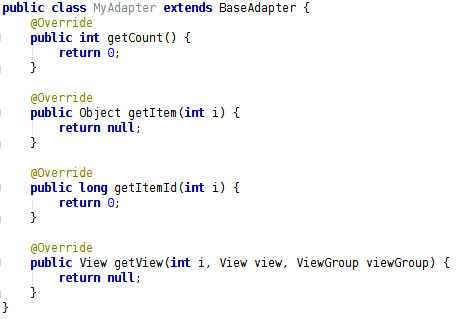
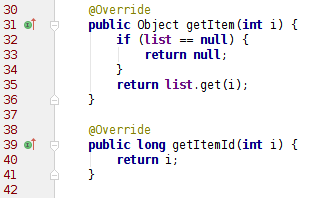
上面列出的四個方法是必須重寫的四個方法,下面一一介紹這四個方法:
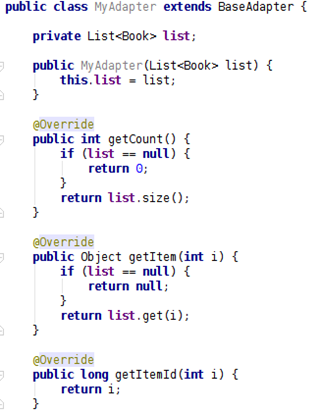
int getCount();獲得數據項列表的長度,也就是一共有多少個數據項;
Object getItem(int i);獲得某一個數據項;
long getItemId(int i);獲得數據項的位置;
View getView(int i, View view, ViewGroup viewGroup);獲得數據項的布局樣式,最重要的一個方法。
自定義 Adapter 需要提供給一個數據列表才能填充數據,一般是一個 List 類型,以圖書列表的例子為例,我們可以先給列表項創建一個類 Book,然後將 List<Book>傳入 Adapter 中作為數據提供的列表:
依照剛剛的想法重寫完之後,接下來是最重要的重寫 getView()方法,首先解釋一下三個 參數的含義:
i 指的是當前是在加載第幾項的列表項;
viewGroup 是列表項 View 的父視圖,調整列表項的寬高用的;
view 指的是一個列表項的視圖,我們需要給 view 一個布局,然後在布局中放置我們需要 的內容。
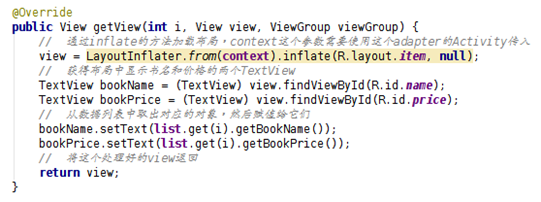
getView()方法的最基本寫法:
這種方法沒有充分利用 view 的特點,只是每次從屏幕外滾進來一個新的項就再加載一次布 局。其實 ListView 每次從屏幕外滾進來一項就會有一項滾出屏幕外,這個時候 view 是有 內容的,不過是舊的內容,因此我們只需要改變一下 view 的內容然後返回它就可以了,不 需要再去加載一次布局。
getView()方法的改進版寫法:
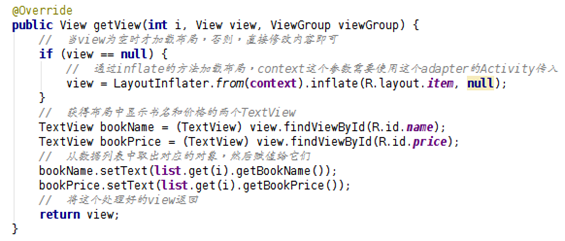
這樣寫可以減少一些重復的加載布局的操作,提高效率。
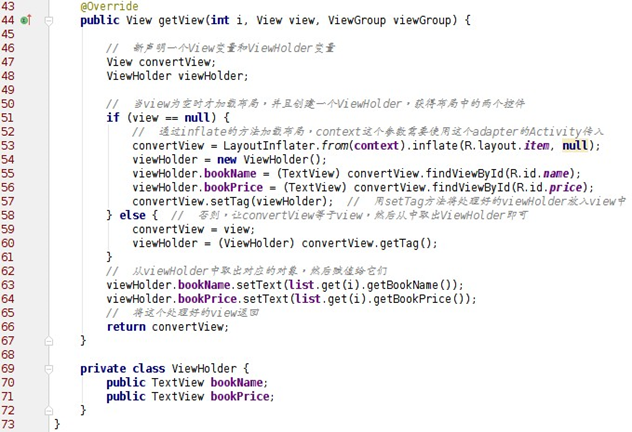
但是每次 findViewById()也是一件很麻煩的事情,如果控件一多,也會降低 ListView 的 效率。因此,使用 setTag 的方法和新建一個 ViewHolder 類來提高這部分的效率。
getView()方法改進版 2.0:
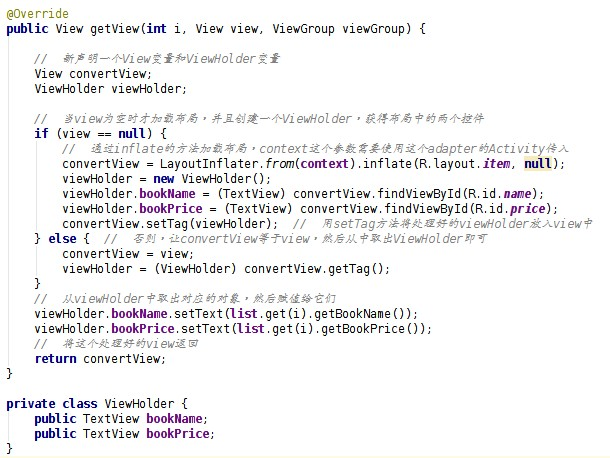
這樣寫的話 ListView 的效率就比較高了。 貼一下最終版的自定義 Adapter:
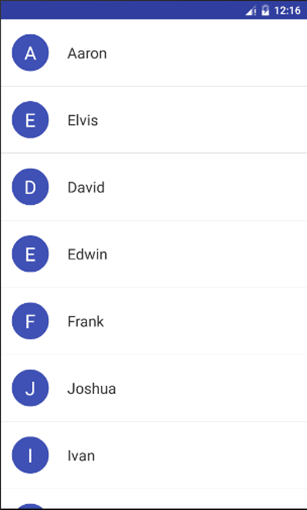
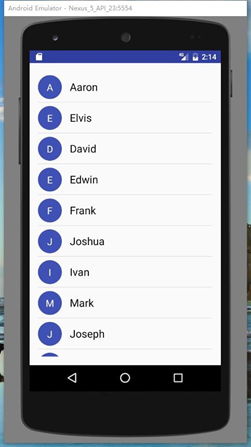
本次實驗模擬實現一個通訊錄,有兩個界面,第一個界面用於呈現通訊錄,如下所示:
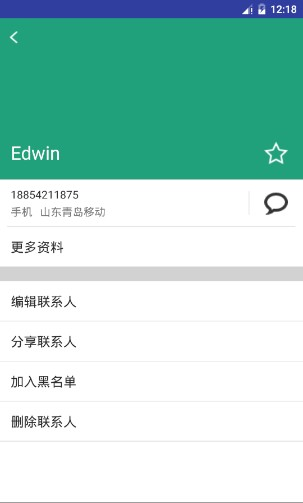
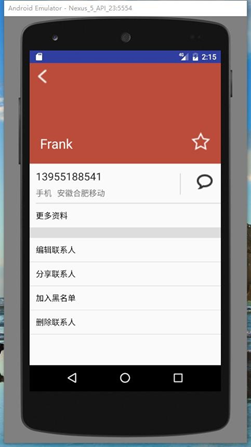
點擊任意一項後,可以看到詳細的信息:
實驗要求
布局方面的要求:
1、通訊錄界面
每一項為一個圓圈和一個名字,圓圈與名字均豎直居中。圓圈中為名字的首字母,首字母 要處於圓圈的中心,首字母為白色,名字為黑色,圓圈的顏色自定義即可,建議用深色的 顏色,否則白色的首字母可能看不清。關於圓圈效果如何實現,還是參照實驗一中的文章:http://blog.csdn.net/sysukehan/article/details/52022307,個人覺得文章中的方法靈活性不夠高。
2、聯系人詳情界面頂部

頂部的背景色在通訊錄數據中已經給出,每個人對應有一種特定的顏色,這塊背景色占整 個界面的 1/3,返回圖標處於這塊 View 的左上角,聯系人名字處於左下角,星標處於右下 角,它們與邊距都有一定距離,自己調出合適的距離即可。需要注意的是,返回圖標與名 字左對齊,名字與星標底邊對齊。這一塊建議大家去看一下 RelativeLayout 的使用。
3、聯系人詳情界面中部

使用的黑色 argb 編碼值為#D5000000,稍微偏灰色一點的“手機”、“ft東青島移動”的 argb 編碼值為#8A000000。注意,電話號碼那一欄的下邊有一條分割線,argb 編碼值為#1E000000,右邊聊天符號的左邊也有一條分割線,argb 編碼值也是#1E000000,這條分割 線要求高度與聊天符號的高度一致,並且豎直居中。字體的大小看著調就可以了。“更多 資料”底部的分割線高度自己定,argb 編碼值與前面的分割線一致。
4、聯系人詳情頁面底部
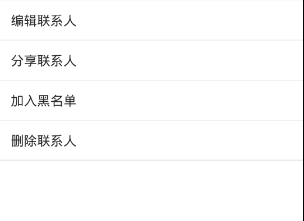
這個沒什麼說的,內容和樣式都很清楚。
5、特別提醒,這次的兩個界面頂部都沒有標題欄,要用某些方法把它們去掉。 邏輯方面的要求:
功能方面的要求:
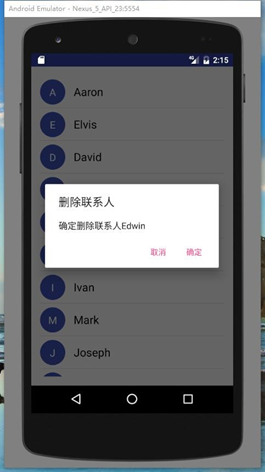
1、點擊通訊錄中的某一個聯系人會跳轉到聯系人詳情界面,呈現該聯系人的詳細信息;長按通訊錄中的聯系人會彈出對話框詢問是否刪除該聯系人,點擊確定則刪除該聯系人,點擊取消則對話框消失。

注意對話框中的人名為被長按的聯系人。
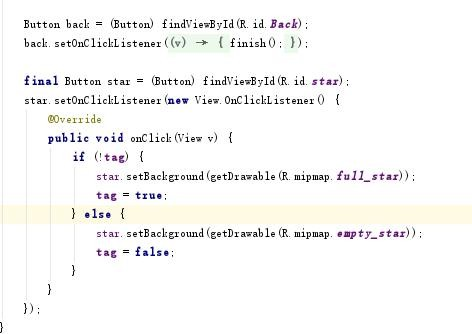
2、聯系人詳情界面中點擊返回圖標會返回上一層,點擊星標會切換狀態,如果原先是空心 星星,則會變成實心星星;如果原先是實心星星,則會變成空心星星。
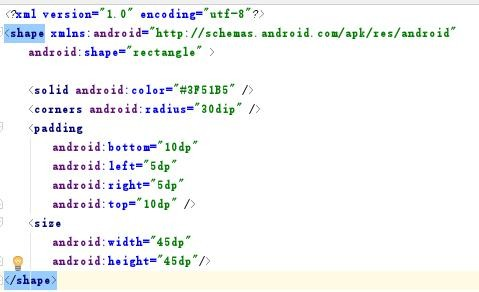
本實驗初始界面的 XML 布局是比較簡單的,我們在一個 xml 布局文件中寫好 一個 ListView(,這樣就創建了一個空的列表,然後在.java 文件中再填充數據), 在另一個 xml 布局文件中使用線性結構寫好兩個 TextView,分別用來存放圓圈 背景及聯系人的姓名。在第一個 TextView 中,我們使用第一次作業中按鈕背景 的設計方法,在 drawable 文件夾中創建一個 xml 文件,運用其中的 size 方法來 設計一個圓形背景:
接下來需要在.java 文件中獲得這個 ListView , 使用 Adapter 為這個 ListView 填充數據。創建了一個 java 類用來存儲相應的數據,初始化一些變量, 並使用 get 和 Set 方法來獲得或者更改相應的數據。
接下來為每一項數據創建一個對象,並添加在 List 中,方便之後傳遞數據 的操作。
然後創建 Listview 的 Adapter。創建 SimpleAdapter 需要 5 個參數。
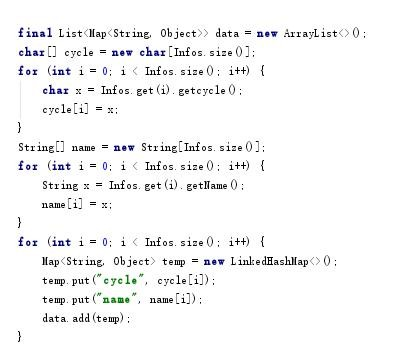
首先構建好數據,一個 map 中有兩個 key,分別存放 name 的首字母和 name, 儲在字符數組和字符串數組中,把它們以 Map 鍵值對的形式添加到 list 中。
即在最初的 xml 文件中一個 LinearLayout 包含兩個 TextView,一個用於顯 示這個 layout 用於規定 ListView 中每一個列表項的樣式。SimpleAdapter 中 的第四個參數 String 數組與 map 的兩個 key 對應,第五個參數數組與這個 layout 中兩個 TextView 的 id 相對應,注意 String[]數組與 int[]數組中的值要一一對 應。
接下來寫 ListView 的單擊和長按事件。在單擊中,主要處理了頁面轉換 以及頁面間的傳值, 由於需要傳一個對象, 所以 person 這個類需要實現 Serializable 這個接口,並把這個對象放到 intent 的 Extra 中,在長按事件 中,主要彈出 AlertDialog 以及處理刪除,由於我用 List 模擬數據庫來放數 據,所以需要將 List 對應的數據也一並刪除; 第二個頁面接應第一個頁面傳過 來的對象,由於傳的是對象,所以用到了 getSerializableExtra 方法。在兩個 方法的參 數中都有 int i,long l 這兩個參數,i 指的是這一項在列表中的位置, l 指的是這一項的 id,在 ArrayAdapter 和 SimpleAdapter 中,i 和 l 是相等的。

即在這裡實現數據更新,SimpleAdapter 有一個 notifyDataSetChanged() 方法,當之前創建該 SimpleAdapter 的 List 發生改變時,調用該方法就可以刷 新列表了。要特別注意的一點 是,List 不能指向新的內存地址,即不能 list=new ArrayList<>();這樣是不起作用的,只能調用它的 remove(),add()等方法來改 變數據集。
星星的切換時使用 tag,每個 View 都可以設置 tag,通過 tag 可以用來判 斷該 View 現在的狀態。在初始化的時候,將 tag 設置為 0,標記此時為空心星 星,如果星星被點擊了,並且 tag 為 0,那麼就把 圖片換為實心的星星,然後 設置 tag 為 1;如果 tag 為 1,那麼就把圖片換為空心的星星,然後設置 tag 為 0。建議在 java 文件中給需要的 view 設置 tag。
最後修改 parent 來去掉標題欄。完成實驗~
activity_main.xml
<?xml version="1.0" encoding="utf-8"?>
<RelativeLayout xmlns:android="http://schemas.android.com/apk/res/android"
    xmlns:tools="http://schemas.android.com/tools"
    android:id="@+id/activity_main"
    android:layout_width="match_parent"
    android:layout_height="match_parent"
    android:paddingBottom="@dimen/activity_vertical_margin"
    android:paddingLeft="@dimen/activity_horizontal_margin"
    android:paddingRight="@dimen/activity_horizontal_margin"
    android:paddingTop="@dimen/activity_vertical_margin"
    tools:context="com.example.yanglh6.myapp3.MainActivity">

    <ListView
        android:layout_width="match_parent"
        android:layout_height="wrap_content"
        android:id="@+id/Start">

    </ListView>
</RelativeLayout>
activity_info.xml
<?xml version="1.0" encoding="utf-8"?>
<LinearLayout xmlns:android="http://schemas.android.com/apk/res/android"
    xmlns:tools="http://schemas.android.com/tools"
    android:layout_width="match_parent"
    android:layout_height="match_parent"
    android:orientation="vertical"
    tools:context="com.example.yanglh6.myapp3.InfoActivity">

    <RelativeLayout
        android:layout_width="match_parent"
        android:layout_height="0dp"
        android:id="@+id/Top"
        android:layout_weight="1"
        android:background="@color/colorPrimaryDark">

        <Button
            android:layout_width="50dp"
            android:layout_height="50dp"
            android:id="@+id/Back"
            android:layout_marginStart="10dp"
            android:background="@mipmap/back" />

        <Button
            android:layout_width="35dp"
            android:layout_height="35dp"
            android:id="@+id/star"
            android:layout_alignParentBottom="true"
            android:layout_alignParentEnd="true"
            android:layout_marginBottom="25dp"
            android:layout_marginEnd="20dp"
            android:background="@mipmap/empty_star" />

        <TextView
            android:layout_width="wrap_content"
            android:layout_height="40dp"
            android:id="@+id/Name"
            android:layout_alignParentBottom="true"
            android:layout_alignParentStart="true"
            android:textSize="25sp"
            android:layout_marginBottom="15dp"
            android:layout_marginStart="20dp"
            android:textColor="@color/white" />
    </RelativeLayout>

    <LinearLayout
        android:layout_width="match_parent"
        android:layout_height="0dp"
        android:layout_weight="2"
        android:orientation="vertical">

        <RelativeLayout
            android:layout_width="match_parent"
            android:layout_height="wrap_content">

            <TextView
                android:layout_width="wrap_content"
                android:layout_height="wrap_content"
                android:id="@+id/telephone"
                android:layout_marginStart="12dp"
                android:layout_marginTop="10dp"
                android:textSize="20sp"
                android:textColor="@color/telephoneNumber" />

            <TextView
                android:layout_width="wrap_content"
                android:layout_height="wrap_content"
                android:id="@+id/info1"
                android:layout_alignStart="@+id/telephone"
                android:layout_below="@+id/telephone"
                android:textSize="15sp"
                android:layout_marginTop="8dp"
                android:textColor="@color/telephone" />

            <TextView
                android:layout_width="wrap_content"
                android:layout_height="wrap_content"
                android:id="@+id/info2"
                android:layout_alignBottom="@+id/info1"
                android:layout_marginStart="10dp"
                android:textSize="15sp"
                android:layout_toEndOf="@+id/info1"
                android:textColor="@color/telephone" />

            <Button
                android:layout_width="30dp"
                android:layout_height="30dp"
                android:id="@+id/chat"
                android:layout_alignParentEnd="true"
                android:layout_alignTop="@+id/telephone"
                android:layout_marginEnd="15dp"
                android:layout_marginTop="8dp"
                android:background="@mipmap/chat" />

            <View
                android:layout_width="2dp"
                android:layout_height="40dp"
                android:layout_alignTop="@+id/chat"
                android:layout_marginEnd="18dp"
                android:layout_toStartOf="@+id/chat"
                android:background="@color/line" />

            <View
                android:layout_width="match_parent"
                android:layout_height="2dp"
                android:id="@+id/line"
                android:layout_alignStart="@+id/info1"
                android:layout_below="@+id/info1"
                android:layout_marginTop="10dp"
                android:background="@color/line" />

            <ListView
                android:layout_width="match_parent"
                android:layout_height="wrap_content"
                android:id="@+id/more"
                android:layout_below="@+id/line"></ListView>

            <View
                android:layout_width="match_parent"
                android:layout_height="18dp"
                android:layout_below="@+id/more"
                android:background="@color/line" />
        </RelativeLayout>

        <ListView
            android:layout_width="match_parent"
            android:layout_height="match_parent"
            android:id="@+id/listview"></ListView>
    </LinearLayout>
</LinearLayout>
info.xml
<?xml version="1.0" encoding="utf-8"?>
<LinearLayout xmlns:android="http://schemas.android.com/apk/res/android"
    android:layout_width="match_parent"
    android:layout_height="match_parent">
    <TextView
        android:layout_width="wrap_content"
        android:layout_height="wrap_content"
        android:id="@+id/cycle"
        android:textSize="18sp"
        android:textColor="@color/white"
        android:background="@drawable/shape"
        android:gravity="center"/>

    <TextView
        android:layout_width="0dp"
        android:layout_height="wrap_content"
        android:id="@+id/name"
        android:textSize="20sp"
        android:layout_weight="1"
        android:textColor="@color/black"
        android:padding="15dp" />
</LinearLayout>
more.xml
<?xml version="1.0" encoding="utf-8"?>
<LinearLayout xmlns:android="http://schemas.android.com/apk/res/android"
    android:layout_width="match_parent"
    android:layout_height="match_parent">
    <TextView
        android:layout_width="wrap_content"
        android:layout_height="wrap_content"
        android:id="@+id/cycle"
        android:textSize="18sp"
        android:textColor="@color/white"
        android:background="@drawable/shape"
        android:gravity="center"/>

    <TextView
        android:layout_width="0dp"
        android:layout_height="wrap_content"
        android:id="@+id/name"
        android:textSize="20sp"
        android:layout_weight="1"
        android:textColor="@color/black"
        android:padding="15dp" />
</LinearLayout>
MainActivity.java
package com.example.yanglh6.myapp3;

import android.content.DialogInterface;
import android.content.Intent;
import android.support.v7.app.AlertDialog;
import android.support.v7.app.AppCompatActivity;
import android.widget.AdapterView;
import android.widget.ListView;
import android.widget.SimpleAdapter;
import android.os.Bundle;
import android.view.View;

import java.util.List;
import java.util.Map;
import java.util.ArrayList;
import java.util.LinkedHashMap;

public class MainActivity extends AppCompatActivity {

    @Override
    protected void onCreate(Bundle savedInstanceState) {
        super.onCreate(savedInstanceState);
        setContentView(R.layout.activity_main);

        final List<Map<String, Object>> data = new ArrayList<>();

        /*  為每一項數據創建一個對象,並添加在List中  */
        final List<Info> Infos = new ArrayList<Info>() {{
            add(new Info("Aaron", "17715523654", "手機", "江蘇蘇州電信", "#BB4C3B"));
            add(new Info("Elvis", "18825653224", "手機", "廣東揭陽移動", "#c48d30"));
            add(new Info("David", "15052116654", "手機", "江蘇無錫移動", "#4469b0"));
            add(new Info("Edwin", "18854211875", "手機", "山東青島移動", "#20A17B"));
            add(new Info("Frank", "13955188541", "手機", "安徽合肥移動", "#BB4C3B"));
            add(new Info("Joshua", "13621574410", "手機", "江蘇蘇州移動", "#c48d30"));
            add(new Info("Ivan", "15684122771", "手機", "山東煙台聯通", "#4469b0"));
            add(new Info("Mark", "17765213579", "手機", "廣東珠海電信", "#20A17B"));
            add(new Info("Joseph", "13315466578", "手機", "河北石家莊電信", "#BB4C3B"));
            add(new Info("Phoebe", "17895466428", "手機", "山東東營移動", "#c48d30"));
        }};

        char[] cycle = new char[Infos.size()];
        for (int i = 0; i < Infos.size(); i++) {
            char x = Infos.get(i).getcycle();
            cycle[i] = x;
        }
        String[] name = new String[Infos.size()];
        for (int i = 0; i < Infos.size(); i++) {
            String x = Infos.get(i).getName();
            name[i] = x;
        }
        for (int i = 0; i < Infos.size(); i++) {
            Map<String, Object> temp = new LinkedHashMap<>();
            temp.put("cycle", cycle[i]);
            temp.put("name", name[i]);
            data.add(temp);
        }

        /*  ListView單擊事件  */
        ListView listView = (ListView) findViewById(R.id.Start);
        final SimpleAdapter simpleAdapter = new SimpleAdapter(this, data, R.layout.info,
                new String[]{"cycle", "name"}, new int[]{R.id.cycle, R.id.name});
        listView.setAdapter(simpleAdapter);

        listView.setOnItemClickListener(new AdapterView.OnItemClickListener() {
            public void onItemClick(AdapterView<?> adapterView, View view, int i, long l) {
                Intent intent = new Intent(MainActivity.this, InfoActivity.class);
                Info temp = Infos.get(i);
                intent.putExtra("Info", temp);
                startActivity(intent);
            }
        });

        /*  ListView長按事件  */
        listView.setOnItemLongClickListener(new AdapterView.OnItemLongClickListener() {
            @Override
            public boolean onItemLongClick(AdapterView<?> parent, View view, final int position, long id) {
                AlertDialog.Builder message = new AlertDialog.Builder(MainActivity.this);
                message.setTitle("刪除聯系人");
                message.setMessage("確定刪除聯系人" + Infos.get(position).getName());
                message.setPositiveButton("確定", new DialogInterface.OnClickListener() {
                    public void onClick(DialogInterface dialogInterface, int i) {
                        Infos.remove(position);
                        data.remove(position);
                        simpleAdapter.notifyDataSetChanged();
                    }
                });
                message.setNegativeButton("取消", new DialogInterface.OnClickListener() {
                    public void onClick(DialogInterface dialogInterface, int i) {
                    }
                });
                message.create().show();
                return true;
            }
        });
    }
}
Info.java
package com.example.yanglh6.myapp3;

import java.io.Serializable;

/*  存儲相應的數據  */
public class Info implements Serializable {

    public Info(String name, String tel, String info1, String from, String background) {
        this.background = background;
        this.info1 = info1;
        this.from = from;
        this.name = name;
        this.tel = tel;
    }

    public String getBackground() {
        return background;
    }

    public void setBackground(String background) {
        this.background = background;
    }

    public String getName() {
        return name;
    }

    public void setName(String name) {
        this.name = name;
    }

    public String getFrom() {
        return from;
    }

    public void setFrom(String from) {
        this.from = from;
    }

    public String getTel() {
        return tel;
    }

    public void setTel(String tel) {
        this.tel = tel;
    }

    public String getinfo1() {
        return info1;
    }

    public void setinfo1(String info1) {
        this.info1 = info1;
    }

    public char getcycle() {
        char first = name.charAt(0);
        if (first >= 97 && first <= 122) {
            first -= 32;
        }
        return first;
    }

    private String background;
    private String info1;
    private String from;
    private String name;
    private String tel;
}
InfoActivity.java
package com.example.yanglh6.myapp3;

import android.graphics.Color;
import android.os.Bundle;
import android.support.v7.app.AppCompatActivity;
import android.view.View;
import android.widget.ArrayAdapter;
import android.widget.RelativeLayout;
import android.widget.TextView;
import android.widget.Button;
import android.widget.ListView;

public class InfoActivity extends AppCompatActivity {

    @Override
    protected void onCreate(Bundle savedInstanceState) {
        super.onCreate(savedInstanceState);
        setContentView(R.layout.activity_info);

        Info p = (Info) getIntent().getSerializableExtra("Info");

        RelativeLayout relativeLayout = (RelativeLayout) findViewById(R.id.Top);
        relativeLayout.setBackgroundColor(Color.parseColor(p.getBackground()));

        Button back = (Button) findViewById(R.id.Back);
        back.setOnClickListener(new View.OnClickListener() {
            @Override
            public void onClick(View v) {
                finish();
            }
        });


        TextView info1 = (TextView) findViewById(R.id.info1);
        info1.setText(p.getinfo1());

        TextView info2 = (TextView) findViewById(R.id.info2);
        info2.setText(p.getFrom());

        TextView name = (TextView) findViewById(R.id.Name);
        name.setText(p.getName());

        TextView tel = (TextView) findViewById(R.id.telephone);
        tel.setText(p.getTel());

        String[] operations1 = new String[]{"更多資料"};
        ArrayAdapter<String> arrayAdapter1 = new ArrayAdapter<>(this, R.layout.more, operations1);
        ListView listView1 = (ListView) findViewById(R.id.more);
        listView1.setAdapter(arrayAdapter1);

        String[] operations2 = new String[]{"編輯聯系人", "分享聯系人", "加入黑名單", "刪除聯系人"};
        ArrayAdapter<String> arrayAdapter = new ArrayAdapter<>(this, R.layout.more, operations2);
        ListView listView = (ListView) findViewById(R.id.listview);
        listView.setAdapter(arrayAdapter);

        /*  星星的切換 */
        final Button star = (Button) findViewById(R.id.star);
        star.setOnClickListener(new View.OnClickListener() {
            @Override
            public void onClick(View v) {
                if (!tag) {
                    star.setBackground(getDrawable(R.mipmap.full_star));
                    tag = true;
                } else {
                    star.setBackground(getDrawable(R.mipmap.empty_star));
                    tag = false;
                }
            }
        });
    }

    private boolean tag = false;
}
1、本實驗實驗環境:
操作系統 Windows 10
實驗軟件 Android Studio 2.2.1
虛擬設備:Nexus_5X
API:23
2、貼代碼的時候由於插入代碼框的大小問題,代碼格式不太嚴整,望見諒~
 android --多線程下載過程分析
android --多線程下載過程分析 多線程下載文件的過程是: (1)首先獲得下載文件的長度,然後設置本地文件的長度。 HttpURLConnection.getCo
 下拉刷新--第三方開源--PullToRefresh,開源--pulltorefresh
下拉刷新--第三方開源--PullToRefresh,開源--pulltorefresh效果預覽圖: 下載地址:https://github.com/chrisbane
 懸浮對話框的實現,懸浮對話框實現
懸浮對話框的實現,懸浮對話框實現直接上代碼: private void setDialog(){ View view = getLayoutIn
 美女的秘密應用項目源碼,秘密項目源碼
美女的秘密應用項目源碼,秘密項目源碼這是一個不錯的Android美女的秘密項目。 源碼下載:http://code.662p.com/list/11_1.html<